

 Know what App history can—and cannot—tell you
App history is a running total, not a live traffic monitor. It is useful when you want to answer questions such as:
Quick walkthrough
- Which app has used the most data since the last reset?
- Which installed app has accumulated unusually high processor time over days or weeks?
- Is an app using data on a metered connection?
- Did a particular Store-style or packaged app begin consuming more resources after you changed a setting or installed an update?
The important distinction is the time scale:
- Processes in Task Manager shows what is using CPU, memory, disk, and network right now.
- App history shows accumulated use over time.
- Performance shows live charts for the PC’s overall processor, memory, disk, Wi-Fi, Ethernet, and GPU activity.
A high number in App history does not prove an app is currently at fault. It means the app used that resource during the recorded period. Check the start date shown in the page before judging whether a total is excessive.
Also, App history does not necessarily provide a complete accounting for every traditional desktop program. If an app you expect to see is missing, use the live Processes view while the problem is happening and use Windows’ Data usage settings for a broader per-app usage view.
Open App history and establish the reporting period
Windows 11
- Press Ctrl + Shift + Esc to open Task Manager.
- If Task Manager opens in its compact layout, select More details.
- In the left navigation pane, select App history.
- Look near the top of the page for the date indicating when Windows began collecting the displayed usage history.
If the left navigation pane is collapsed, select the navigation button near the upper-left corner of the Task Manager window to expand it.
Windows 10
- Press Ctrl + Shift + Esc to open Task Manager.
- If you see only a small list of open programs, select More details.
- Select the App history tab.
- Check the date near the top of the tab. The totals below are collected from that point forward.
You do not need to restart the PC or run Task Manager continuously for App history to collect its totals. However, the history is most useful when you deliberately reset it at the beginning of a period you want to measure.
For example, reset it on the first day of a billing cycle, after joining a mobile hotspot, or before testing whether a specific app setting reduces data use.
Sort App history to find the biggest users
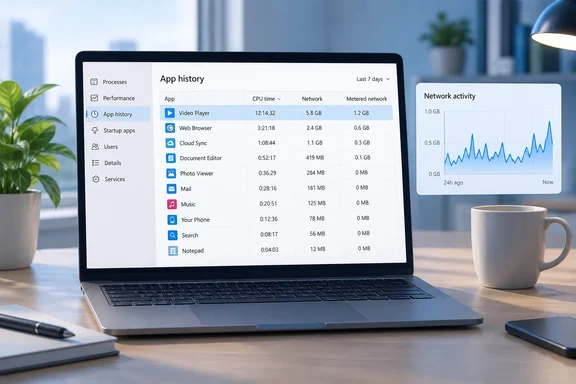
The App history list normally includes an app name and resource columns such as CPU time, Network, and Metered network. Depending on your Windows version and the app, you may also see a tile-related activity column.
- Select the Network column heading once to sort from the largest value to the smallest.
- Select the heading again if needed to reverse the sort order.
- Write down or take a screenshot of the first few apps and their totals.
- Select Metered network to identify the apps that have used data specifically while Windows considered the connection metered.
- Select CPU time to find apps that have spent the most total processor time during the same recording period.
- Select Name to restore alphabetical order.
Use these columns correctly:
- Network is the accumulated network traffic Windows attributes to the app during the displayed history period. It is not the present transfer speed.
- Metered network is the portion of activity recorded when the network connection was treated as metered. A large value here deserves attention if you use cellular data, a hotspot, satellite service, or an ISP plan with a cap.
- CPU time is accumulated processor time, usually shown as a time value. It is not the current CPU percentage and does not mean the app kept one processor core busy continuously for that entire amount of wall-clock time.
Compare like with like. A cloud-storage client may legitimately rank high in network usage immediately after you add a large photo or video folder. A browser may rank high because of streaming, meetings, downloads, or sites left open in background tabs. The useful finding is not merely “this app is first”; it is “this app’s total is inconsistent with what I expected it to do during this period.”
Reset the totals before a controlled test
Resetting App history deletes the displayed resource-use totals. It does not uninstall apps, close programs, erase personal files, or change your network configuration.
Warning: Reset only after recording anything you may need for comparison. You cannot restore the prior App history totals after deleting them.
- Open Task Manager and select App history.
- Record the current start date and the highest entries if you want a before-and-after comparison.
- Select Delete usage history near the top of the App history page or tab.
- Confirm the action if Windows asks for confirmation.
- Verify that the start date changes and that app totals return to zero or begin building again.
Leave the PC in normal use for a meaningful period after the reset:
- For a hotspot or short trip, test for several hours.
- For a monthly allowance, reset at the beginning of the billing period.
- For a suspected background app, reset the totals, avoid deliberately using the app, and check again after a day or two.
This approach separates ordinary foreground use from unwanted background activity. If an app remains near the top while you have not actively opened it, investigate its background permissions, sync settings, automatic downloads, and startup behavior.
Investigate a high-usage app before restricting it
Before changing a setting, identify what the app is intended to do. A high total can be expected for:
- Cloud synchronization and backup software.
- Web browsers used for video, music, conferencing, or downloads.
- Email and collaboration apps that download attachments or synchronize messages.
- Game launchers downloading updates.
- Windows apps that update content or send notifications in the background.
Use this short investigation sequence:
- In App history, note the app’s exact name.
- Open the Processes page in Task Manager.
- Look for the same app while the PC is idle or when you notice unwanted traffic.
- Check its Network and CPU columns for current activity.
- Right-click the app only if you recognize it. Options such as opening its file location or searching online can help distinguish a legitimate component from unfamiliar software.
- Open the app’s own settings and look for controls related to syncing, automatic downloads, update schedules, video quality, backup frequency, or startup behavior.
Do not end a process merely because it is high in App history. Ending a process affects only the current session, may lose unsaved work, and does not address the setting that caused repeated background use.
Reduce background activity in Windows 11
Windows 11 lets you manage background permissions for many apps through the installed-app settings page. The option is not available for every app, and traditional desktop programs often manage this behavior in their own settings.
- Select Start > Settings > Apps > Installed apps.
- Find the app identified in App history.
- Select the More options button beside the app.
- Select Advanced options.
- Find Background app permissions.
- Under Let this app run in background, choose the appropriate setting:
- Always allows background activity, notifications, and updates.
- Power optimized (recommended) lets Windows manage the app’s background activity.
- Never prevents the app from running in the background.
- Close Settings. A restart is normally not required.
Warning: Choosing Never can stop an app from refreshing information, synchronizing files, receiving notifications, or completing background tasks. Do not use it for apps whose notifications or syncing you rely on, such as an email client, cloud backup client, security tool, or workplace communication app.
To roll back the change, return to the same Advanced options page and select Power optimized (recommended) or Always, according to the behavior you need.
For a conventional desktop app that has no Background app permissions section, open that app’s own settings. Look for options such as “launch at startup,” “run in the background,” “keep running after close,” “automatic updates,” or “sync only on Wi-Fi.”
Reduce background activity in Windows 10
Windows 10 uses a broader background-app control page.
- Select Start > Settings > Privacy > Background apps.
- Ensure Let apps run in the background is turned on if you want to manage individual apps.
- Under Choose which apps can run in the background, locate the app you identified.
- Turn off its switch to prevent that app from running in the background.
To stop most eligible apps from running in the background, turn off Let apps run in the background. Use this carefully: it can stop notifications and background updates for multiple apps at once.
To reverse either choice, return to Settings > Privacy > Background apps and turn the relevant switch back on.
As with Windows 11, ordinary desktop applications are not necessarily governed by this page. Check the program’s own preferences and its Startup entry in Task Manager.
Use a metered connection when data is limited
A metered connection tells Windows to reduce data use where supported. It is a control that can help limit background syncing and nonessential downloads; it is not a guarantee that no traffic will occur and it is not a replacement for checking your provider’s usage records.
Windows normally treats cellular connections as metered. You can manually set Wi-Fi or Ethernet as metered when you are using a capped plan, a personal hotspot, or a connection that charges by volume.
Windows 11
- Select Start > Settings > Network & internet.
- Select Wi-Fi, Ethernet, or Cellular, depending on the connection in use.
- Select the connected network where applicable.
- Turn on Metered connection.
Windows 10
- Select Start > Settings > Network & Internet.
- Select Wi-Fi, Ethernet, or Cellular.
- Select the connected network where applicable.
- Turn on Set as metered connection.
When a connection is metered, Windows and apps may reduce or postpone some background activity. Windows Update will generally download only priority updates unless you explicitly allow updates over metered connections. Microsoft Store app downloads can also be paused, and Offline Files may not synchronize automatically.
If the metered option is unavailable or dimmed:
- Check whether a data limit has been configured. In current Windows settings, go to Network & internet > Advanced network settings > Data usage, select the connection, and remove a limit if that is appropriate.
- Confirm that you are signed in with an administrator account.
- On a work-managed PC, ask IT whether organizational policy controls the setting.
Verify that the change worked
After changing an app setting or enabling a metered connection, verify the result with a fresh App history period.
- Reset App history using Delete usage history.
- Use the PC normally, but avoid opening the app you are testing unless the test requires it.
- Wait long enough for the app’s normal background schedule to occur.
- Return to Task Manager > App history.
- Sort by Network and then by Metered network.
- Compare the app’s new totals with the totals recorded before the change.
- If you are testing CPU impact, sort by CPU time and also check Processes while the PC is idle.
A successful change may not reduce an existing total; that is why resetting first matters. Success means the app adds little or no unexpected usage during the new measurement period while its essential functions still work as intended.
Troubleshoot misleading or missing results
The app is high in App history but is not using data now
This is expected when the app used data earlier in the reporting period. Open Processes and sort by Network to identify current traffic. Reset App history and measure a new period if you need a current comparison.
The totals seem far too large
First check the date at the top of App history. The figures may cover weeks or months. Reset the history and test over a known interval before changing settings. If the list is clearly displaying incorrect or inconsistent information, install current Windows updates; Microsoft has issued Task Manager reliability improvements for App history in Windows 11 updates.
An expected desktop program is missing
App history is not a complete replacement for live process monitoring or provider-level accounting. Use the Processes page while the app is running, review its own sync and update settings, and check Settings > Network & internet > Advanced network settings > Data usage for Windows’ data-usage view.
There is no Background app permissions option
That app may be a traditional desktop application or may not expose a Windows background-permission control. Use the app’s own settings to change synchronization, update, and startup behavior. For startup activity, open Task Manager, select Startup apps in Windows 11 or the Startup tab in Windows 10, then disable only apps you do not need to launch automatically.
An app stopped sending notifications or syncing after a change
Return its background permission to Power optimized (recommended) or Always in Windows 11, or re-enable it under Background apps in Windows 10. If you set the connection to metered, confirm whether the app has a separate option to sync on metered networks and decide whether that behavior is worth the data use.