

That rename is worth knowing before troubleshooting. Microsoft’s Edge policy documentation confirms that Screenshot is the same feature previously known as Web Capture, supports captures of web and PDF content, and can be opened from the right-click menu, the Settings and more menu, or Ctrl+Shift+S. Older instructions that tell you to look for “Web Capture” are describing the same underlying tool.
For a full-page image, Screenshot is usually the right choice when the layout itself matters: a long receipt, a dashboard, a product comparison, a support thread, or a page whose visual arrangement would be lost in a text-only printout. For an archive meant to remain selectable, searchable, and paginated, Edge’s separate Print command is the better route because it can create a PDF instead of a bitmap image.
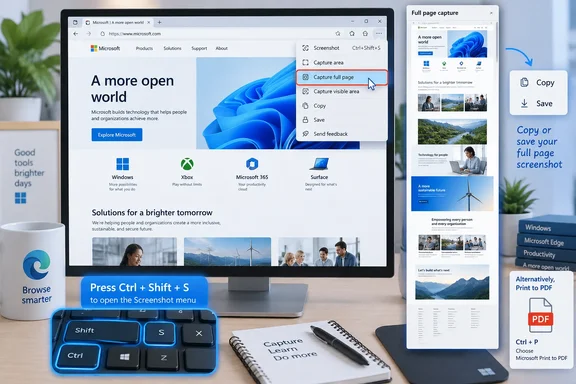 Open Edge Screenshot from the keyboard or menu
Open the webpage in Microsoft Edge and let it finish loading before capturing it. If the page uses infinite scrolling, interactive charts, lazy-loaded images, or expandable sections, scroll through the material you need first. A full-page capture can only include content the site has actually rendered.
Use either of these entry points:
- Press Ctrl+Shift+S to open Screenshot immediately.
- Select the three-dot Settings and more menu in the upper-right corner of Edge, then choose Screenshot.
- Right-click a blank part of the webpage and choose Screenshot if the site and Edge context menu expose the command.
The keyboard shortcut is the most dependable method because website-specific right-click menus can replace or suppress Edge’s normal context menu. It also avoids hunting through a browser menu that may use the new Screenshot wording instead of the older Web Capture name.
When the capture controls appear, Edge normally offers two practical choices: Capture area and Capture full page. The first produces a rectangular image from the portion you select. The second tells Edge to capture the page’s full vertical document, including content below the current viewport.
Do not confuse Ctrl+Shift+S with Windows’ Win+Shift+S shortcut. Win+Shift+S opens Snipping Tool, which captures what is visible on the Windows desktop, an application window, or a chosen screen region. Edge Screenshot works inside the browser document and is designed to create a scrolling webpage capture.
Capture an entire scrolling webpage
To create a long screenshot, press Ctrl+Shift+S and choose Capture full page. Edge processes the page and opens a preview rather than immediately dropping an image file into your Pictures folder.
The preview is important. It is your chance to verify that the bottom of the page was included and that dynamic material did not shift during the capture. Long pages can produce very large images, particularly pages containing high-resolution photographs, elaborate infographics, or long tables. Give Edge time to finish rendering before deciding that the tool has stalled.
A full-page screenshot preserves the page as an image. It is useful for recording visual evidence, but it does not create an editable offline copy of the site. Links in the image do not remain clickable, page text generally is not retained as selectable text, and a subsequent site update will not change the saved image.
This produces a different result from saving a webpage with Ctrl+S. Edge’s Save page command attempts to save webpage files or a single-file web archive, depending on the available options. Screenshot instead creates a visual record. Use it when what the page looked like matters more than preserving its HTML structure.
Some content will not capture cleanly, and that is a limitation of modern websites rather than a Windows problem. Cookie banners, sticky navigation bars, animated ads, pop-up chats, embedded maps, autoplay video overlays, and content inside separate embedded frames can appear unexpectedly, repeat, remain blank, or be omitted. Close overlays and expand the sections you need before beginning.
For pages that keep adding items as you scroll, do a quick pass from top to bottom first. That gives lazy-loaded images and articles a chance to load. If the final screenshot stops early, reload the page, allow it to settle, scroll through the material again, and retry. Splitting a very long page into two deliberate area captures can be more reliable than forcing a single enormous image.
Capture a selected area when the whole page is too much
Choose Capture area when the useful information fits inside a defined rectangle: an error message, a configuration setting, a comparison chart, a shipping estimate, or a paragraph that needs review.
After selecting Capture area, click and drag around the part of the page you want. The dimmed overlay makes the intended selection easier to see. Include enough surrounding context that another person can identify where the information came from; a cropped number without the field name, product, date, or page heading is often less useful than it first appears.
This is also the safer choice for sensitive material. A full-page screenshot can quietly include account names, addresses, order history, internal navigation, open support tickets, or information farther down the page than you meant to share. Select only the evidence you need, then inspect it before copying or saving it.
For operational documentation, a sequence of small annotated captures is often clearer than one full-page image. A long capture is excellent as a record; it is poor as a step-by-step visual when the recipient must zoom repeatedly to find a particular control.
Mark up the capture before you share it
Once Edge opens the capture preview, select the markup or drawing option to annotate the image. Microsoft describes Screenshot as supporting inking tools, so the feature is built for quick visual callouts rather than full image editing.
Use a pen or highlighter to circle the setting, underline the warning, draw an arrow toward the button, or mark the specific row in a table. A short annotation can prevent the common failure of sending someone a screenshot with the instruction, “Click the thing on the right.”
Keep annotations restrained. Thick freehand marks can cover small text, and highlighting an entire screen makes it harder to see what is important. On a dense page, capture the relevant area again at a tighter crop instead of trying to rescue a cluttered full-page screenshot with excessive drawing.
Before sharing, look carefully for private information. Screenshot markup is an annotation tool, not a dependable redaction system. Drawing over text can be sufficient for a casual explanation, but it should not be treated as a security control for passwords, account numbers, customer data, access tokens, or confidential case details. Capture a clean version that excludes sensitive data whenever possible.
Copy the image or save a file
From the capture preview, use Copy when you need the image immediately in Teams, Outlook, OneNote, Word, Paint, a forum post, or a ticketing system. Then click the destination and press Ctrl+V.
Clipboard copying is fast, but it is temporary. The next copied item may replace the screenshot, and a pasted image is only as private as the destination where you put it. Verify the recipient and channel before pasting captures from work systems or personal accounts.
Use Save when the capture needs to be retained as a file. Pick a folder you can find again, then use a meaningful name rather than accepting a generic sequence of screenshots. A name such as VPN-portal-MFA-error-2026-09-19.png has more value six months later than Screenshot_12.png.
A saved full-page capture is an image, so it is better suited to visual reference than document search. If you expect to search the content later, preserve the URL and capture date in the filename or a nearby note. For important records, save both: the original image for layout and appearance, and a PDF print for searchable text where the site permits it.
Use Print when the destination should be PDF
Screenshot does not create a PDF. To save a webpage as a PDF, use Edge’s Print workflow instead: press Ctrl+P, open the printer or destination selection, choose a PDF-capable destination such as Save as PDF or Microsoft Print to PDF, then select Print or Save and choose a location.
Microsoft’s Edge support documentation confirms that Ctrl+P opens print settings and exposes choices including layout, paper size, margins, scaling, background graphics, headers, and footers. Those controls matter because a PDF reflects the browser’s print layout, which can differ sharply from the page you see onscreen.
Before saving, use the preview to check for cut-off tables, strange page breaks, missing colors, or blank areas. Turn on Background graphics if the preview omits colored charts, shaded cells, or page styling that you need to preserve. Turn on headers and footers if you want a printed date and page numbers, but leave them off when you need the cleanest possible reproduction of the source page.
If Edge’s normal print preview is not sufficient, Microsoft also documents Ctrl+Shift+P as the shortcut for the Windows system print dialog. That can expose printer-specific settings, although its exact options depend on the installed PDF printer or physical printer driver.
The practical choice is simple: use Screenshot for a visual image of a selected region or a complete scrolling page, and use Print to PDF when you need a multipage document with selectable text and print controls. Keeping those jobs separate avoids the common mistake of expecting a full-page screenshot to behave like a PDF—or expecting a print-to-PDF file to preserve every pixel of a live webpage.