

cl.exe compiler can build a working Windows C++ program from any folder on Windows 10 or Windows 11, but only after the Visual Studio toolchain has initialized that shell. The recurring beginner mistake is installing Build Tools successfully, opening an ordinary Command Prompt or PowerShell window, and then concluding that the compiler is missing when cl returns “is not recognized.”
Microsoft Learn’s command-line C++ documentation makes the underlying requirement clear: MSVC depends on more than the location of cl.exe. The shell also needs paths to headers, libraries, the linker, and supporting tools. The Developer Command Prompt sets those values for the current session. It is not a special place where source files must live; it is an initialized environment that you can use before moving to any project directory.
For a first native Windows program, the leanest route is Visual Studio Build Tools rather than the full Visual Studio IDE. The IDE remains the better choice if you want a graphical editor, debugger, project templates, and integrated Git tools. Build Tools is designed for command-line compiles, automated builds, and machines where the editor is unnecessary.
 Install the MSVC toolchain, not merely a code editor
Download and run the Visual Studio Build Tools installer. If you already have Visual Studio Community, Professional, or Enterprise installed, open Visual Studio Installer instead and choose Modify for that installation.
In the installer’s Workloads tab, select Desktop development with C++. Microsoft identifies this workload as the supported way to install the current C++ toolset. It brings in the core MSVC compiler and linker components, the C++ libraries, MSBuild support, and a Windows SDK needed for ordinary native Windows development.
Do not confuse this with Visual Studio Code. VS Code can edit C++ source files and launch tasks, but it does not include Microsoft’s C++ compiler. Likewise, installing a C++ extension in VS Code does not place cl.exe on the machine.
For this tutorial, the important outcome is that the installation includes the x64/x86 MSVC Build Tools and a Windows SDK. The installer may expose many optional components—CMake integration, Clang tools, MFC, ATL, older toolsets, game-development packages, and mobile targets—but none are required to compile a basic console application.
After the installer finishes, restart any terminals that were open during installation. Existing Command Prompt windows do not automatically inherit a newly installed developer environment.
Open the prompt that targets x64
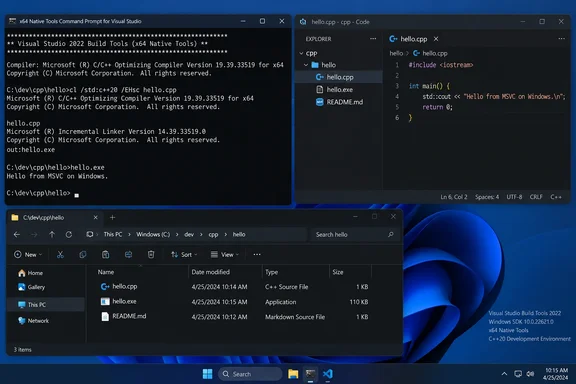
On a 64-bit Windows 10 or Windows 11 PC, search the Start menu for x64 Native Tools Command Prompt for Visual Studio. The wording varies by installed Visual Studio release, but “x64 Native Tools” is the important part.
Microsoft’s current command-line documentation notes a detail that is easy to miss: the ordinary Developer Command Prompt shortcut defaults to x86 tools and an x86 target. That is acceptable when deliberately making a 32-bit program, but it is the wrong default for most current desktop Windows development. Choose x64 Native Tools when you want a standard 64-bit .exe.
Run this command immediately after opening the prompt:
cl
A correctly configured shell prints the Microsoft C/C++ Optimizing Compiler banner, a version number, and a usage line. It should identify the target as x64 when you chose the x64 prompt.
You can also confirm which executable Windows will run:
where cl
The result should point inside your Visual Studio or Visual Studio Build Tools installation, under an MSVC tools directory. The exact path and version are installation-specific, so do not copy a path from somebody else’s PC into your system-wide PATH.
The Developer Command Prompt is deliberately scoped to that window. Closing it removes the toolchain setup from your active session. This is safer and more predictable than permanently editing PATH, INCLUDE, and LIB yourself—variables that can conflict when multiple Visual Studio versions or toolsets are installed.
Compile a first C++ program from your own folder
Create a project folder anywhere you normally keep code. The folder can be in your user profile, on another drive, or inside a checked-out Git repository. The compiler does not require C:\hello, a Visual Studio project folder, or an administrator-owned directory.
In the x64 Native Tools Command Prompt, enter:
mkdir "%USERPROFILE%\source\hello-msvc"
cd /d "%USERPROFILE%\source\hello-msvc"
The /d in cd /d lets Command Prompt change drives as well as directories, which prevents a minor but common surprise when the destination is on another volume.
Create a source file:
notepad hello.cpp
If Notepad asks whether to create the file, choose Yes, then paste and save this code:
#include <iostream>

int main()
{
    std::cout << "Hello from MSVC on Windows." << std::endl;
    return 0;
}
Back at the prompt, compile it with:
cl /nologo /std:c++20 /W4 /EHsc hello.cpp /Fe:hello.exe
Then run it:
.\hello.exe
You should see:
Hello from MSVC on Windows.
This command is more useful as a starting point than the bare minimum cl hello.cpp because it makes several choices explicit. /nologo suppresses the long compiler banner in routine builds. /std:c++20 selects the ISO C++20 language mode. /W4 enables a high warning level that catches many mistakes early. /EHsc enables the normal ISO C++ exception-handling model that Microsoft recommends for standard C++ code. /Fe:hello.exe fixes the output executable name rather than relying on the source file name.
For a one-file program, cl.exe preprocesses and compiles the .cpp file, produces hello.obj, and invokes Microsoft’s linker automatically to create hello.exe. You do not need to call link.exe separately unless you are managing objects and libraries yourself.
The executable and object file appear in the current directory. That behavior is the practical reason to build from a project folder rather than from the Visual Studio installation directory or a random location in C:\Windows.
Build from any folder after the environment is loaded
The Developer Command Prompt does not lock you into the folder where it first opens. Once cl works, change to any source directory and compile there:
cd /d D:\Projects\WidgetTool
cl /nologo /std:c++20 /W4 /EHsc main.cpp widget.cpp /Fe:WidgetTool.exe
The first source file is not conceptually more important than the others, but MSVC needs all translation units that make up the program listed on the command line unless a build system supplies them. If main.cpp calls a function implemented in widget.cpp and you compile only main.cpp, the linker will report an unresolved external symbol.
For a small practice program, listing files manually is fine. Once a project has multiple configurations, third-party libraries, generated code, tests, or several executables, move the build definition into a real build system such as CMake, MSBuild, or NMAKE. Microsoft’s own documentation distinguishes direct cl.exe usage as a way to build simple programs, while larger projects use a build description to control sources, options, dependencies, and target architectures consistently.
A useful boundary to remember is that a Developer Command Prompt configures command-line tools. MSBuild projects can carry their own toolset and library configuration, so do not assume that changing environment variables is a reliable way to override a checked-in .vcxproj build.
Fix “cl is not recognized” before changing PATH
If this command fails:
cl
with an error similar to:
'cl' is not recognized as an internal or external command,
operable program or batch file.
do not begin by searching for cl.exe and adding its directory to the global PATH. That treats only one piece of the problem. MSVC also requires the matching INCLUDE and LIB paths, and the linker must find the right architecture-specific libraries and Windows SDK files.
Use this recovery sequence instead:
- Close the ordinary Command Prompt, Windows Terminal tab, or PowerShell session where the error occurred.
- Search Start for x64 Native Tools Command Prompt for the installed Visual Studio version, then run
clagain. - If no Developer Command Prompt shortcut appears, open Visual Studio Installer, select the installed Build Tools or Visual Studio instance, choose Modify, and verify that Desktop development with C++ is installed.
- If the shortcut opens but
clstill fails, use Visual Studio Installer’s repair option or modify the installation to reinstall the C++ workload.
Microsoft also documents a manual fallback for machines where the Start-menu shortcut is missing: run the installation’s VsDevCmd.bat from a regular Command Prompt. The exact location changes by release, edition, and whether you installed the standalone Build Tools package, so locate the batch file within the relevant Visual Studio installation rather than assuming a hard-coded path. Once it runs successfully, cl should become available in that same window.
If cl starts but reports an error such as fatal error C1083 for a standard header like iostream, the compiler is present but its headers are unavailable to the session. Reopen the proper developer prompt first; if the problem persists there, repair the C++ workload. If the compiler reaches the link step but reports LNK1104 for a library, the same rule applies: confirm the intended x64 prompt and a complete MSVC/Windows SDK installation before manually modifying library paths.
Keep the architecture intentional
For modern Windows desktop software, compile x64 unless you have a defined compatibility reason to ship x86. A 64-bit edition of Windows runs x64 applications natively, while an x86 build is constrained by the 32-bit process address space and depends on Windows’ compatibility layer on 64-bit systems.
The architecture of Windows itself does not automatically make every build x64. The prompt selection does. A developer can have both x86 and x64 MSVC tools installed, and Microsoft’s generic Developer Command Prompt may still initialize the x86 target by default. Check the cl banner whenever the target matters, especially before compiling binaries you plan to distribute or benchmark.
For one-off work, selecting x64 Native Tools Command Prompt is enough. For scripts and CI jobs, initialize the environment explicitly with the Visual Studio developer command file and target architecture so a build cannot silently change because a different Start-menu shortcut was used.
Once cl /nologo /std:c++20 /W4 /EHsc hello.cpp /Fe:hello.exe works in a folder you chose, the essential setup is complete: you have a native x64 MSVC toolchain, a repeatable command line, and a clean separation between the build environment and the source tree where your projects actually live.