
The latest troubleshooting guidance from TweakTown emphasizes this layered approach: check the printer itself first, confirm that Windows can see it, make sure jobs are going to the intended printer, then address stuck queues, spooler failures, and drivers. TweakTown’s guide aligns closely with Microsoft’s own Windows 11 and Windows 10 support steps for printer recognition and reinstallation. Microsoft’s printer-not-found guidance provides the same essential escalation path.
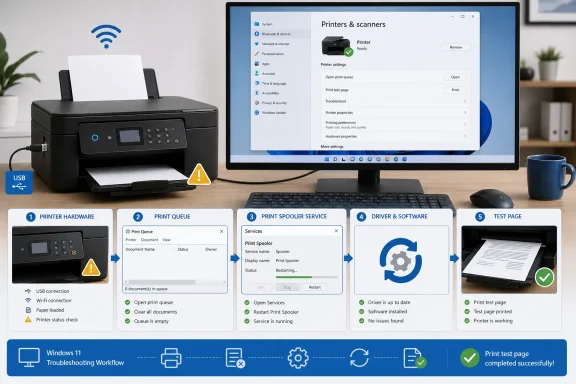 Overview: Diagnose the Stage That Has Failed
A reliable Windows printer troubleshooting routine begins by identifying where a job stops. That distinction prevents a common mistake: treating every printing problem as a driver problem.
For example, a printer that is not powered on, has an open toner door, or is disconnected from Wi‑Fi cannot be repaired from Device Manager. Conversely, a printer that produces its own test page but remains invisible in Windows is probably not suffering from a paper jam.
The most useful way to separate the possibilities is to look at the failure pattern:
- The printer does not turn on or shows an error: Start with power, paper, ink or toner, jams, covers, and maintenance warnings.
- The printer is ready but absent from Windows: Investigate USB, network connectivity, Bluetooth, printer discovery, and device installation.
- The printer appears in Windows but documents do not arrive: Check the selected printer, its status, and the print queue.
- Jobs remain in “Printing,” “Error,” or “Paused”: Clear the queue and restart the Print Spooler.
- The printer installs but behaves incorrectly: Update, replace, or reinstall the driver.
- Only network or shared printing fails: Focus on the Wi‑Fi network, the host PC, discovery, sharing permissions, and firewall rules.
This sequence has another advantage: it preserves useful evidence. A user who immediately removes a printer and installs a new driver may erase the very status information that reveals whether the issue is actually an offline network device or a jammed queue.
Start With the Printer, Not Windows
Before opening Settings or running a troubleshooter, make sure the printer is physically capable of printing. This sounds elementary, but it is the fastest way to rule out a large set of otherwise misleading Windows symptoms.
Check power, indicators, and the printer display
Verify that the printer is powered on and has completed its startup sequence. A blinking attention light, a warning on the touchscreen, or a repeated mechanical initialization cycle points to a printer-side problem rather than an issue with Windows.
Look for alerts involving:
- Paper jams or a partially torn sheet in the paper path
- Empty or incorrectly seated ink or toner cartridges
- A cover, rear access panel, or cartridge door left open
- Incorrect paper size or paper type settings
- A full output tray or blocked carriage path
- Required maintenance, cleaning, or replacement parts
Microsoft specifically recommends resolving physical paper-jam conditions by powering the printer down, checking all access points, removing scraps of paper, and reloading paper with the tray guides properly aligned. Even a small fragment can keep a sensor reporting a jam. Microsoft’s paper-jam troubleshooting guide describes these checks in detail.
Confirm the connection type
For a USB printer, reseat the cable at both ends. Then try a different USB port on the PC. If possible, test with a known-good cable; USB printer cables can fail in ways that leave the printer powered on but prevent Windows from identifying it correctly.
Avoid routing a problem printer through an unpowered USB hub while troubleshooting. Connect it directly to the PC first. If Windows recognizes the printer only when directly connected, the hub, cable, or its power delivery is the likely weak point.
For a wireless printer, confirm that the printer is connected to the same local network as the Windows PC. A printer may still show a saved Wi‑Fi network name after it has lost its connection, changed IP address, or joined a guest network that cannot communicate with local devices.
Microsoft’s current guidance for “printer not found” errors makes the same distinction: USB printers should be checked for secure cabling and alternate ports, while Wi‑Fi printers should be verified on the same network as the PC. Microsoft’s recognition troubleshooting steps also call out Bluetooth range and pairing where applicable.
Use the printer’s own test function
If the printer has a control panel, print its internal test page, network configuration page, or supply-status report. This is an exceptionally useful dividing line.
If the printer cannot print its own report, Windows is not the primary problem. If it can print the report, the mechanical components and basic print engine are likely functioning, and attention can move to discovery, queues, drivers, or network communication.
Make Sure Windows Detects the Printer
Once the printer is powered, ready, and connected, open Windows Settings:
- Select Start.
- Open Settings.
- Go to Bluetooth & devices.
- Select Printers & scanners.
On Windows 11, this page is the central place to see installed devices, add a printer, remove an obsolete entry, view status, and open the print queue.
When the printer appears in the list
Select the printer and examine its status. A visible device is good news, but the wording matters:
- Ready usually means Windows can communicate with the printer well enough to submit a job.
- Offline suggests Windows cannot currently reach the device, even if it is installed.
- Unavailable can indicate a connection, discovery, sharing, or configuration issue.
- Needs attention often means Windows has detected an error state that requires action before jobs can complete.
A status label is a clue, not a diagnosis. “Offline,” for example, may be caused by a powered-off device, changed Wi‑Fi network, stale printer port, sleeping network hardware, or a PC that is attempting to use an old instance of the printer.
When Windows cannot find the printer
Choose Add device beside Add a printer or scanner and allow Windows time to search. Microsoft notes that a directly connected wired printer will normally install automatically once it is plugged in and turned on, but a manual add process is available if it does not. Microsoft’s add-printer instructions also explain that Windows may take a few minutes to populate the list.
If the correct printer does not appear, use the manual option—typically labeled The printer that I want isn’t listed or Add a new device manually. This becomes important for printers added by network address, devices on a shared host PC, or older hardware that automatic discovery fails to locate.
Do not confuse a newly detected printer with a fully featured installation. Windows may install a basic driver that enables printing but omits scanning tools, maintenance utilities, specialty paper controls, duplex configuration, or finishing features. Microsoft warns that a printer can work with reduced functionality until a complete set of drivers is installed. Microsoft’s installation guidance makes that distinction explicit.
Remove and add the printer again—at the right time
Removing and re-adding a printer is a valid repair step, but it is most useful after basic connectivity has been checked. If a USB cable is faulty or the printer is off the network, removal will not cure the root cause.
Use this reset when:
- The printer appears with an old or duplicate entry.
- Windows sees the printer but repeatedly reports it unavailable.
- Its configuration has changed substantially.
- The driver has been updated but the queue still uses an outdated device instance.
- A shared printer was moved to another host PC or renamed.
Microsoft recommends removing a non-responsive printer, adding it again, and then using Windows Update to obtain current driver software. Microsoft’s driver installation guidance identifies reinstallation as a way to force a fresh device and driver setup.
Set the Correct Default Printer
A printer can be perfectly healthy yet receive no jobs because Windows is sending documents somewhere else. This is especially common on systems that have accumulated old USB printers, office network queues, PDF printers, label printers, and remote desktop printer redirection entries.
Open Settings > Bluetooth & devices > Printers & scanners, select the intended printer, and choose Set as default.
This matters because Windows applications may follow the default device automatically, while individual programs can retain their own last-used printer selection. A Word document may try to print to an office queue, for example, while a browser sends its output to Microsoft Print to PDF.
Stop Windows from changing the default automatically
Windows can manage the default printer based on the one used most recently. That behavior is convenient for users who move between locations, but it can create confusion in a stable home or office setup.
If Windows keeps changing the selected printer:
- Open Settings > Bluetooth & devices > Printers & scanners.
- Find the option that lets Windows manage the default printer.
- Turn it off.
- Return to the desired printer and set it as default.
TweakTown specifically highlights this setting as a remedy for users who find that Windows keeps redirecting jobs to another device. Its Windows printer guide correctly frames this as a routing problem rather than a printer hardware failure.
Clear Stuck Print Jobs Before Reinstalling Anything
A single corrupt or failed job can block everything behind it. This produces one of the most familiar Windows printing symptoms: a document remains at “Printing” forever, subsequent jobs pile up, and the printer never responds.
To inspect the queue:
- Go to Settings > Bluetooth & devices > Printers & scanners.
- Select the relevant printer.
- Choose Open print queue.
- Review the status of each document.
Cancel jobs showing Paused, Error, or Printing when they are clearly not progressing. Then send one small, simple test document—plain text is ideal—to determine whether the queue is moving again.
Why a queue can become stuck
Print jobs are not merely passed as a file from an application to the printer. Windows processes and spools them before delivery. A document can fail at several points: the originating application may stop responding, the printer may go offline mid-job, the driver may mis-handle a document feature, or the spooler may retain a corrupted job.
Clearing the queue is therefore an efficient, low-risk test. It does not alter the printer’s drivers or settings, but it can remove a blockage that makes a working printer appear broken.
TweakTown’s published steps recommend cancelling stalled documents, restarting the printer and PC if they refuse to disappear, and clearing the full queue before testing again. The guide’s print-queue section is a sensible first response to jobs that remain stuck.
Do not repeatedly resend the same document
Repeatedly clicking Print while a job is stuck often makes recovery harder. It can create a long backlog, consume time after the issue is fixed, and risk printing multiple copies of a sensitive or expensive document.
Instead:
- Cancel the blocked jobs.
- Confirm the queue is empty.
- Restart the printer if necessary.
- Send one small test page.
- Only then resend the original document.
If the test page succeeds but a particular document still fails, the printer may be working correctly and the original file, application, fonts, page size, embedded images, or print settings may be the source of the problem.
Restart the Print Spooler Service
The Print Spooler is the Windows service that manages queued print jobs and passes them along for printing. If it becomes unresponsive, jobs may stay in the queue, vanish without completing, or fail to reach the printer.
Restarting it is one of the most effective Windows printer fixes because it resets the service without requiring a full Windows reinstallation or a wholesale driver purge.
Restart the service through Services
- Press Windows + R.
- Type
services.msc. - Press Enter.
- Find Print Spooler.
- Right-click it and select Restart.
If the service is stopped, choose Start instead. Then open the printer queue again and test with a small document.
Microsoft’s printer-recognition article gives the same procedure: open the Services console, find Print Spooler, and restart it to address temporary printer recognition or job-management problems. Microsoft’s troubleshooting instructions support this as a standard recovery step.
Verify the startup type
Open the Print Spooler service properties and ensure Startup type is set to Automatic. That setting allows Windows to start the service on boot.
If the spooler is disabled or remains stopped after every restart, that is a more significant clue. It can indicate a service configuration change, a problematic driver component, a system policy in a managed environment, or a security product interfering with printing functions.
The risk of overcorrecting
Restarting the spooler is safe in most everyday cases, but users should recognize that it interrupts queued documents. In an office, shared environment, or production workflow, first note what is waiting in the queue. Jobs may need to be reprinted afterward.
Avoid deleting system folders or running random “spooler repair” scripts from untrusted sites. Those approaches can create permission problems or install unwanted software while offering little advantage over the built-in Windows service controls.
Update or Reinstall Printer Drivers Carefully
A printer driver is the software layer that lets Windows communicate with a particular printer model. It controls essentials such as resolution, paper sizes, color modes, duplexing, tray selection, and, in many cases, scanning or device-management features.
When a printer is detected but produces garbled output, prints blank pages, ignores settings, or fails immediately after a Windows or manufacturer update, a driver problem becomes more plausible.
Start with Windows Update
Microsoft recommends Windows Update as the preferred method for downloading, installing, and updating printer drivers. Its current driver guidance says Windows Update can provide updated hardware drivers, while acknowledging that another method may be necessary if no driver is found.
This approach has two benefits:
- It uses a driver delivery path integrated with Windows.
- It reduces the chance of downloading software from an unofficial driver site.
Check for Windows updates, install available updates, restart when required, and test the printer again. This is particularly worthwhile after adding the device anew.
Use Device Manager as a secondary route
To update from Device Manager:
- Open Device Manager.
- Expand Printers.
- Right-click the printer.
- Select Update driver.
- Choose the automatic search option.
If no update is found and printing is still broken, uninstalling the device and restarting Windows can prompt a fresh detection and driver installation. Microsoft lists Device Manager as an available option, while still positioning Windows Update and the manufacturer’s support site as the recommended routes for driver updates. Microsoft’s driver documentation clarifies the hierarchy.
Download only from the printer manufacturer
If Windows Update does not provide the features or compatibility needed, download the driver from the printer manufacturer’s official support page for the exact model and version of Windows.
Be careful with similarly named models. A driver intended for a closely related printer can install but cause missing trays, unavailable duplexing, incorrect color output, or scanning failures.
Avoid third-party “driver updater” utilities. Their value is questionable when Windows Update and the manufacturer are already the trusted channels, and their installation bundles can introduce unnecessary software or recurring subscriptions.
A special note for Windows on ARM
Microsoft has documented an issue affecting some ARM-based Windows PCs, including some Copilot+ PCs, where a manufacturer-supplied installer may not successfully add or install a printer. In that circumstance, Microsoft advises using Settings > Bluetooth & devices > Printers & scanners > Add device rather than relying on the vendor installer, unless the manufacturer supplies specific Windows on ARM guidance. Microsoft’s printer driver article identifies this limitation and workaround.
That is a useful reminder that “download the vendor installer” is not always the best first step, especially on newer Windows hardware architectures.
Fix Wireless, Network, and Shared Printer Problems
Network printing adds layers that a USB printer does not have: Wi‑Fi connectivity, IP addressing, router isolation, device discovery, sharing settings, and sometimes credentials.
If a wireless printer works from a phone but not from a Windows PC, the printer itself may be fine. The PC may be on another network band, using a VPN, connected to a guest network, or holding an outdated printer connection.
Check the local network first
Confirm the PC and printer are on the same intended local network. Guest Wi‑Fi networks frequently block device-to-device traffic by design. A VPN can also change how Windows routes traffic, making a local printer appear offline.
A quick diagnostic option is to temporarily connect the printer by USB or Ethernet, if the model supports it. If printing works over a wired connection, the issue is much more likely to be wireless discovery, Wi‑Fi signal quality, or network configuration than a queue or driver defect.
Repair a shared printer connection
A shared printer is physically connected to one Windows PC—the host—and exposed to other PCs on the network. If the host is off, asleep, disconnected, or not configured for sharing, client PCs cannot print.
Microsoft’s shared-printer guidance recommends verifying that the device is shared on the host, confirming that both machines can reach each other on the same network, enabling Network discovery and File and printer sharing, then adding the printer manually using a path in the form \\ComputerName\PrinterShareName. Microsoft’s shared-printer support article also advises removing and reconnecting the shared printer if the existing connection remains unreliable.
In a business environment, do not change sharing or security settings casually. Corporate endpoint policies, managed print servers, and access controls may intentionally limit printer visibility. Escalate through the organization’s IT support process when the printer is centrally managed.
Use the Built-In Printer Troubleshooter as a Diagnostic Tool
Windows includes a printer troubleshooter through the Get Help experience. It can run diagnostics and attempt common repairs for printer connection, recognition, and configuration problems.
Microsoft recommends beginning with the automated printer troubleshooter for printer-not-found or printer-not-recognized errors. Its official troubleshooting page presents it as an early step alongside connection checks, spooler restarts, driver work, default-printer settings, and reinstallation.
The troubleshooter should not be viewed as magic, but it has practical value:
- It can identify a printer set offline.
- It can point to a default-printer mismatch.
- It may detect queue, service, or configuration problems.
- It offers a quick baseline before more invasive changes.
The limitation is equally important: automated diagnostics cannot clear a physical paper jam, fix a dead USB cable, reconnect a printer to the correct Wi‑Fi network, or obtain credentials for a protected office share. It is a helpful layer in the process, not a replacement for it.
A Practical Recovery Order for Windows Printing Problems
When time matters, use the following sequence rather than jumping randomly between Settings pages.
- Check the printer itself. Confirm power, paper, supplies, covers, jams, and any warning messages.
- Restart the printer and Windows PC. This clears many temporary state issues.
- Verify the connection. Reseat USB, try another port, or confirm the printer and PC use the same Wi‑Fi network.
- Check Windows detection. Open Printers & scanners and inspect whether the device is listed and what status it shows.
- Set the printer as default. Ensure the job is not being sent to an old device or a virtual PDF printer.
- Open and clear the print queue. Cancel stalled jobs and test with a small document.
- Restart Print Spooler. Use
services.msc, restart the service, and confirm it starts automatically. - Run the Get Help printer troubleshooter.
- Update drivers through Windows Update. Then use the manufacturer’s official support site if a fuller or newer package is required.
- Remove and reinstall the printer. Treat this as a targeted reset after the basics have been verified.
- Investigate network, sharing, firewall, or security software. This is especially relevant when USB printing works but Wi‑Fi or shared printing does not.
The strength of this approach is that it moves from the least disruptive checks to the more consequential repairs. A loose cable takes seconds to correct; removing drivers and rebuilding a network printer configuration can take considerably longer.
Conclusion
Most Windows printer problems are recoverable without replacing hardware or performing drastic system repairs. The key is to avoid treating “won’t print” as a single diagnosis. A printer may be mechanically unavailable, undiscovered by Windows, assigned the wrong default target, blocked by a stale queue, stalled behind the Print Spooler, or running the wrong driver.
Start with the physical printer, verify detection in Printers & scanners, clear the queue, restart Print Spooler, and then update or reinstall the driver through trusted channels. That structured workflow turns a frustratingly vague error into a manageable set of checks—and usually gets documents moving again.
