
CBS_E_SOURCE_MISSING: the Component-Based Servicing stack found corruption or an incomplete component but could not resolve a usable source for the replacement payload.
The practical order matters. Start by letting Deployment Image Servicing and Management, or DISM, contact Microsoft Update with no custom source. Only point DISM at installation media after the default repair fails or when the PC is intentionally blocked from Microsoft Update. A common self-inflicted failure is adding /LimitAccess to the first command: that switch explicitly prevents DISM from checking Windows Update, removing its default repair source.
Microsoft’s current Windows Update troubleshooting guidance calls for DISM first, then System File Checker, before retrying the failed update. This procedure applies to supported Windows 10 and Windows 11 installations and requires an account that can run an elevated terminal.
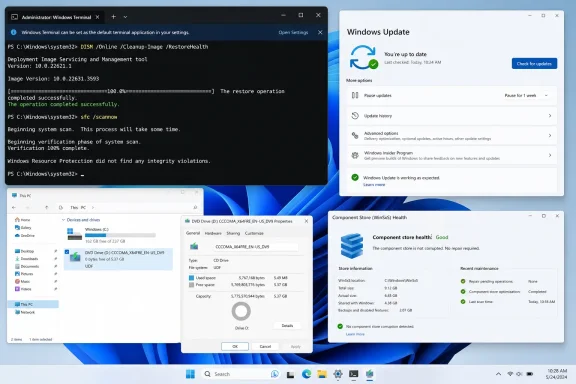 Confirm that the component store needs repair
Open Windows Terminal (Admin), Command Prompt as administrator, or PowerShell as administrator. First, check whether Windows has already flagged the component store as corrupt:
DISM /Online /Cleanup-Image /CheckHealth
/CheckHealth is fast, but it does not perform a complete scan. If it reports that the component store is repairable, or if Windows Update is currently returning 0x800F081F, run the deeper check:
DISM /Online /Cleanup-Image /ScanHealth
This scan examines the running Windows image’s component store, commonly called WinSxS. Do not confuse that directory with disposable cache data: it contains servicing manifests and component versions Windows needs to add features, install cumulative updates, and repair system files. Deleting WinSxS files manually can make a repairable installation worse.
The error is often displayed during Windows Update, but the underlying failure can also appear when DISM itself runs /RestoreHealth. In both cases, the code tells you what was missing: a package or file source. It does not by itself identify which update caused the condition or prove that an antivirus product, a damaged update cache, or disk corruption is responsible.
Let DISM use Microsoft Update first
If the machine has an ordinary Internet connection and is allowed to use Microsoft Update, run:
DISM /Online /Cleanup-Image /RestoreHealth
This is Microsoft’s preferred first repair path. For an online Windows image, DISM can use configured repair locations and then Windows Update to obtain the files it needs. The operation can pause at particular percentages for several minutes; a stationary progress counter is not enough reason to terminate it. Keep the terminal open until DISM reports either successful completion or a specific error.
If it succeeds, run System File Checker immediately afterward:
sfc /scannow
SFC checks protected operating-system files against the repaired component store. Running SFC first can be less useful when the store it relies upon is itself damaged; Microsoft’s published update-repair sequence puts DISM ahead of SFC for that reason.
Restart Windows after both commands complete, then return to Settings > Windows Update and try the failed update again. If DISM says it could not download source files, returns 0x800F081F again, or the PC is managed by an organization that restricts Windows Update access, move to a local repair source.
Use an installation image that actually matches the PC
A local source is only useful when it contains the precise component version DISM needs. “Windows 11 media” or “Windows 10 media” is not a sufficient match. The installation image should match the installed system’s:
- Windows release and servicing branch, such as Windows 11 version 24H2 rather than an older feature release.
- Architecture, normally x64 or Arm64.
- Edition, such as Home, Pro, Enterprise, or Education.
- Display language and installed language components where relevant.
- Cumulative-update servicing level closely enough to contain the component version required by the target PC.
Microsoft’s deployment documentation cautions that repair media can fail when the target has been patched beyond the source, because the image lacks the updated files the installation requires. This explains a frustrating pattern: DISM accepts a valid ISO path but still ends with 0x800F081F. The drive was readable; the source simply did not contain the required payload.
Check the installed Windows release and build before downloading or mounting media:
winver
For more detail, including edition and architecture, use:
systeminfo
Obtain installation media from Microsoft rather than from modified ISO collections. Mount the ISO by double-clicking it in File Explorer and note its assigned drive letter. The examples below use D:; replace it with the actual letter on your system.
Open D:\sources and look for either install.wim or install.esd. Installation media normally contains one of them, not both.
Find the image index before running RestoreHealth
A single install.wim or install.esd may contain several Windows editions. DISM must be told which indexed image is the repair source. Guessing that “1” means Pro or Home is unreliable, especially with media that includes multiple editions.
For a WIM source, list the available images:
DISM /Get-WimInfo /WimFile:D:\sources\install.wim
For an ESD source, use:
DISM /Get-WimInfo /WimFile:D:\sources\install.esd
Review the output and identify the index corresponding to the edition installed on the PC. If the system is Windows 11 Pro and the list reports “Windows 11 Pro” as Index 6, use 6 in the repair command. If the installed edition is Enterprise but the retail ISO contains only Home and Pro, stop there: none of those indexes is an appropriate repair source.
Then run one of these commands from an elevated terminal.
For a WIM image:
DISM /Online /Cleanup-Image /RestoreHealth /Source:wim:D:\sources\install.wim:6 /LimitAccess
For an ESD image:
DISM /Online /Cleanup-Image /RestoreHealth /Source:esd:D:\sources\install.esd:6 /LimitAccess
The wim: or esd: prefix, image path, and index are all significant. So is /LimitAccess—but only in this stage. Here it is useful because it tells DISM to use the source you deliberately supplied instead of falling back to Windows Update, which is important for offline systems and tightly controlled enterprise networks.
If the image source is genuinely compatible, DISM should finish with “The restore operation completed successfully.” Follow it with:
sfc /scannow
Restart, unmount the ISO if desired, and retry Windows Update.
When a matching ISO still cannot supply the file
Do not keep cycling through random ISO images or run registry cleaners. Repeated source-missing errors after using what appears to be matching media usually point to one of three conditions: the media is from a different Windows release or language, the source is insufficiently patched for the target, or the source index does not match the installed edition.
On business-managed PCs, Group Policy can also alter the repair-source behavior. Microsoft documents the policy named Specify settings for optional component installation and component repair, located under Computer Configuration, Administrative Templates, System. It can define a network repair location, permit Windows Update as a fallback, or prevent the usual public Windows Update path from being used. A device enrolled in WSUS, Windows Update for Business, or another management platform may therefore behave differently from a personal PC even when both have Internet access.
Administrators should verify whether a configured source is still reachable and whether it carries current servicing content. A shared C:\Windows folder from another machine is only a credible source when the donor system runs the same Windows version and is maintained at a compatible patch level. “Another working Windows PC” is not automatically a valid donor.
For stubborn cases, review the logs rather than treating the generic error code as the final diagnosis. DISM writes its log under:
C:\Windows\Logs\DISM\dism.log
Windows servicing activity is also recorded in:
C:\Windows\Logs\CBS\CBS.log
Search near the timestamps of the failed repair for 0x800f081f, source, payload, or the package name. The log can reveal the exact component DISM wanted, which is far more useful than retrying the same command with a different drive letter.
Verify the repair before resuming normal patching
A successful DISM repair does not mean every protected system file has already been checked, which is why SFC remains part of the procedure. The clean sequence is:
DISM /Online /Cleanup-Image /RestoreHealth
sfc /scannow
Or, when Windows Update cannot serve as the source:
DISM /Online /Cleanup-Image /RestoreHealth /Source:wim:D:\sources\install.wim:6 /LimitAccess
sfc /scannow
After SFC reaches 100 percent and Windows is restarted, try the update again. If 0x800F081F returns despite a successful DISM and SFC run, the repair-source problem has likely been resolved and the remaining failure should be investigated as an update-specific servicing issue—starting with the corresponding CBS log entries and the exact KB number Windows Update is attempting to install.
