
Microsoft Support documents this as a text-only accessibility setting, distinct from display scaling. Microsoft’s developer guidance adds an important qualification: modern Windows applications generally support it well, but older software and apps built with certain custom or legacy interface technologies may enlarge only some text—or none of it. That limitation is the reason to start with Text size, then move to display Scale only if the apps you use remain difficult to operate.
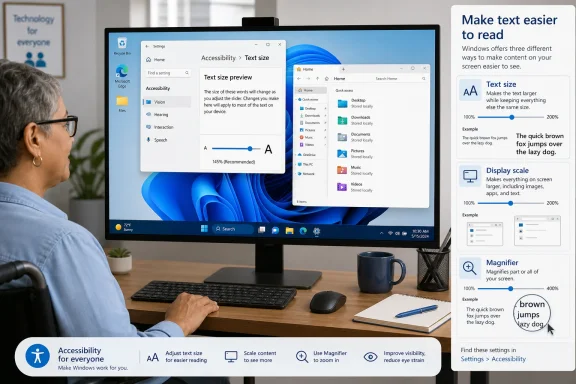 Use Text size before changing resolution or Scale
Changing a monitor’s resolution is a blunt fix for small text. A lower resolution can make the entire desktop appear larger, but it also reduces usable workspace and can make a display look less sharp, especially on a laptop panel or a high-resolution external monitor. Windows’ Text size control avoids that trade-off: it changes the system text-scale preference while leaving the display at its native resolution.
On Windows 11, open Start > Settings > Accessibility > Text size. You can also press Windows key + U to open Accessibility settings, then select Text size.
On Windows 10, go to Start > Settings > Ease of Access > Display. The relevant control appears under Make text bigger. The wording and layout differ from Windows 11, but the purpose is the same: increasing readable text without making every visual element proportionally larger.
The slider includes a preview sample. Treat that preview as more than decoration. It is the safest way to choose a setting because it lets you judge line length, weight, and readability before committing the change across Windows. Move the slider gradually to the right, stopping at the first point where the sample becomes comfortable at your normal viewing distance.
When the preview looks right, select Apply. Windows then updates text across supported system surfaces and applications. The setting can be changed again at any time; there is no need to reset the display resolution, reinstall a graphics driver, or edit the Registry.
Microsoft’s Windows app documentation describes the text-scale range as 100% through 225%. A larger number does not mean every individual label will grow by exactly that percentage, however. Windows intentionally treats some larger text differently from smaller body text, and the final result depends on whether an application honors the system text-scale preference.
Apply the change in small, testable steps
A sensible starting point is a modest increase rather than immediately pushing the slider to its maximum. Small increases can make menus and dialog text substantially easier to read while preserving the density of the desktop and avoiding awkward line wrapping in narrower panes.
After selecting Apply, check the places where small text actually slows you down:
- Open File Explorer and inspect the navigation pane, column headings, and file names.
- Open Settings and a common desktop dialog box, such as the Run dialog with
Windows key + R. - Check the application you use most for reading or work, whether that is Outlook, a browser, an accounting package, an IDE, or a line-of-business application.
- If you use more than one monitor, check each display rather than assuming the result will feel identical across screens of different size and pixel density.
The last step matters particularly with mixed-monitor setups. A 24-inch 1080p monitor, a 27-inch 4K monitor, and a laptop’s high-DPI display can make the same text setting feel radically different in practice. Text size improves legibility, but it does not alter the physical size of the monitor or compensate for every difference in viewing distance.
If the first adjustment feels too strong, return to the same page and reduce it. If it helps system menus but does not fix the app that prompted the change, do not keep increasing text size indefinitely. That result points to an application compatibility issue or a broader interface-sizing problem, both of which call for a different tool.
Why some applications may still look too small
The Text size slider is a system preference, not a universal command that can rewrite every application’s interface. Microsoft Learn says WinUI applications support text scaling by default, while legacy technologies and custom controls can require developer work to handle enlarged text properly. In practical terms, current Windows apps tend to behave better than old utilities with rigid dialog layouts, fixed-height buttons, or custom-drawn text.
This can produce a confusing split result. File Explorer and Settings may become comfortably readable, while an older administration tool retains tiny labels, or only its menus and toolbars enlarge. That is not evidence that the Windows setting failed. It means the application is not fully participating in the Windows text-scaling model.
Do not try to solve that mismatch by lowering resolution. First look for an in-app zoom, font-size, or interface-scale setting. Web browsers, Office applications, PDF readers, code editors, remote-control clients, and many business applications offer their own controls; those settings can target a difficult application without changing the rest of Windows.
For a web page that is too small, browser zoom is usually the more precise answer. In Microsoft Edge, Ctrl + Plus (+) enlarges the current page, Ctrl + Minus (-) reduces it, and Ctrl + 0 returns it to the default zoom level. Page zoom changes the content in the browser, whereas Windows Text size changes supported interface text across the device.
A text-only adjustment can also expose application design flaws. Labels may wrap into two lines, dialog boxes may feel crowded, or controls may not expand to match their text. If that happens in a business-critical application, set Windows text size to the largest usable value that does not obstruct the workflow, then use the application’s own scaling controls where available. The operating system cannot reliably repair a layout an app developer made fixed-size.
Use display Scale when the controls—not only the words—are too small
Windows’ Scale setting serves a different purpose. It enlarges the overall interface: text, icons, buttons, application controls, images, and other onscreen elements. On Windows 11, find it under Start > Settings > System > Display > Scale. Windows 10 places its equivalent display-sizing setting in the Display area of Settings.
Choose Scale when you can read the words but still struggle to hit a small button, see a tiny toolbar icon, distinguish a narrow scroll bar, or use touch controls. Text size alone makes the caption bigger; Scale makes the surrounding target larger too.
This distinction is especially useful on high-resolution displays. A 4K monitor can provide a crisp image while leaving interface elements physically too small for a comfortable viewing distance. Raising Scale to a standard option such as 125%, 150%, or another value offered by Windows gives the interface more physical presence without forcing a lower, blurrier resolution.
Start with the recommended scaling value Windows presents for the display. Microsoft warns against custom scaling unless there is a specific reason to use it. A custom percentage can be useful in unusual monitor arrangements, but it is more likely to expose older application compatibility problems and may require signing out and back in before some apps reflect the change cleanly.
Text size and Scale can be combined, but do so deliberately. If you raise both aggressively, desktop applications can become oversized, toolbars can consume valuable workspace, and text may wrap more often. A practical pattern is to choose a comfortable display Scale first when controls are too small, then use a modest Text size increase only if labels still need help.
Keep Magnifier for temporary close-up work
Magnifier is a third tool, and it solves a third problem. Use it when one field, image, spreadsheet cell, or dialog needs temporary enlargement—not when the whole desktop should be permanently more readable. Press Windows key + Plus (+) to open Magnifier and zoom in; press Windows key + Esc to close it.
For sustained reading, the permanent Text size setting is less disruptive because it preserves the desktop’s general layout. For interaction problems, Scale is the broader correction. For a momentary close look, Magnifier avoids changing either setting.
The practical order is straightforward: raise Text size first if words are too small, use Scale if the entire interface is too small, and rely on app-specific zoom when one program or webpage is the outlier. That approach preserves sharp native resolution while avoiding the common mistake of making the whole Windows desktop oversized just to fix a few hard-to-read labels.
