
git fetch, pull, or push. The important qualification is that Git must be invoking the same Windows ssh.exe that can communicate with the Windows ssh-agent service; Git for Windows can otherwise use its separate bundled SSH client.
Microsoft documents ssh-agent as part of the Windows OpenSSH client, while GitHub’s Windows guidance specifically calls out the two-client problem as a common reason an apparently loaded key still produces passphrase prompts. Set up the Windows service once, add the private key under your own account, then verify both the SSH connection and the repository’s remote URL.
This guide assumes PowerShell in Windows Terminal, but the SSH and Git commands work from any current PowerShell session.
 Check that Windows OpenSSH is installed
First, check whether the OpenSSH client capability is present. This is a local-client task; you do not need to install or run OpenSSH Server merely to authenticate Git to GitHub, Azure DevOps, GitLab, or another SSH Git remote.
Open an elevated PowerShell window and run:
Get-WindowsCapability -Online | Where-Object Name -like 'OpenSSH.Client*'
Look for State : Installed. If it reports NotPresent, install the client feature:
Add-WindowsCapability -Online -Name OpenSSH.Client~~~~0.0.1.0
Then confirm that Windows is finding the expected executables:
Get-Command ssh
Get-Command ssh-add
On a normal Windows installation, the native executables are in:
C:\Windows\System32\OpenSSH\
Microsoft’s OpenSSH documentation applies this client tooling to Windows 10 and Windows 11, including ssh, ssh-keygen, ssh-agent, and ssh-add. The agent stores private keys for public-key authentication; it does not replace Git credentials for HTTPS remotes.
Enable the ssh-agent Windows service
The ssh-agent service often exists but is disabled by default. Its startup configuration is a machine-level setting, so enable it from an elevated PowerShell window.
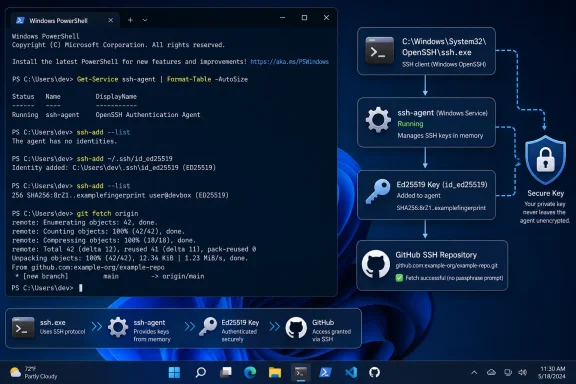
Get-Service -Name ssh-agent
If the service is present, configure it to start automatically and start it now:
Set-Service -Name ssh-agent -StartupType Automatic
Start-Service -Name ssh-agent
Get-Service -Name ssh-agent
The last command should show a status of Running.
Do not use the familiar Unix-style command below in PowerShell:
eval "$(ssh-agent -s)"
That launches a session-oriented agent in Bash-like environments. The Windows service is the durable option this guide is configuring, and it is the agent that the native Windows OpenSSH client expects to use.
The design is useful for developers who restart Windows regularly: once a key is registered, the service can make it available again without requiring an agent-launch script in every terminal profile. It is also a security trade-off worth understanding. A passphrase protects the key file at rest, but an unlocked Windows session with access to the agent can request signatures with the key. Treat a logged-in Windows account as a security boundary: use a strong Windows sign-in method, lock the machine when away, and remove keys from the agent when a device is retired or reassigned.
Find an existing key or create an Ed25519 key
Check the standard SSH directory before generating anything new:
Get-ChildItem -Force $env:USERPROFILE\.ssh
A typical key pair has two matching files:
id_ed25519
id_ed25519.pub
The file without .pub is the private key. Keep it private. The .pub file is the public key you upload to GitHub or install with the administrator of another Git server.
If you already have a suitable private key, use it rather than casually creating duplicates. Multiple keys are valid, but unmanaged collections of old keys make it harder to tell which device still has repository access.
If no key exists, create a new Ed25519 key:
ssh-keygen -t ed25519 -C "[email][email protected][/email]"
When prompted for the file path, pressing Enter uses the default path:
C:\Users\YourName\.ssh\id_ed25519
Enter a memorable, strong passphrase when prompted. An empty passphrase defeats the point of protecting a copied or stolen private-key file. GitHub no longer accepts new DSA keys, and Ed25519 is the sensible default for a current Windows OpenSSH client.
If your organization requires RSA for compatibility with a legacy system, follow its documented key policy rather than generating a different algorithm blindly. For most current Git hosting platforms, an Ed25519 key is the simpler choice.
Add the private key to the Windows agent
Close the elevated PowerShell window if you opened one solely for service setup. Adding a user key should be done in a regular PowerShell session running as the Windows user who will use Git.
Add the private key:
ssh-add "$env:USERPROFILE\.ssh\id_ed25519"
Enter the key passphrase when prompted. Be precise about the filename: adding id_ed25519.pub is incorrect because that is the public half of the pair and cannot sign an authentication challenge.
List identities currently registered in the agent:
ssh-add -l
A successful result shows a fingerprint and key type such as ED25519. To display public identities instead of fingerprints, use:
ssh-add -L
Do not paste the output of the private-key file into a ticket, chat window, password manager note, or Git hosting site. The command that is safe to share is the public-key content:
Get-Content "$env:USERPROFILE\.ssh\id_ed25519.pub"
For GitHub, copy that single public-key line and add it in the account’s SSH and GPG keys settings as an authentication key. GitHub’s documentation is explicit that putting a private key into the local agent is only half the configuration: the corresponding public key must also be associated with the GitHub account before GitHub can recognize the key.
If your company uses GitHub Enterprise Server, GitLab, Bitbucket, Azure DevOps, or a self-hosted SSH server, add the same public key through that service’s user-key workflow instead. The agent is local to Windows; the remote service still decides whether the public key is authorized.
Make Git use Windows OpenSSH
This is where many Windows setups fail. Git for Windows may invoke its bundled MSYS2-based ssh.exe, while PowerShell uses C:\Windows\System32\OpenSSH\ssh.exe. GitHub documents this split directly: a key can appear in the Windows agent and direct SSH tests can work, yet Git still asks for a passphrase because it is talking to a different SSH implementation.
Inspect what PowerShell resolves:
Get-Command ssh | Select-Object -ExpandProperty Source
Then check whether Git already has an SSH command override:
git config --global --get core.sshCommand
If the command returns nothing, or points to Git for Windows’ bundled client, direct Git to the native Windows OpenSSH executable:
git config --global core.sshCommand "C:/Windows/System32/OpenSSH/ssh.exe"
Verify the setting:
git config --global --get core.sshCommand
This change affects Git operations for the current Windows user. It does not alter the SSH client used by WSL, Git Bash sessions deliberately configured around a separate agent, IDE extensions with their own SSH setting, or GUI clients that ship their own SSH stack.
For a developer who actively uses both Windows-native Git and WSL Git, keeping their credentials separate is usually clearer. WSL is a distinct Linux environment and commonly runs its own ssh-agent; loading a Windows key into the Windows service does not automatically configure a Linux shell inside WSL.
Test GitHub and the repository remote
After uploading the public key to GitHub, test the account-level SSH connection:
ssh -T [email][email protected][/email]
On the first connection, Windows may ask whether to trust GitHub’s host key. Verify the fingerprint against GitHub’s published SSH host-key fingerprints before accepting it. A successful result identifies your GitHub username and explains that GitHub does not provide shell access. GitHub documents that this test commonly exits with code 1; the success message is what matters.
Now inspect the remote URL inside an existing repository:
git remote -v
For SSH authentication, the fetch and push URLs should look like this:
origin  [email][email protected][/email]:OWNER/REPOSITORY.git (fetch)
origin  [email][email protected][/email]:OWNER/REPOSITORY.git (push)
If the remote begins with https://, Git will continue to use HTTPS authentication, typically a token or credential manager entry. The SSH agent cannot eliminate prompts for an HTTPS remote because SSH is not involved.
Change an existing origin remote to SSH only when that is the intended authentication method:
git remote set-url origin [email][email protected][/email]:OWNER/REPOSITORY.git
git remote -v
Finally, perform a read-only Git operation:
git fetch
A successful fetch without a passphrase prompt confirms the complete chain: Git is using an SSH URL, Git invokes Windows OpenSSH, Windows OpenSSH reaches the running ssh-agent service, and the remote recognizes the public key.
Remove a key when access should end
The agent is a convenience mechanism, not a reason to retain access forever. Remove one key by its path:
ssh-add -d "$env:USERPROFILE\.ssh\id_ed25519"
Or remove all identities from the agent:
ssh-add -D
Then remove the public key from GitHub or the relevant Git service if the laptop is being sold, replaced, lost, or moved out of service. Deleting only the local file does not revoke a public key that remains authorized on a remote account, and removing only the remote public key does not clean up a private key left behind on the device.
The practical result is straightforward: after the agent is enabled, the key is loaded, Git is pinned to Windows OpenSSH, and the repository uses an SSH URL, normal Git operations authenticate without repeatedly asking for the SSH key passphrase.
