
ERROR_FILE_NOT_FOUND.The practical fix is to work from the least invasive repair outward: restart and run the built-in troubleshooter, rebuild the Windows Update cache, then repair the Windows image with Deployment Image Servicing and Management (DISM) and System File Checker (SFC). Do not jump straight to registry edits, third-party “repair” utilities, or copying DLL files from another PC. Those approaches can turn an update problem into a servicing problem that is harder to diagnose.
This procedure applies to Windows 11 and can still be used on Windows 10 version 22H2, but Windows 10 reached end of support on October 14, 2025. A successful update scan on Windows 10 does not restore normal free security-update support.
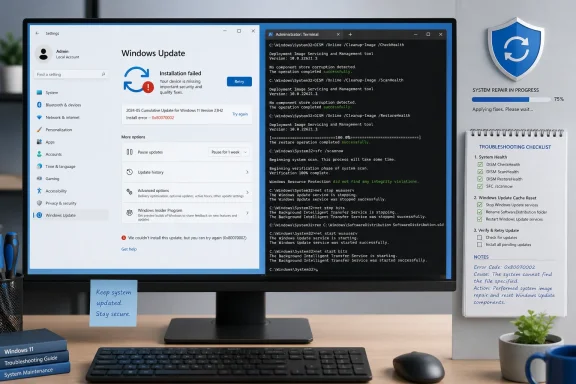 Confirm that 0x80070002 is the active failure
Start at Settings > Windows Update > Update history and identify the exact update that failed. Record its KB number if one is shown, such as KB50xxxxx, and note whether the failure occurs while downloading, installing, or restarting. The same hexadecimal code can be the visible symptom of different faults, so this detail determines whether a cache reset is likely to help.
Before changing anything, restart the PC once. A pending reboot can leave the servicing stack midway through an operation and cause the next update attempt to fail for reasons that look like missing files. After restarting, return to Windows Update and select Check for updates.
On Windows 11, Microsoft now directs users first to the Windows Update troubleshooter through the Get Help app. You can also reach it through Settings > System > Troubleshoot > Other troubleshooters, then select Run beside Windows Update. Let it finish, restart if prompted, and try the update again.
If the error immediately returns, check two simple conditions before rebuilding anything:
- Make sure the system drive has enough free space for the update and its temporary working files. Feature updates, cumulative updates, and component-store repairs can require several gigabytes beyond the final installed size.
- Confirm that the PC has a reliable internet connection and that its date, time, and time zone are correct. A wrong clock can interfere with update authentication and download validation.
If one specific driver update is failing, especially an optional driver supplied through Windows Update, do not assume that repairing Windows will fix the driver package. Note the manufacturer and device name, then check the PC maker’s support page for a current driver. The Windows Update cache reset below is still reasonable, but it cannot correct a vendor’s bad or inapplicable driver package.
Rebuild the SoftwareDistribution cache safely
The C:\Windows\SoftwareDistribution directory holds Windows Update’s local download files and data store. Microsoft Support explicitly recommends clearing its contents for corrupt cached update files, and its advanced procedure also documents renaming the folder alongside Catroot2.
The important distinction is that this is a cache rebuild, not an uninstall operation. It does not remove updates already installed on the PC. It does, however, force Windows to download pending packages again and can clear the visible Windows Update history list because the local update data store is rebuilt. If you need the record of installed patches, use Update history > Uninstall updates or your organization’s patch-management records rather than treating the cache as an audit log.
Open Terminal (Admin), Windows PowerShell (Admin), or Command Prompt (Admin). Then run the following commands one at a time:
net stop bits
net stop wuauserv
ren %systemroot%\SoftwareDistribution SoftwareDistribution.bak
ren %systemroot%\System32\catroot2 Catroot2.bak
net start bits
net start wuauserv
This is safer than manually deleting files while Windows Update is active. Renaming preserves a rollback copy until you verify that the update succeeds; Windows creates new SoftwareDistribution and Catroot2 folders as it scans again.
A few command results require interpretation:
- If
net stop wuauservreports that the service was not started, continue. There is nothing to stop. - If the rename command says the folder already exists, check whether a previous repair left
SoftwareDistribution.bakorCatroot2.bakbehind. Rename that older backup to a different name or remove it only after confirming it is not needed. - If Windows says a folder is in use, restart the PC and repeat the commands before opening Windows Update. Do not delete locked files by force.
Microsoft’s current Support article gives the same core service-reset sequence: stop Background Intelligent Transfer Service (BITS) and Windows Update, rename the two folders, start both services, and restart. The frequently circulated advice to stop a long list of additional services is unnecessary for this targeted repair and increases the chance of leaving a machine in an odd state.
Restart after the cache reset, then go to Settings > Windows Update and select Check for updates. Allow Windows to complete a fresh scan and download. If the failed KB now installs, the original issue was likely confined to local update metadata or a damaged download.
Keep the .bak folders until the update has installed and the PC has restarted successfully. You can delete them later to reclaim disk space, but there is no operational benefit to removing them immediately.
Repair the servicing image with DISM, then run SFC
If the update still fails with 0x80070002 after a clean download, repair Windows’ servicing image. This is where DISM and SFC serve different purposes, and their order matters.
DISM checks and repairs the component store that Windows uses as a source for protected system components. SFC then scans the active operating system and replaces protected files that do not match the repaired source. Microsoft Learn’s Windows Update corruption guidance specifies this order: run DISM.exe /Online /Cleanup-Image /RestoreHealth, then run sfc /scannow, and only then retry Windows Update.
Open an elevated terminal and run:
DISM.exe /Online /Cleanup-Image /RestoreHealth
The command can appear to pause at certain percentages. Leave the window open and let it complete; interrupting DISM creates no advantage and may leave diagnosis incomplete. On a normally configured home or small-business PC with internet access, DISM uses Windows Update as its repair source.
A successful result should say that the restore operation completed successfully. If DISM fails because it cannot obtain source files, the problem may be your update source rather than local corruption. This is particularly relevant on managed devices that use Windows Server Update Services (WSUS), Configuration Manager, or update policies that redirect clients away from public Windows Update. Microsoft’s enterprise troubleshooting guidance notes that a WSUS-scanning client can receive a different update set and has separate server-policy and connectivity dependencies.
Once DISM completes successfully, run:
sfc /scannow
Wait for verification to reach 100 percent. SFC may report one of several outcomes:
- “Windows Resource Protection did not find any integrity violations” means it found no protected-file corruption.
- “Windows Resource Protection found corrupt files and successfully repaired them” means restart the PC and retry the update.
- A message that SFC found corruption but could not repair some files means the repair is incomplete; do not declare the update problem solved merely because the scan finished.
DISM and SFC logs can be useful when the repair fails or repeats. Microsoft Learn identifies C:\Windows\Logs\CBS\CBS.log as the primary CBS log path for servicing issues. For an individual PC, it is usually enough to retain that log and the failed KB number before escalating to a manufacturer, Microsoft support channel, or internal IT team.
Retry the same update and verify the installed state
After DISM and SFC finish, restart Windows even if neither tool explicitly demands it. Then return to Settings > Windows Update, select Check for updates, download the offered update, and allow the restart phase to complete.
Verify the result in two places. First, Windows Update should show that the device is up to date or offer only newer updates. Second, open Update history and confirm that the exact KB previously failing is listed as successfully installed. For a cumulative update, you can also run winver after rebooting and compare the displayed OS build with the build documented for that month’s update.
If the same KB still fails with 0x80070002, do not keep cycling through cache resets. At that point the cache and component store have been addressed, and the remaining fault is more likely to be update-specific, policy-related, a driver conflict, a disk problem, or a servicing prerequisite issue. Microsoft Learn recommends checking for the latest servicing stack update and, when appropriate, downloading the specific KB from the Microsoft Update Catalog for a manual installation attempt.
Windows 11 also provides a stronger recovery option: Settings > System > Recovery > Fix problems using Windows Update > Reinstall now. Microsoft says this reinstalls the current version of Windows while preserving apps, files, and settings, repairing system files and components in the process. It is a sensible escalation before a reset or clean installation, but it may be unavailable on work-managed PCs and devices governed by Windows Update policies.
For an unmanaged PC, the cache reset followed by DISM and SFC is the appropriate boundary for a 20-minute repair attempt. If 0x80070002 survives all three stages, preserve the KB number and logs rather than applying increasingly aggressive internet fixes: the evidence now points beyond a stale download cache.