
The important distinction is that an open handle is not necessarily an obvious open document. File Explorer thumbnail generation, an Office app’s recent-file preview, an antivirus scan, a backup client, a terminal window whose current directory is on the USB drive, or a media player can all retain access after you think you are finished. The safe fix is to identify that process and close it normally, then eject the correct device again.
Microsoft also documents two external-drive removal policies, Quick removal and Better performance. Those settings affect write caching and the risk from disconnecting without an eject operation; they do not explain away a live process lock. Changing the policy may be appropriate for how a drive is used, but it is not a cure for the “device currently in use” message.
 Start with a clean, low-risk eject attempt
Before investigating handles, stop activity that can still be writing to the drive. Wait for file copies, sync jobs, photo imports, video exports, backup tasks, and command-line operations to finish. Close every File Explorer window showing the removable drive, including windows opened directly into a folder on that drive.
Then use the normal Windows removal command:
- Select the hidden-icons arrow in the taskbar notification area if necessary.
- Right-click Safely Remove Hardware and Eject Media.
- Choose Eject followed by the drive’s actual label or device name.
- Disconnect the device only after Windows displays the safe-removal notification.
On Windows 11, Microsoft also provides a Settings route: Settings > Bluetooth & devices > Devices, locate the device under Other devices, and select Remove device. The taskbar eject command is generally the clearer option for USB storage because it is designed to flush and take the storage device offline.
Make sure the drive you select is the right one. A multi-card reader, USB dock, or external enclosure can expose several removable entries. If the listed device names are vague, open File Explorer first and note the volume label and drive letter—such as ARCHIVE (E:)—before ejecting anything.
If Windows reports that the device is in use, leave it connected. The drive is still mounted, and removing it at this point can interrupt an unfinished metadata update even when no copy-progress window is visible.
Use Resource Monitor to find the process holding the USB drive
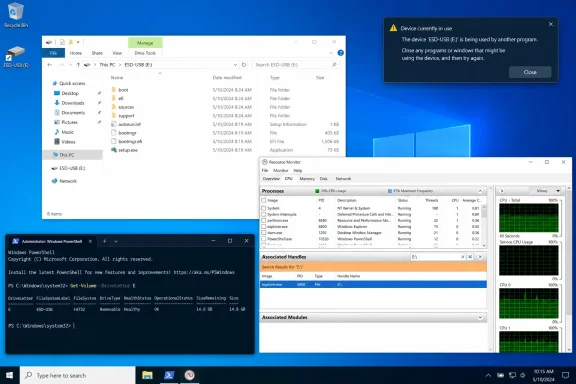
Resource Monitor is built into Windows 10 and Windows 11 and is the best first tool for finding a program with an open file or folder on the removable drive. It identifies file-based access, which is more useful here than simply checking which program has a high overall number of Windows handles.
Open it with either method:
- Press Win + R, type
resmon, and press Enter. - Open Task Manager, select Performance, then choose Open Resource Monitor near the bottom of the window.
In Resource Monitor, select the CPU tab. At the bottom of that tab, expand Associated Handles. In the search field, enter the USB drive letter followed by a colon—for example, E:—and wait a few seconds for the results to narrow.
The results show handle names and the processes that opened them. A hit resembling E:\Projects\report.xlsx tells you both what is open and which executable owns it. Search with the drive letter first, rather than a folder name, because that catches handles anywhere on the volume.
Interpret the results before shutting anything down:
- If the process is
WINWORD.EXE,EXCEL.EXE, an image editor, a media player, or a file-compression tool, save work and exit the application normally. - If it is a sync, backup, indexing, or security product, pause its job or use the program’s own exit command before trying again.
- If it is
explorer.exe, close File Explorer windows that point to the USB drive. Give Windows a moment, then search again; Explorer may be holding a preview, thumbnail, or folder view. - If it is
cmd.exe,powershell.exe, or Windows Terminal, check whether that session’s current folder is on the removable drive. Change to a local path such asC:\Users\<your-name>or close the session.
Resource Monitor can show more than one result. Close the process that is actively using the volume, run the same E: search again, and repeat until the result list is empty or no longer points to the removable drive. Then retry the taskbar’s Eject command.
A process may disappear from the list on its own after it finishes a scan or completes a delayed write. That is why waiting briefly after closing an app is worthwhile. Immediately killing processes can turn a small removal problem into lost unsaved work.
Task Manager can stop the app, but it cannot prove the exact lock
Task Manager is useful once Resource Monitor has named the offending executable. It is not a substitute for Resource Monitor because the Handles count in Task Manager is the total number of object handles owned by a process; it does not show which handle belongs to E:.
Press Ctrl + Shift + Esc to open Task Manager. On the Processes page, find the application Resource Monitor identified and select End task only if the program will not close normally. For a background app, expand grouped entries first so you do not terminate the wrong component.
The Details page is more useful when several similar processes are running. Match the process name and PID shown in Resource Monitor to the PID in Task Manager, then end that exact process. You can add the PID column in Details if it is not visible by right-clicking a column heading and choosing the appropriate column.
Use End task with restraint. It is reasonable for a stuck media player, an abandoned command prompt, or an application that has already stopped responding. It is a poor first choice for applications that may still be writing data, including backup software, database tools, encryption software, editors, or cloud-sync clients. Closing the application normally gives it a chance to flush its own files and release the drive safely.
Do not confuse “System” or a Windows service with proof that Windows itself is malfunctioning. Antivirus and indexing activity often appears through service-hosted components, while some storage activity takes a moment to settle after a copy. First confirm that all user applications have released E: and wait. If the drive remains blocked by a service repeatedly, identify the installed security, backup, or synchronization product responsible and adjust its schedule or exclusions according to the organization’s policy rather than terminating core Windows processes.
For deeper investigation, Microsoft’s Sysinternals Process Explorer can search for handles by drive letter and display handles in a lower pane. It is useful for administrators, but its Close Handle command is deliberately not the normal remedy. Forcibly closing a handle bypasses the owning program’s cleanup path and can leave that program unstable or cause data loss. Close the owning application instead; reserve forced handle closure for a tested support procedure or a disposable process with no unsaved data.
Check Device Manager’s removal policy without mistaking it for a lock fix
Windows stores a removal policy per external storage device. To view it, keep the USB drive connected, right-click Start, and choose Device Manager. Expand Disk drives, right-click the matching USB storage device, choose Properties, and open the Policies tab.
If Properties opens without a Policies tab, Microsoft’s documented path is to select the Hardware tab, choose the removable disk from the list, select Properties, and then look for Policies there. USB enclosures often advertise generic model names, so use the device capacity, manufacturer, or the physical drive’s temporary disconnection and reconnection to avoid changing the policy for the wrong disk.
The two choices have different purposes:
- Quick removal tells Windows to manage the device so it is ready for removal without relying on write caching. Microsoft says this can reduce performance because Windows cannot cache disk writes in the same way.
- Better performance permits write caching to improve performance. Microsoft says you must use Safely Remove Hardware before disconnecting, because the eject operation ensures cached writes have finished.
Since Windows 10 version 1809, Microsoft has made Quick removal the default policy for external storage media. That lowered the risk of a casual unplug, but it did not make unplugging a replacement for proper ejection in every situation. An application can still be writing directly to the volume, keeping a file open, or updating its own data when the cable is pulled.
For ordinary USB flash drives used for documents and occasional transfers, Quick removal is usually the sensible setting. For an external SSD or hard drive used for sustained transfers, Better performance can be appropriate—but only when users consistently eject it before disconnecting. If the drive contains irreplaceable material, treat safe eject as mandatory under either policy.
If the drive was unplugged anyway, verify it before trusting it
If a drive was removed after a failed eject attempt, reconnect it and copy any important data elsewhere before making repairs. Do not write new files to it until you know the file system is healthy; new activity can complicate recovery from a damaged directory or allocation record.
Open an elevated Command Prompt and run the following command, replacing E: with the USB drive’s letter:
chkdsk E: /f
Microsoft documents that chkdsk /f fixes logical file-system errors and needs exclusive access to make repairs. Close File Explorer and every application using the drive before running it. For large external disks, avoid jumping straight to /r unless there is a reason to suspect a hardware read problem; it performs a much longer surface-oriented scan and is not the standard response to one failed eject.
A USB drive that repeatedly refuses to eject after Resource Monitor shows no application handle deserves a broader hardware check. Test a different USB port, bypass an unpowered hub or docking station, try another cable for an external drive, and test the device on another PC. Repeated disconnects, disappearing drive letters, read errors, or the need for frequent file-system repairs point beyond a simple handle conflict.
The practical rule is straightforward: find and close the owner of the drive access, eject the device, and disconnect only after Windows confirms it is safe. Removal policy changes can reduce risk or improve throughput, but they cannot safely release a file that an application still has open.
