

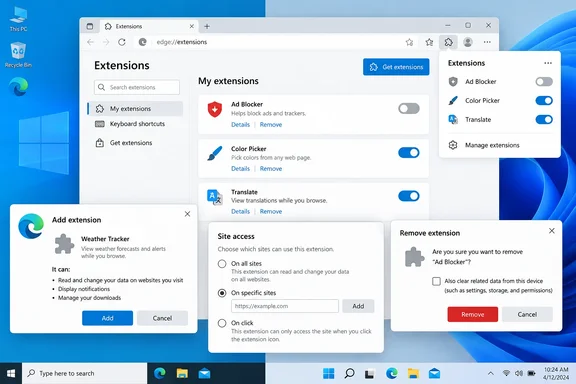
WinCentral’s extension-management walkthrough covers these everyday controls, which Microsoft also documents in its support guidance. The steps below explain the installation and removal workflows, plus Microsoft’s additional options for restricting website access and identifying organization-managed extensions.
Add an extension from Microsoft Edge Add-ons
Extensions are browser add-ons that provide functions such as password management, content blocking, or productivity tools. Before installing one, review the permissions it requests: those permissions determine what access you are being asked to grant.
To install from Microsoft’s store:
- Open Microsoft Edge.
- Select Extensions, the puzzle-piece icon to the right of the address bar. If it is not visible, select Settings and more (…) > Extensions.
- Select Get Extensions for Microsoft Edge.
- Find the extension you want and select Get.
- Read the permissions shown in the installation prompt. If you accept that access, select Add extension.
- Wait for Edge’s confirmation that the extension has been added.
The permission prompt is a decision point, not simply another confirmation to dismiss. If the requested access does not seem appropriate for the extension’s function, stop before selecting Add extension.
Install an extension from the Chrome Web Store
Microsoft also supports installing extensions designed for Google Chrome in Edge. You must open the Chrome Web Store in Edge for this workflow.
- Open the Chrome Web Store in Microsoft Edge.
- Search for the extension and open its product details page.
- Select Get extension on the banner at the top of the page, or Get on the page.
- If Edge displays an Allow extensions from other stores prompt, select Allow to proceed.
- Review the extension’s requested permissions, then select Add extension if you accept them.
- Look for the installation confirmation.
Allowing another store and approving an individual extension are separate decisions. The other-store prompt enables that installation route; the permissions prompt describes the access requested by the particular extension.
Chrome Web Store availability does not resolve every compatibility question. If an installed extension does not work, Microsoft’s FAQ recommends checking its compatibility with your Edge version, along with its enabled state and permissions.
Turn off an extension without uninstalling it
Disabling is useful when you want a temporary break from an add-on or need to investigate whether it is interfering with a website.
- Select Extensions > Manage extensions.
- Find the extension in the installed list.
- Turn off its toggle.
The extension stays in the list, but it is disabled. To restore it, return to the same page and turn the toggle on again; Microsoft documents that control for both enabling and disabling extensions.
For website appearance problems, Microsoft recommends disabling suspected extensions individually to identify the cause. Changing one at a time makes the result easier to interpret than switching off several together. If the problem disappears with a particular extension disabled, that is evidence of a possible connection—not proof that the extension is malicious.
Restrict website access instead of disabling everywhere
If you still need an extension on particular websites, Edge also provides a more targeted control. Microsoft documents this procedure for restricting its site access:
- Open Extensions > Manage extensions.
- Select Details under the extension.
- Under Site access, choose On specific sites.
- Enter the website addresses where you want the extension to work.
This is useful when your goal is to keep an extension available for selected sites rather than leave it active more broadly. Site access is a narrower adjustment than disabling the entire extension; it does not replace reviewing the full permissions request during installation.
Remove an extension completely
If you no longer need an extension, Edge offers several removal paths. Choose whichever is easiest to reach.
From its toolbar icon
- Right-click the extension’s icon beside the address bar, or select and hold it.
- Select Remove from Microsoft Edge.
- Select Remove to confirm.
From the Extensions menu
- Select Extensions beside the address bar.
- Select More actions (…) next to the extension.
- Select Remove from Microsoft Edge.
- Confirm with Remove.
You can also open Extensions > Manage extensions, locate the add-on under Installed extensions, and select Remove, then confirm. Microsoft’s FAQ says successful removal produces an “Extension removed” confirmation.
Unlike disabling, removal does not leave an installed extension that you can restore with its toggle. If you only want to test whether it is causing a problem, use the off switch first.
If an extension does not work—or cannot be managed normally
For a newly installed extension that is not working, Microsoft recommends checking that it is enabled, checking for extension updates, disabling and re-enabling it, and ensuring Edge is up to date. Its permissions can be inspected through Extensions > Manage extensions > Details. If it is installed but missing from the puzzle-piece menu, first verify that its toggle is on; Microsoft also suggests restarting Edge if it remains invisible.
On a work or school device, extension management may be controlled by your organization. Microsoft’s FAQ describes a briefcase icon beside an extension’s enable/disable control; hovering over it can identify the extension as “managed by your organization.” Consult your IT department before changing an unexpected organization-managed extension, rather than attempting to bypass its management controls.
An unexpected managed label on a personal, unmanaged PC needs different handling. Microsoft warns that extensions claiming organizational management can sometimes be malware and recommends a full scan with Microsoft Defender or another reputable antivirus program. The label alone does not establish an infection, but it is a reason to investigate instead of treating the extension as an ordinary unwanted add-on.
References
- How to Add, Disable or Remove Extensions in Microsoft Edge - thewincentral.com thewincentral.com · 2026-09-21T07:16:56+00:00
- Add, turn off, or remove extensions in Microsoft Edge | Microsoft Support support.microsoft.com
- Microsoft Edge Extensions: Frequently Asked Questions | Microsoft Support support.microsoft.com