

The fastest way to check PC specifications is to open Settings > System > About. That page lists the processor, installed RAM, system type, PC model, Windows edition, version, and OS build. This guide covers Windows 11 and Windows 10, including home PCs, local accounts, Microsoft accounts, and most work or school devices. Windows 10 reached end of support on October 14, 2025, although these tools still work on it.
Use the About page when an installer, support technician, or troubleshooting guide asks for your processor, RAM, Windows version, system architecture, or device name.
Do not post your Device ID, Product ID, serial number, or product key publicly unless a trusted support provider specifically requires it.
You can also create reports from Command Prompt:
For a text report, use:
Wait for System Information to finish collecting data. The report will appear on the current user’s desktop.
The DirectX Version on the System tab is not the same as the GPU’s supported Feature Levels. For game compatibility, check both the DirectX version and the feature levels on the relevant Display tab.
Checking properties is safe, but do not select Uninstall device, Disable device, or Update driver merely to identify the component. Those actions change the system and may interrupt graphics, networking, audio, or input-device operation.
This reports the Windows version and build, system manufacturer and model, processor information, BIOS version, memory totals, updates, boot time, and network adapters. It does not provide a complete storage-capacity report.
To save the result on the desktop, run:
To return only properties containing “version,” run:
For shorter hardware-specific results, use:
Memory and storage values returned by CIM may be expressed in bytes. For easier storage output in gigabytes, run:
Avoid relying on old
Common manufacturer utilities include:
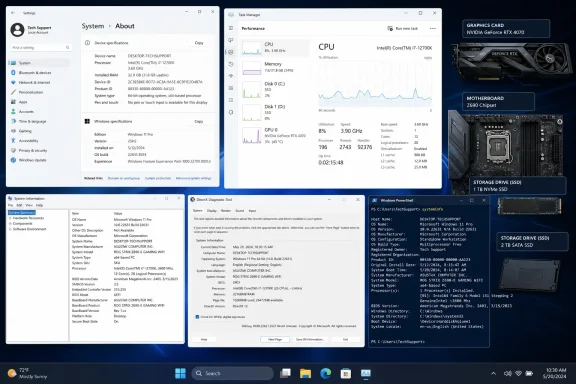 Check the main specifications in Settings
Use the About page when an installer, support technician, or troubleshooting guide asks for your processor, RAM, Windows version, system architecture, or device name.- Press Windows key + I to open Settings.
- Select System.
- Scroll down and select About.
- Review Device specifications:
- Device name: The PC’s network name.
- Model: The manufacturer’s model name, when Windows can identify it.
- Processor: The installed CPU model.
- Installed RAM: The amount of physical memory installed.
- Device ID: An identifier generated for the Windows device.
- Product ID: An identifier associated with the Windows installation.
- System type: Shows whether Windows and the processor use a 64-bit or 32-bit architecture.
- Pen and touch: Reports touch or pen support.
- Review Windows specifications:
- Edition: Such as Windows 11 Home, Pro, Enterprise, or Education.
- Version: The installed Windows feature-update version.
- Installed on: When the current Windows installation or feature update was installed.
- OS build: The exact Windows build and revision.
- Experience: The installed Windows Feature Experience Pack.
Do not post your Device ID, Product ID, serial number, or product key publicly unless a trusted support provider specifically requires it.
Check the exact Windows version with Winver
The About page is best for a combined hardware and Windows summary. Use Winver when you only need the Windows edition, version, and build.- Press Windows key + R.
- Type:
winver- Press Enter.
- Read the Windows edition, version, and OS build in the About Windows dialog.
- Select OK when finished.
Check storage capacity and free space
The About page does not show the complete storage layout. Use Storage settings for space usage or Disks & volumes for individual physical disks and partitions.View storage usage
- Open Settings.
- Select System > Storage.
- Review the capacity and usage of the Windows system drive.
- Select a category, such as Installed apps, Temporary files, or Other, to see what is consuming space.
- If the PC has multiple drives, expand Advanced storage settings.
- Select Storage used on other drives.
- Choose a drive to see its capacity, free space, and usage categories.
Identify whether a drive is an SSD or HDD
- Open Settings > System > Storage.
- Expand Advanced storage settings.
- Select Disks & volumes.
- Locate the required disk or volume.
- Select Properties where available to review its details.
- Open Start.
- Search for Defragment and Optimize Drives.
- Open the matching result.
- Check the Media type column.
Use Task Manager for live CPU, RAM, disk, and GPU details
Task Manager combines hardware identification with real-time utilization. It is especially useful when checking whether an application is exhausting CPU, memory, disk, network, or graphics resources.- Press Ctrl + Shift + Esc.
- If necessary, select Performance in the left navigation pane.
- Select each hardware category to inspect it.
- Processor model
- Current utilization and speed
- Base speed
- Number of sockets
- Physical cores
- Logical processors
- Virtualization status
- Cache sizes
- System uptime
- Installed and usable memory
- Current usage
- Memory speed
- Slots used
- Form factor
- Hardware-reserved memory
- Drive model
- Capacity and formatted capacity
- SSD or HDD status on supported hardware
- Active time
- Read and write speed
- Graphics processor name
- GPU utilization
- Dedicated GPU memory
- Shared GPU memory
- Driver version and date
- DirectX version
- Physical location
Get a complete report with System Information
System Information is the best built-in tool for a broad, support-ready inventory. It includes the PC manufacturer and model, BIOS or UEFI version, motherboard information, memory totals, Secure Boot state, hardware resources, components, drivers, and software environment.- Press Windows key + R.
- Type:
msinfo32- Press Enter.
- Select System Summary.
- Check important fields such as:
- OS Name
- Version
- System Manufacturer
- System Model
- System Type
- Processor
- BIOS Version/Date
- BaseBoard Manufacturer
- BaseBoard Product
- Installed Physical Memory
- Total Physical Memory
- BIOS Mode
- Secure Boot State
- Expand Components for display, storage, sound, network, USB, and other hardware.
- Expand Software Environment for drivers, services, startup programs, and running tasks.
- Open Start and search for System Information.
- Right-click System Information.
- Select Run as administrator.
- Approve the User Account Control prompt.
Save a System Information report
- In System Information, select File > Save to create an
.nfofile that can be reopened in System Information. - Alternatively, select File > Export to create a plain-text report.
- Choose a folder and file name.
- Select Save.
.nfo report can contain device names, network configuration, installed software details, and other potentially sensitive information. Review it before posting it publicly.You can also create reports from Command Prompt:
msinfo32 /nfo "%USERPROFILE%\Desktop\PC-Specs.nfo"For a text report, use:
msinfo32 /report "%USERPROFILE%\Desktop\PC-Specs.txt"Wait for System Information to finish collecting data. The report will appear on the current user’s desktop.
Check the graphics card and DirectX support with DxDiag
Use the DirectX Diagnostic Tool when checking game requirements, graphics drivers, audio devices, display problems, or the installed DirectX version.- Press Windows key + R.
- Type:
dxdiag- Press Enter.
- If prompted to check whether drivers are digitally signed, select Yes.
- Open the System tab to review:
- PC manufacturer and model
- BIOS information
- Processor
- Memory
- Windows build
- DirectX version
- Open each Display or Render tab to review:
- GPU name
- Manufacturer
- Display memory
- Display mode
- Driver model
- Driver version and date
- DirectX feature levels
- Open the Sound tabs for audio devices and drivers.
- Open Input for connected input devices.
The DirectX Version on the System tab is not the same as the GPU’s supported Feature Levels. For game compatibility, check both the DirectX version and the feature levels on the relevant Display tab.
Inspect a specific component in Device Manager
Device Manager is useful when you need an installed device’s exact name, driver version, hardware ID, or error status.- Right-click Start.
- Select Device Manager.
- Expand the relevant category:
- Display adapters for graphics cards
- Processors for CPU entries
- Disk drives for storage device models
- Network adapters for Ethernet and Wi-Fi hardware
- Sound, video and game controllers for audio hardware
- Bluetooth for Bluetooth adapters and devices
- Right-click the required device.
- Select Properties.
- Check:
- General for the device status
- Driver for provider, date, version, and signer
- Details for hardware IDs and other properties
- Events for installation and configuration history
Checking properties is safe, but do not select Uninstall device, Disable device, or Update driver merely to identify the component. Those actions change the system and may interrupt graphics, networking, audio, or input-device operation.
Use Command Prompt or PowerShell for text output
Commands are useful when you need to paste specifications into a support case, compare several PCs, or save results to a file.Command Prompt system summary
- Open Start.
- Search for Command Prompt.
- Open it and run:
systeminfoThis reports the Windows version and build, system manufacturer and model, processor information, BIOS version, memory totals, updates, boot time, and network adapters. It does not provide a complete storage-capacity report.
To save the result on the desktop, run:
systeminfo > "%USERPROFILE%\Desktop\systeminfo.txt"PowerShell computer summary
Open Windows Terminal or PowerShell, then run:Get-ComputerInfoTo return only properties containing “version,” run:
Get-ComputerInfo -Property "*version"For shorter hardware-specific results, use:
Code:
Get-CimInstance -ClassName Win32_Processor |
    Select-Object Name, NumberOfCores, NumberOfLogicalProcessors, MaxClockSpeed
Code:
Get-CimInstance -ClassName Win32_ComputerSystem |
    Select-Object Manufacturer, Model, SystemType, TotalPhysicalMemory
Code:
Get-CimInstance -ClassName Win32_BIOS |
    Select-Object Manufacturer, SMBIOSBIOSVersion, ReleaseDate, SerialNumber
Code:
Get-CimInstance -ClassName Win32_VideoController |
    Select-Object Name, DriverVersion, AdapterRAM
Code:
Get-CimInstance -ClassName Win32_LogicalDisk -Filter "DriveType=3" |
    Select-Object DeviceID, VolumeName, Size, FreeSpace
Code:
Get-CimInstance -ClassName Win32_LogicalDisk -Filter "DriveType=3" |
    Select-Object DeviceID,
        @{Name="SizeGB";Expression={[math]::Round($_.Size/1GB,2)}},
@{Name="FreeGB";Expression={[math]::Round($_.FreeSpace/1GB,2)}}wmic commands. Microsoft deprecated the WMIC command-line utility, and it may be absent from current Windows installations. WMI itself remains available through supported PowerShell commands such as Get-CimInstance.Find the exact PC model and serial number
Start with Settings > System > About or the System Model field inmsinfo32. If Windows reports a generic model, use the manufacturer’s support application or inspect the label attached to the computer.Common manufacturer utilities include:
- Microsoft Surface: Open the Surface app and expand Device information.
- Dell or Alienware: Use SupportAssist to identify the model, Service Tag, and warranty-linked device details.
- HP: Open HP Support Assistant, select the PC, and review its specifications.
- Lenovo: Open Lenovo Vantage and review the device or system information area.
- ASUS: Open MyASUS and select System Info.
Resolve missing or conflicting specifications
If two tools disagree, match the tool to the information you need:- Installed RAM is lower than expected: Check Task Manager > Performance > Memory for hardware-reserved memory. Also confirm that each memory module is detected by the PC’s firmware.
- Storage is smaller than advertised: Check Settings > System > Storage > Advanced storage settings > Disks & volumes for partitions and unallocated or reserved capacity.
- Dedicated GPU is missing: Check every entry under Task Manager > Performance and Device Manager > Display adapters. A missing or warning-marked GPU may require a manufacturer-supported driver.
- Model name is blank or generic: Check
msinfo32, the manufacturer’s support utility, the firmware setup screen, or the physical service label. - DxDiag shows an old driver: Compare its driver version with Device Manager > Display adapters > device Properties > Driver. Obtain updates through Windows Update or the PC/GPU manufacturer.
- System Information opens blank or stops responding: Restart Windows and run
msinfo32again as administrator. If only a report is required, trysysteminfoorGet-ComputerInfo. - A work PC hides information or blocks tools: Organization policy may restrict Settings, Terminal, Device Manager, or System Information. Contact the organization’s administrator rather than attempting to bypass the restriction.
References
- Primary source: Technobezz
Published: 2026-07-13T18:45:16.930000+00:00
How to Check PC Specs on Windows in 2026 | Technobezz
How to check PC specs on Windows using Settings, Task Manager, System Information, DxDiag, commands, and official PC maker tools.www.technobezz.com
