Fix High RAM Usage in Windows 10/11: Find Memory Hogs, Limit Background Apps, and Stop Leaks
Difficulty: Intermediate | Time Required: 20 minutesHigh RAM usage can make Windows feel sluggish, cause stutters in games, slow down tab switching, and trigger “Low memory” warnings—even on PCs that should feel fast. The good news: most “mystery” memory use comes from a handful of common causes—one or two runaway apps, too many background starters, browser tab bloat, or a memory leak from a driver/app.
This guide walks you through finding the memory hogs, reducing background usage safely, and spotting the signs of leaks in Windows 10 and Windows 11.
Prerequisites
Quick walkthrough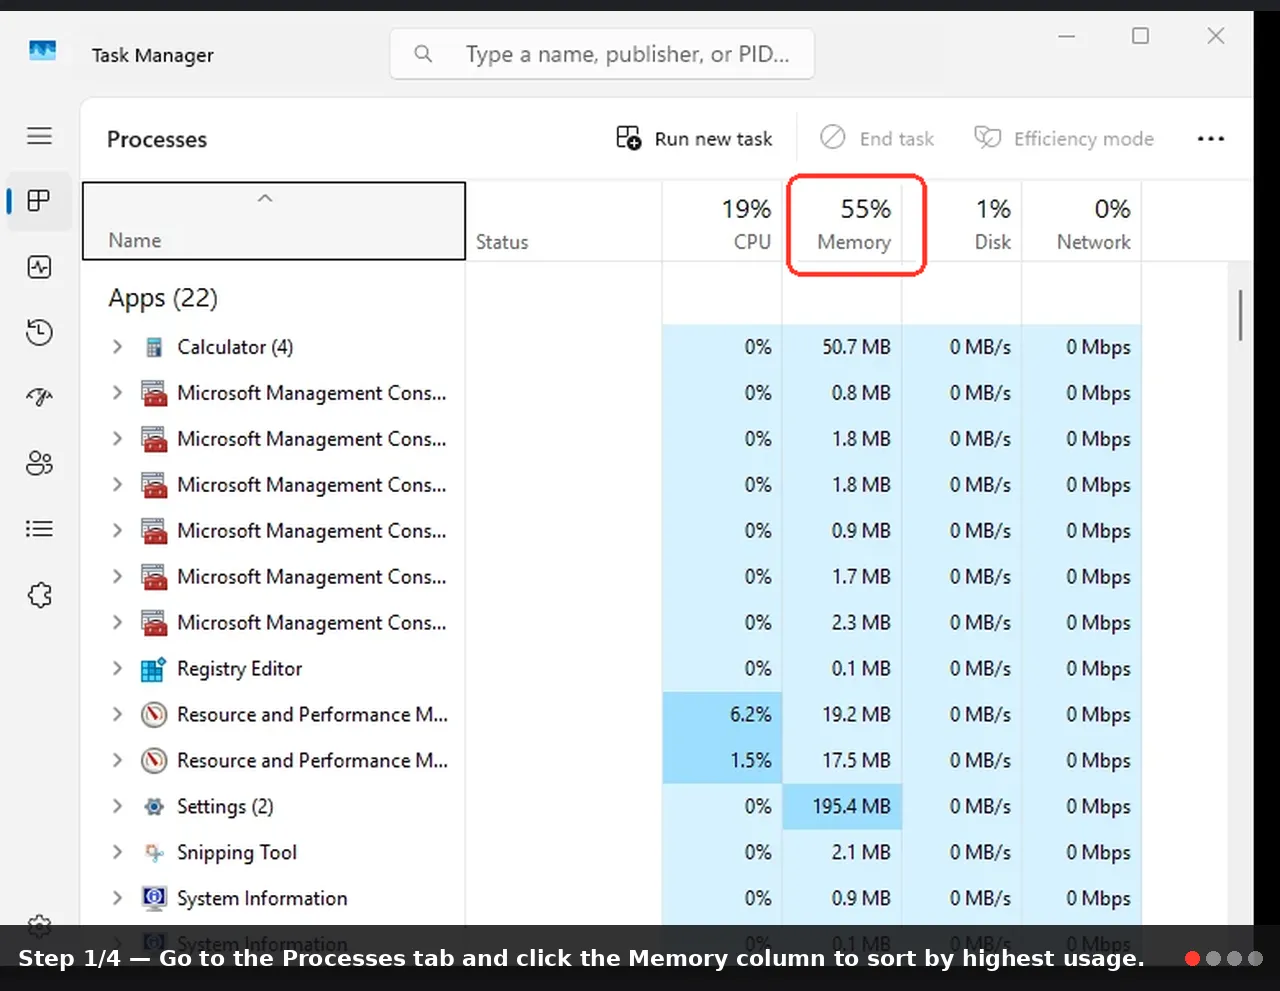
- Windows 10 (1909+) or Windows 11 (any current build)
- A user account with Administrator access (for some steps)
- Optional but helpful: a few minutes of “normal use” after boot so memory patterns settle
Note: If your PC only has 4–8 GB RAM, Windows may run “high” under load simply because modern browsers and apps are heavy. The steps below still help—especially background trimming and leak detection.
Step-by-step: Diagnose and fix high RAM usage
1) Confirm the symptoms (Task Manager basics)
- Press Ctrl + Shift + Esc to open Task Manager.
- If it opens in compact view, click More details.
- Go to the Processes tab and click the Memory column to sort by highest usage.
- Look for:
- A single app using an unusually large amount (example: browser at 6–12 GB)
- Multiple mid-sized apps adding up
- “Antimalware Service Executable” or “Service Host” spikes (often temporary)
- Click the Performance tab → Memory to review:
- In use (Compressed): active memory usage
- Available: what’s left before paging begins
- Committed: if this is near the limit, you’ll feel slowdowns
Tip: If Memory is consistently 80–95% while you’re not doing much, you likely have too many background apps, an overly heavy browser session, or a leak.
2) Identify the real memory hogs (Details view + Resource Monitor)
Task Manager’s “Processes” is good, but for deeper clarity:- In Task Manager, go to Details.
- Right-click any column header → Select columns.
- Enable:
- Commit size
- Working set (memory)
- Click Working set and find processes that stay high and keep growing.
- Press Win + R, type
resmon, press Enter. - Open the Memory tab.
- Sort by Commit (KB) and then by Working Set (KB).
- Look for a process that steadily climbs over time (classic leak behavior).
Warning: Don’t end random Windows processes. If you’re unsure, Google the process name or post a screenshot to WindowsForum for advice.
3) Reduce background apps at startup (biggest quick win)
Too many startup items can consume RAM all day.- Open Task Manager → Startup tab.
- For each item you don’t need immediately at boot, right-click → Disable.
Focus on: updaters, launchers, chat clients, printer helpers, RGB tools, etc.
Windows 11 / Windows 10 (Settings method):
- Open Settings → Apps → Startup.
- Toggle Off anything non-essential.
Tip: You can keep cloud sync (OneDrive) enabled if you rely on it—just be selective with everything else.
4) Limit background permissions (Windows 11 + Windows 10 nuance)
Some Store apps and modern apps run in the background.Windows 11:
- Settings → Apps → Installed apps.
- Click the three dots next to an app → Advanced options (if available).
- Under Background apps permissions, set to Never for apps you don’t need running.
- Background app control is broader:
- Settings → Privacy → Background apps.
- Turn off background access globally or per-app.
Note: Not every app supports background permission controls (especially classic Win32 desktop apps).
5) Fix browser memory bloat (Chrome/Edge/Firefox)
Browsers are the #1 “memory hog” for many users.- Close tabs you don’t need (especially video, social feeds, web apps).
- Disable or remove heavy extensions:
- Chrome/Edge: open
chrome://extensionsoredge://extensions - Enable efficiency features:
- Microsoft Edge: Settings → System and performance → enable Sleeping tabs and Efficiency mode
- Chrome: Settings → Performance → enable Memory Saver
- Identify a tab eating memory:
- Chrome: Shift + Esc (Chrome Task Manager)
- Edge: Shift + Esc (Edge Browser Task Manager)
Tip: If your browser is using lots of RAM but your PC is still responsive, that can be normal caching. The real problem is when RAM usage stays high and Windows starts paging (disk activity spikes, stutters).
6) Find and stop memory leaks (apps, drivers, and services)
A memory leak looks like “usage keeps climbing until the PC slows down.”A. Quick isolation test (clean boot style)
- Press Win + R, type
msconfig, press Enter. - Go to Services → check Hide all Microsoft services.
- Click Disable all.
- Go to Startup tab → click Open Task Manager → disable all startup items.
- Restart and observe memory behavior.
B. Watch for “Non-paged pool” growth (driver leak clue)Warning: Don’t leave your PC permanently in a clean boot state—this is a diagnostic step. Re-enable what you need once you find the culprit.
- Open Task Manager → Performance → Memory.
- Look for unusually high Paged pool / Non-paged pool that grows over time.
- Update chipset/network/audio/GPU drivers from the PC or motherboard vendor
- Update Windows (see next step)
- Remove recently added low-level utilities (VPN, “optimizer” tools, third-party firewalls)
7) Update Windows + drivers (stability and leak fixes)
- Settings → Windows Update → Check for updates.
- Install available updates and restart.
- Update GPU driver:
- NVIDIA/AMD/Intel official packages (avoid random driver sites)
- Update motherboard/laptop drivers:
- Chipset + LAN/Wi‑Fi + audio from your OEM support page
Tip: If high RAM usage started after a new driver/app install, roll it back or uninstall it as a test.
8) Adjust virtual memory (page file) to prevent crashes
This doesn’t “reduce RAM usage,” but it helps prevent app crashes and low-memory errors.- Press Win + R, type
sysdm.cpl, press Enter. - Advanced tab → Performance → Settings.
- Advanced tab → Virtual memory → Change.
- Leave Automatically manage paging file size for all drives enabled (recommended).
- Click OK and reboot if prompted.
Warning: Disabling the page file can cause instability and crashes on Windows 10/11, especially with heavy apps and games.
Tips and troubleshooting notes
- “Antimalware Service Executable” is using a lot of RAM/CPU: Often temporary during scans. Let it finish, and schedule scans for off-hours if needed.
- Lots of “Service Host” entries: Normal. Don’t kill them blindly; they host Windows services.
- RAM usage is high right after boot: Give Windows 3–5 minutes to settle and finish background indexing/updates.
- Still slow at high RAM: Check disk usage. If RAM is full and disk is at 100%, you’re paging heavily. Reducing background apps helps, but adding RAM may be the real fix.
- If usage slowly climbs only after sleep/hibernation: That often points to a driver leak. Update drivers and consider disabling Fast Startup temporarily (advanced troubleshooting).
Conclusion
By using Task Manager and Resource Monitor to identify memory hogs, trimming startup/background apps, optimizing browser behavior, and watching for leak patterns (especially driver-related), you can dramatically reduce persistent high RAM usage and regain a smooth, responsive Windows 10/11 experience—without reinstalling Windows.Key Takeaways:
- Identify the biggest RAM users using Task Manager and Resource Monitor (look for growth over time).
- Disable unnecessary startup and background activity to reclaim memory permanently.
- Browser tabs/extensions are often the largest “memory hog”—use Sleeping Tabs/Memory Saver.
- Persistent, steadily increasing memory use can indicate a memory leak—often fixed by updating/removing the offending app/driver.
This tutorial was generated to help WindowsForum.com users get the most out of their Windows experience.
Last edited by a moderator: