Install .NET SDK and Manage Multiple Versions with global.json in Windows 10/11
Difficulty: Intermediate | Time Required: 20 minutesModern .NET development moves quickly. You might have one project that requires .NET 8, another that targets .NET 9, and a newer experiment using .NET 10. Fortunately, Windows allows multiple .NET SDK versions to be installed side-by-side, and the
global.json file lets each project choose which SDK it should use.This tutorial walks you through installing the .NET SDK on Windows 10/11, checking installed versions, installing additional SDKs, and using
global.json to make project builds more predictable.Prerequisites
Before you begin, make sure you have:Quick walkthrough
- A Windows 11 PC, or a supported Windows 10 configuration.
- Current .NET releases support Windows 11 on x64, x86, and Arm64.
- Windows 10 support is limited to supported LTSC/Enterprise releases, depending on the .NET version.
- An administrator account if you plan to install .NET system-wide.
- Windows Terminal, PowerShell, or Command Prompt.
- Internet access.
- Optional but recommended: Visual Studio, Visual Studio Code, or another code editor.
Note: The .NET SDK is for building applications. If you install the SDK, you do not need to separately install the matching runtime for normal development work.
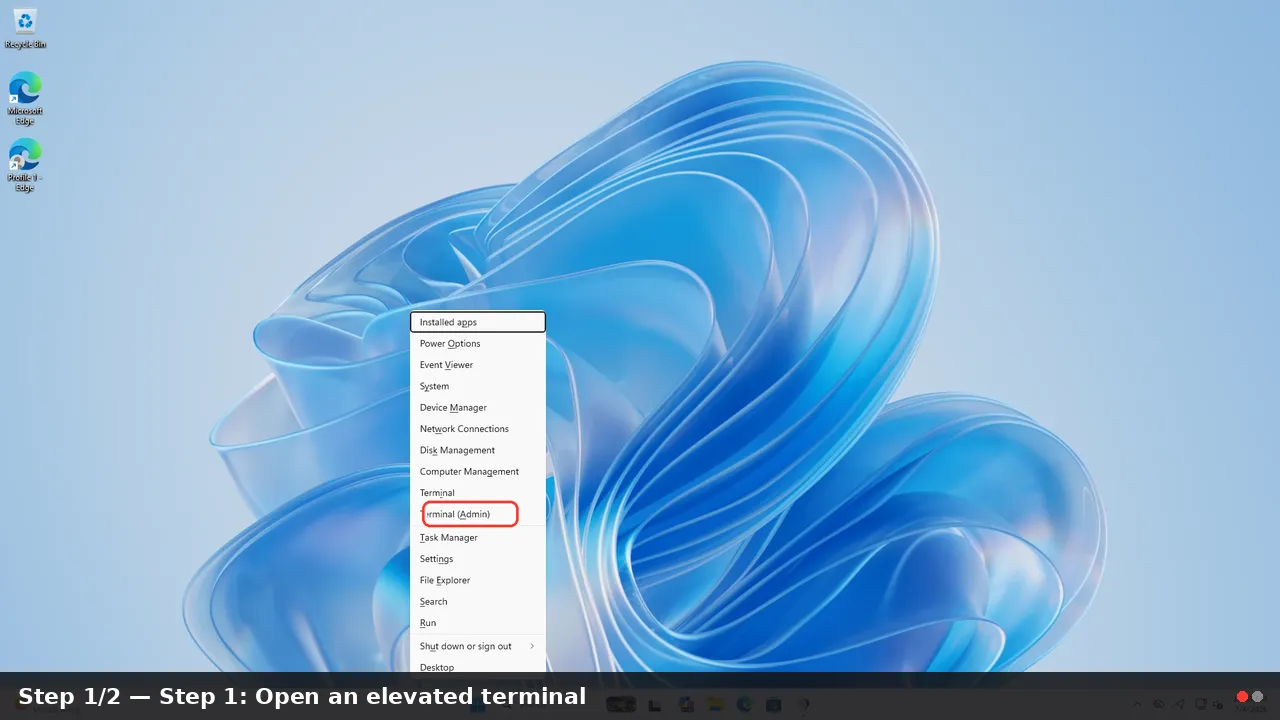
Step 1: Open an elevated terminal
- Right-click Start.
- Select Terminal (Admin) or Windows PowerShell (Admin).
- Accept the User Account Control prompt.
Using an elevated terminal is recommended because the standard .NET installers and WinGet packages install system-wide under:
C:\Program Files\dotnetStep 2: Check whether .NET is already installed
Run:dotnet --infoIf .NET is installed, you will see information about the SDK, runtime environment, installed SDKs, and installed runtimes.
To list only installed SDK versions, run:
dotnet --list-sdksExample output:
Code:
8.0.302 [C:\Program Files\dotnet\sdk]
9.0.100 [C:\Program Files\dotnet\sdk]
10.0.100 [C:\Program Files\dotnet\sdk]dotnet --list-runtimesTip: The SDK version and the project target framework are related but not the same thing. A project may targetnet8.0while being built by a newer SDK, unless you control the SDK version withglobal.json.
Step 3: Install the .NET SDK with WinGet
Windows Package Manager is the easiest command-line method for most Windows 10/11 users.To search available .NET SDK packages, run:
winget search Microsoft.DotNet.SDKInstall the current .NET SDK package you want. For example:
winget install Microsoft.DotNet.SDK.10If you need .NET 9 or .NET 8 for an older project, you can install those side-by-side:
Code:
winget install Microsoft.DotNet.SDK.9
winget install Microsoft.DotNet.SDK.8dotnet --list-sdksYou should now see multiple SDK versions listed.
Note: .NET SDKs are designed to coexist side-by-side across major and minor versions. This is exactly what makes multi-project development practical on one Windows machine.
Step 4: Alternative installation method using the .NET installer
If you prefer a graphical installer:- Go to the official .NET download page in your browser.
- Choose the .NET version you need.
- Download the SDK installer for Windows.
- Choose the correct architecture:
- x64 for most modern Intel/AMD PCs.
- Arm64 for Windows on Arm devices.
- x86 only if you specifically need 32-bit tooling.
- Run the installer.
- Select Install and follow the prompts.
- Reopen your terminal and run:
dotnet --infoWarning: If you use Visual Studio, remember that Visual Studio can install its own managed .NET SDK components. For project consistency, standalone SDK installation plusglobal.jsonis often easier to manage across teams.
Step 5: Create a test project folder
Now let’s create a sample folder to demonstrate SDK version control.- Open PowerShell.
- Create and enter a new folder:
Code:
mkdir C:\Dev\DotNetGlobalJsonDemo
cd C:\Dev\DotNetGlobalJsonDemo- Create a new console app:
dotnet new console- Run it:
dotnet runAt this point, .NET uses its normal SDK resolution rules. If no
global.json file exists, the highest installed compatible SDK is usually selected.Step 6: Create a global.json file
Aglobal.json file tells the .NET CLI which SDK version to use for commands run in that directory tree.From your project folder, run:
dotnet new globaljson --sdk-version 10.0.100 --roll-forward latestFeatureThis creates a file named:
global.jsonOpen it in your editor. It should look similar to this:
Code:
{
  "sdk": {
    "version": "10.0.100",
    "rollForward": "latestFeature"
  }
}
Important: Theversionvalue must be a full SDK version such as10.0.100,9.0.100, or8.0.302. Values like10,10.0, or10.0.xare not valid.
Step 7: Understand rollForward behavior
TherollForward setting controls what happens if the exact SDK version is not installed.Common choices include:
| Setting | What it does |
|---|---|
disable | Requires the exact SDK version. |
latestPatch | Allows newer patches within the same feature band. |
latestFeature | Allows newer feature bands within the same major/minor version. |
latestMinor | Allows newer minor versions within the same major version. |
latestMajor | Allows the highest installed SDK equal to or newer than the requested version. |
Code:
{
  "sdk": {
    "version": "10.0.100",
    "rollForward": "latestFeature"
  }
}If you need strict reproducibility, use:
Code:
{
  "sdk": {
    "version": "10.0.100",
    "rollForward": "disable"
  }
}Warning:rollForward: disableis strict. If another developer or build server does not have that exact SDK installed,dotnet buildwill fail until the correct SDK is installed.
Step 8: Verify which SDK your project uses
From the folder containingglobal.json, run:dotnet --versionThis prints the SDK selected for that directory.
Now move one level up:
Code:
cd C:\Dev
dotnet --versionglobal.json file only applies to its folder and child folders.The .NET CLI searches from your current directory upward through parent directories until it finds a
global.json file. This makes it ideal to place global.json at the root of a repository or solution.Step 9: Use different SDK versions for different projects
Create another folder:
Code:
mkdir C:\Dev\LegacyDotNetProject
cd C:\Dev\LegacyDotNetProject
dotnet new consoleglobal.json for .NET 8:dotnet new globaljson --sdk-version 8.0.302 --roll-forward latestFeatureNow run:
dotnet --versionThis project can use a .NET 8 SDK while your newer project uses a .NET 10 SDK. Both can live happily on the same Windows installation.
Tips and Troubleshooting
dotnet is not recognized
Close and reopen your terminal. If that does not work, check that this folder is in your system Path:C:\Program Files\dotnet\The wrong SDK is being used
Run:where.exe dotnetOn most 64-bit Windows systems,
C:\Program Files\dotnet\dotnet.exe should appear before any x86 path.The SDK specified in global.json cannot be found
Run:dotnet --list-sdksCompare the installed versions with the version in
global.json. Either install the missing SDK or adjust the version and rollForward settings.Avoid preview SDK surprises
If you install preview SDKs, the command line may consider them depending on your configuration. In Visual Studio, preview SDK usage depends on Visual Studio preview settings. For stable team builds, set:
Code:
{
  "sdk": {
    "version": "10.0.100",
    "rollForward": "latestFeature",
    "allowPrerelease": false
  }
}
Keep global.json in source control
Commitglobal.json to your repository so everyone on the project uses the same SDK selection rules.Conclusion
Installing multiple .NET SDK versions on Windows 10/11 is straightforward, andglobal.json gives you control over which SDK each project uses. This is especially helpful when maintaining older applications, testing new .NET releases, or keeping build behavior consistent across multiple developer machines and CI systems.Key Takeaways:
- The .NET SDK includes the runtimes needed for normal development.
- Multiple .NET SDK versions can be installed side-by-side on Windows.
- Use
dotnet --list-sdksto see what is installed. - Place
global.jsonin your solution or repository root to control SDK selection. - Use
rollForwardto balance compatibility, convenience, and reproducibility.
This tutorial was generated to help WindowsForum.com users get the most out of their Windows experience.
Last edited: