Manage Optional Windows Features with Settings, DISM, and PowerShell in Windows 10/11
Difficulty: Intermediate | Time Required: 15 minutesOptional Windows features let you add, remove, or control built-in Windows components without installing a separate third-party program. These can include tools such as OpenSSH Client, Wireless Display, Windows Sandbox, Hyper-V, .NET Framework 3.5, Telnet Client, and legacy components shown in the classic Windows Features dialog.
For everyday users, the Settings app is usually enough. For administrators, DISM and PowerShell are faster, scriptable, and useful when managing multiple PCs or troubleshooting missing components. This tutorial walks through all three methods in Windows 10 and Windows 11.
Prerequisites
Before you begin:Quick walkthrough
- Sign in with an administrator account.
- Connect to the internet if you are adding a feature that Windows must download.
- Save open work, because some feature changes require a restart.
- Make sure your Windows edition supports the feature you want. For example, Hyper-V is not available on every Windows edition.
Note: Windows 11 interface wording can vary slightly by release and cumulative update. On newer Windows 11 builds, Optional features may appear under Settings > System. On some systems, it may appear under Settings > Apps.
Method 1: Manage Optional Features Using Settings
This is the easiest method and is best for one-off changes.Windows 11
- Press Windows + I to open Settings.
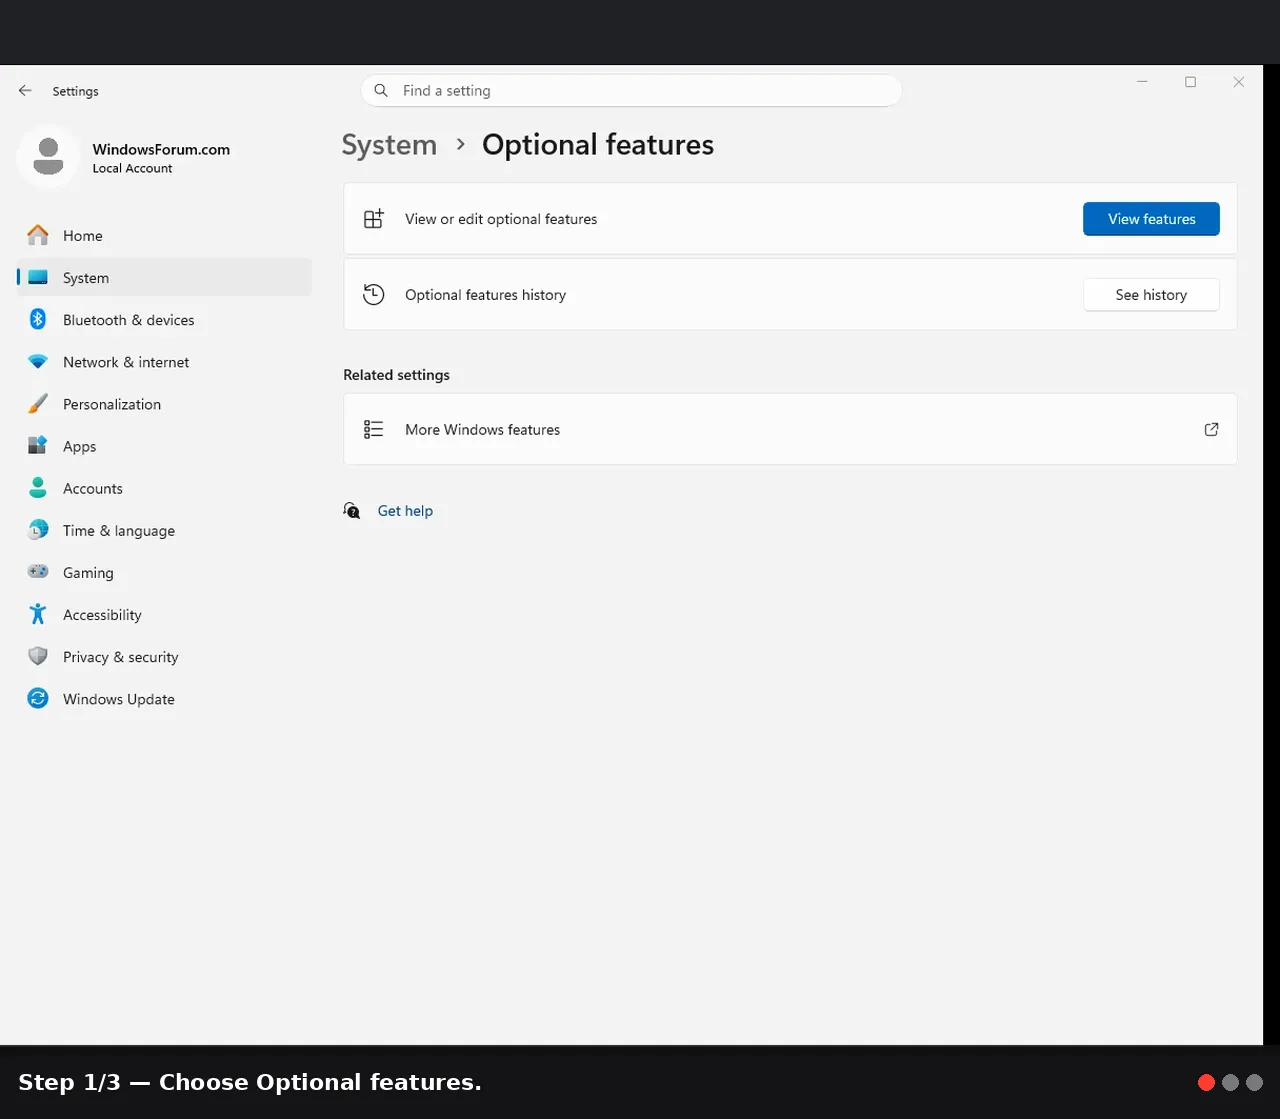
- Select System.
- Choose Optional features.
- If you do not see it there, check Settings > Apps > Optional features.
- To install a feature, select View features next to Add an optional feature.
- Search for the feature you want, such as:
OpenSSH ClientWireless DisplayWindows Fax and Scan- Check the box next to the feature.
- Select Next.
- Review the selection and select Add.
- Wait for Windows to install the feature.
- Restart if Windows prompts you.
Windows 10
- Press Windows + I to open Settings.
- Go to Apps.
- Select Apps & features.
- Choose Optional features.
- Select Add a feature.
- Search for the feature you want to install.
- Select it, then choose Install.
- Restart if required.
Removing a Feature in Settings
- Open Optional features using the steps above.
- Under Installed features, search for the feature you want to remove.
- Select the feature to expand it.
- Choose Remove.
- Restart if prompted.
Method 2: Use the Classic “Windows Features” Dialog
Some system components still appear in the older Control Panel-style interface.- Press Windows + R.
- Type:
optionalfeatures- Press Enter.
- In Windows Features, check a box to enable a feature or clear a box to disable it.
- Select OK.
- Let Windows apply the changes.
- Restart if prompted.
Common items found here include:
- .NET Framework 3.5
- Hyper-V
- Internet Information Services
- Microsoft Print to PDF
- SMB 1.0/CIFS File Sharing Support
- Windows Sandbox
- Windows Subsystem for Linux
Warning: Avoid enabling old or insecure components unless you specifically need them. For example, SMB 1.0 is a legacy file-sharing protocol and should usually remain disabled unless required for an older device or application.
Method 3: Manage Features with DISM
DISM is a built-in Windows servicing tool. It is useful for administrators, repair tasks, scripts, and offline Windows images. The examples below work against the currently running Windows installation by using/online.Open an Elevated Command Prompt
- Right-click Start.
- Select Terminal (Admin), Windows PowerShell (Admin), or Command Prompt (Admin).
- Approve the UAC prompt.
List Available Optional Features
Run:dism /online /get-features /format:tableThis shows feature names and states, such as:
EnabledDisabledDisabled with Payload Removed
View Details About a Specific Feature
Use:dism /online /get-featureinfo /featurename:Microsoft-Hyper-V-AllReplace
Microsoft-Hyper-V-All with the feature name you want to inspect.Enable a Feature
Use this format:dism /online /enable-feature /featurename:FeatureName /allExample:
dism /online /enable-feature /featurename:Microsoft-Hyper-V-All /allThe
/all switch enables required parent features when applicable.If you want to prevent an automatic restart, use:
dism /online /enable-feature /featurename:Microsoft-Hyper-V-All /all /norestartDisable a Feature
Use:dism /online /disable-feature /featurename:FeatureNameExample:
dism /online /disable-feature /featurename:Microsoft-Hyper-V-All /norestartTip: DISM feature names are exact. If a command fails, run/get-featuresagain and copy the name carefully.
Method 4: Manage Features with PowerShell
PowerShell is often the most convenient option for repeatable administration because you can filter, pipe, and script results.Open PowerShell as Administrator
- Right-click Start.
- Select Terminal (Admin) or Windows PowerShell (Admin).
- Confirm the UAC prompt.
List Optional Features
Run:Get-WindowsOptionalFeature -OnlineFor a cleaner table:
Code:
Get-WindowsOptionalFeature -Online |
Sort-Object FeatureName |
Format-Table FeatureName, State
Search for a Feature
Example:Get-WindowsOptionalFeature -Online -FeatureName *Hyper*You can replace
*Hyper* with another keyword, such as *SMB*, *Telnet*, or *IIS*.Enable a Feature
Use:Enable-WindowsOptionalFeature -Online -FeatureName Microsoft-Hyper-V-All -AllTo suppress automatic restart behavior:
Enable-WindowsOptionalFeature -Online -FeatureName Microsoft-Hyper-V-All -All -NoRestartDisable a Feature
Use:Disable-WindowsOptionalFeature -Online -FeatureName Microsoft-Hyper-V-All -NoRestartRemove Feature Payload Files
PowerShell can also remove the payload for some disabled features:Disable-WindowsOptionalFeature -Online -FeatureName FeatureName -RemoveWarning: Using-Removecan save disk space, but reinstalling the feature later may require Windows Update, installation media, or a configured repair source. Do not use it casually on systems you may need to reconfigure quickly.
Tips and Troubleshooting
Feature Installation Fails
- Make sure the PC is connected to the internet.
- Run Windows Update and install pending updates.
- Restart the PC and try again.
- If using DISM or PowerShell, confirm the feature name is correct.
Feature Is Missing
Some features depend on:- Windows edition
- Windows version
- Hardware virtualization support
- Organization policy
- Installed language or region components
Restart Pending
If a feature shows as pending, restart Windows before troubleshooting further. Some components are not fully enabled or disabled until after reboot.Use Settings for Simplicity, PowerShell for Scale
For a single home PC, Settings is usually fastest. For administrators or repeated tasks, PowerShell is easier to document, automate, and reuse.Conclusion
Managing optional Windows features is a useful skill for both home users and system administrators. Settings provides a friendly interface, the classic Windows Features dialog exposes many legacy components, DISM gives you precise command-line control, and PowerShell makes the process scriptable.By knowing all three approaches, you can quickly add tools, remove unneeded components, standardize systems, and troubleshoot feature installation issues in Windows 10 and Windows 11.
Key Takeaways:
- Use Settings for the easiest way to add or remove optional features.
- Use optionalfeatures to open the classic Windows Features dialog.
- Use DISM when you need precise command-line servicing.
- Use PowerShell for filtering, automation, and repeatable administration.
- Always check feature availability by Windows version, edition, and system requirements.
- Restart Windows when prompted to complete feature changes.
This tutorial was generated to help WindowsForum.com users get the most out of their Windows experience.
Last edited by a moderator: