

Pinned apps are one of the simplest ways to make Windows 11 feel faster, calmer, and more personal. Whether the goal is to keep work essentials within reach, turn frequently visited websites into app-like launchers, or remove the clutter left by software you rarely use, Windows 11 provides separate—but closely related—tools for the Start menu and the taskbar.
The key distinction matters. Start pins are a curated launcher inside the Start menu, where you can keep a broader collection of apps, folders, files, shortcuts, and websites. Taskbar pins are designed for the much smaller set of programs opened repeatedly throughout the day. Treating those spaces differently is the foundation of an efficient Windows 11 desktop.
Windows 11 has also moved beyond the live-tile workflows associated with Windows 10. There are no tile sizes to adjust, no tile groups in the old sense, and no supported way to move the primary taskbar to the top or sides of the screen. Instead, the focus is on pinning, reordering, folders, app-like websites, and a Start layout that can remember the views you prefer.
At a glance, Start and the taskbar can appear to do the same job. Both display app icons, both allow rearranging, and both support right-click menus. Their purposes, however, are different enough that using each intentionally can improve everyday productivity.
A practical taskbar might include only a few essentials:
This method works well for classic desktop programs, Microsoft Store apps, many Windows utilities, and installed web applications. It is also useful when an app does not appear prominently in the All view.
To pin from All:
This is a strong option for people who often drill down through the same locations. A folder such as
A compact layout might look like this:
Unpinning removes only the shortcut from Start or the taskbar. The program remains installed, its files remain intact, and it can still be found through Search, All, File Explorer shortcuts, or its installation directory.
Unpinning is therefore a low-risk way to refine the interface. It is worth removing shortcuts that are not genuinely useful. A smaller set of pins makes the remaining apps easier to see and faster to launch.
The distinction is important. A website shortcut typically opens in the browser. A web app, often based on Progressive Web App technology, can open in its own window and may behave more like a traditional desktop app.
A web app is especially effective for services such as:
For a standard shortcut:
On shared devices, keep especially sensitive services unpinned, use a locked Windows account, and ensure browser profiles and passwords are protected.
This option is ideal for users who rely on Start as their primary launcher and maintain a sizeable collection of pins. It is less useful for people who prefer a minimalist Start menu and launch most apps from Search or the taskbar.
Right-click an empty part of the taskbar and select Taskbar settings. From there, the interface can be simplified by adjusting several options.
This can lead to several scenarios:
The practical first step is simple: try the ordinary unpin and reorder controls. If the layout reverts, the behavior is likely being managed by the organization rather than caused by a local Windows malfunction.
For classic desktop software, opening the program first and pinning its running taskbar icon can sometimes succeed when a Start-based option is unavailable.
For websites, confirm that the pinned item leads to the correct page. A shortcut may point to a temporary sign-in page, a redirect URL, or a browser profile that is no longer in use.
It can also help to use Start folders for categories that do not need constant taskbar access. This preserves the taskbar for active work while keeping less frequent tools only a few clicks away.
A useful rule is:
Use the taskbar as a compact command strip for the applications that define the day. Use Start as a broader, structured library for workflows, folders, web tools, and secondary software. Use folders to prevent Start from becoming a wall of icons, and use Search whenever an app does not deserve a permanent place.
Windows 11’s pinning tools are simple by design, but they are more flexible than they first appear. With a few minutes of cleanup, the desktop can become a deliberate workspace where the tools that matter are always close and everything else stays out of the way.
The key distinction matters. Start pins are a curated launcher inside the Start menu, where you can keep a broader collection of apps, folders, files, shortcuts, and websites. Taskbar pins are designed for the much smaller set of programs opened repeatedly throughout the day. Treating those spaces differently is the foundation of an efficient Windows 11 desktop.
Windows 11 has also moved beyond the live-tile workflows associated with Windows 10. There are no tile sizes to adjust, no tile groups in the old sense, and no supported way to move the primary taskbar to the top or sides of the screen. Instead, the focus is on pinning, reordering, folders, app-like websites, and a Start layout that can remember the views you prefer.
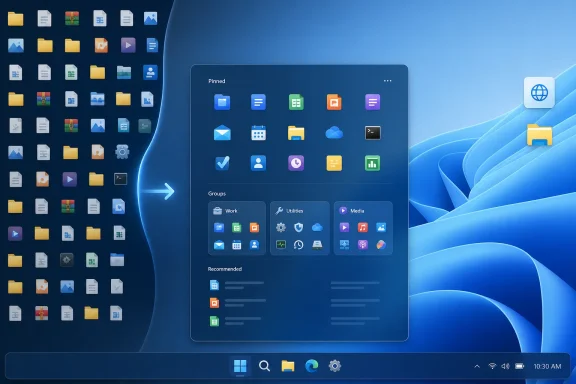 Understanding Start Pins and Taskbar Pins in Windows 11
At a glance, Start and the taskbar can appear to do the same job. Both display app icons, both allow rearranging, and both support right-click menus. Their purposes, however, are different enough that using each intentionally can improve everyday productivity.Start is your organized launch area
The Windows 11 Start menu is best suited to apps and shortcuts that are useful but not necessarily open all day. It can contain a larger and more varied collection of items, including:- Installed desktop applications
- Microsoft Store apps
- Folders from File Explorer
- Website shortcuts
- Installed web apps
- Shortcuts to utilities and infrequently used tools
The taskbar is your active workspace
The taskbar is more immediate. It is visible whenever Windows is running, except when it has been set to auto-hide, and it shows both pinned apps and currently open windows.A practical taskbar might include only a few essentials:
- A preferred web browser
- File Explorer
- Email or calendar software
- A messaging or collaboration client
- A note-taking app
- A password manager
- A screenshot or media tool used constantly
How to Pin an App to the Start Menu
Pinning an app to Start is the most straightforward way to build a personalized launcher. Search is normally the fastest route because it works whether the app is visible in the current Start view or buried in the complete list of installed software.Pin an app through Search
- Select Start or the Search box on the taskbar.
- Type the name of the app.
- Right-click the matching result.
- Select Pin to Start.
This method works well for classic desktop programs, Microsoft Store apps, many Windows utilities, and installed web applications. It is also useful when an app does not appear prominently in the All view.
Pin an app from the All section
Windows 11’s updated Start menu can show installed apps using different layouts, including Category, Grid, and List views. The appearance depends on the Windows 11 version and the view last selected on the PC.To pin from All:
- Open Start.
- Select All or All apps, depending on the current Start menu layout.
- Find the application.
- Right-click it.
- Choose Pin to Start.
Pin folders to Start
Windows 11 lets users pin ordinary folders to Start, which is particularly useful for project directories, media libraries, or shared work folders.- Open File Explorer.
- Navigate to the folder.
- Right-click the folder.
- Select Pin to Start.
This is a strong option for people who often drill down through the same locations. A folder such as
Projects, Invoices, Screenshots, or Schoolwork can be opened directly from Start without first launching File Explorer and navigating through multiple levels.How to Pin Apps to the Windows 11 Taskbar
Pinning to the taskbar should be more selective than pinning to Start. The taskbar is most valuable when it provides instant access to tools that are part of a daily workflow.Pin an app from Search
- Select the taskbar Search box or icon.
- Type the name of the app.
- Right-click the result.
- Select Pin to taskbar.
Pin an app that is already open
This is often the fastest approach when a program is already running.- Open the app.
- Find its icon on the taskbar.
- Right-click the icon.
- Select Pin to taskbar.
Reorder taskbar icons
Taskbar icons can be rearranged with a simple drag-and-drop action.- Click and hold a pinned app icon.
- Drag it left or right.
- Release it in the desired location.
A compact layout might look like this:
- Browser
- File Explorer
- Mail or calendar
- Teams, Slack, or another chat app
- Notes
- Frequently used creative, development, or business software
Unpinning Apps Does Not Uninstall Them
One of the most common Windows 11 misunderstandings is the fear that unpinning an app will remove it from the PC. It will not.Unpinning removes only the shortcut from Start or the taskbar. The program remains installed, its files remain intact, and it can still be found through Search, All, File Explorer shortcuts, or its installation directory.
Remove a Start pin
- Open Start.
- Right-click the pinned app, folder, website, or shortcut.
- Select Unpin from Start.
Remove a taskbar pin
- Right-click the app icon on the taskbar.
- Select Unpin from taskbar.
Unpinning is therefore a low-risk way to refine the interface. It is worth removing shortcuts that are not genuinely useful. A smaller set of pins makes the remaining apps easier to see and faster to launch.
Organize Pinned Apps into Start Menu Folders
Start menu folders are one of the best Windows 11 organization features for users who want quick access without visual overload. They work similarly to app folders on a smartphone: stack related items together, open the folder when needed, and keep the main Start grid uncluttered.Create a folder
- Open Start.
- Drag one pinned item directly over another pinned item.
- Release the item when Windows displays the folder grouping.
- Add additional pins by dragging them into the folder.
Rename the folder
After creating a folder, open it and use the available rename control to assign a useful label. Naming matters once several folders exist. A label such as Work, Media, Admin, Utilities, or Games is more helpful than a collection of miniature icons that must be inspected individually.Remove an item from a folder
- Open the folder in Start.
- Drag the app or shortcut out of the folder.
- Drop it into an open area of the pinned section.
Build folders around tasks, not software brands
The best folder structure is usually based on what needs to be accomplished rather than who made the app. For example:- Work: Outlook, Teams, OneNote, Excel, a project folder
- Creative: Photos, Paint, Clipchamp, an image editor, a media folder
- Utilities: Settings, Terminal, Snipping Tool, Calculator, Character Map
- Entertainment: Steam, Spotify, a streaming web app, game launchers
- Security: Password manager, VPN client, backup software, antivirus dashboard
Pin Websites and Install Web Apps
Modern websites can be just as important as installed software. Windows 11 supports two related approaches: pinning a normal website shortcut and installing a website as a web app.The distinction is important. A website shortcut typically opens in the browser. A web app, often based on Progressive Web App technology, can open in its own window and may behave more like a traditional desktop app.
Pin a website to Start with Microsoft Edge
Microsoft Edge includes a direct option for adding a site to Start.- Open Microsoft Edge.
- Visit the website.
- Select Settings and more from the three-dot menu.
- Select More tools.
- Choose Pin to Start.
Install a site as an app in Edge
For websites that support an app-like experience, Edge may display an app-install icon in or near the address bar. If it does not, the site can often still be installed through the menu.- Open the website in Edge.
- Select the install icon if it appears in the address bar, or open Settings and more.
- Select Apps.
- Choose the available install option.
A web app is especially effective for services such as:
- Microsoft 365 web apps
- Gmail or Outlook on the web
- Project-management tools
- Chat platforms
- Music services
- Web-based CRM systems
- Newsroom, analytics, and publishing dashboards
Create website shortcuts in Google Chrome
Google Chrome also supports creating shortcuts for websites. The exact wording can vary by Chrome version and by the site’s capabilities, but the common path is through Chrome’s main menu and its shortcut or install controls.For a standard shortcut:
- Open the website in Chrome.
- Select the three-dot More menu.
- Open More tools or the available save/share section.
- Choose the option to create a shortcut or install the page as an app.
- Confirm the name and creation options.
Consider privacy before pinning sensitive sites
Pinning a financial, healthcare, payroll, or administrative site is convenient, but the shortcut can reveal the service used by the account holder. The shortcut does not contain login credentials by itself, yet it can make a sensitive destination more visible to anyone using the PC.On shared devices, keep especially sensitive services unpinned, use a locked Windows account, and ensure browser profiles and passwords are protected.
Customize the Start Menu View
The Start menu has evolved significantly since the original Windows 11 release. On supported and updated systems, the Pinned and All sections can remember the view most recently selected.Show all pinned apps by default
If the pinned section is compacted, select Show all. Windows can remember that expanded state, allowing the full pinned collection to appear the next time Start opens.This option is ideal for users who rely on Start as their primary launcher and maintain a sizeable collection of pins. It is less useful for people who prefer a minimalist Start menu and launch most apps from Search or the taskbar.
Choose an All apps view
The All section can offer several ways to browse installed apps:- Category groups apps by type or purpose.
- Grid displays app icons in a more visual arrangement.
- List provides a conventional alphabetical app list.
Add folder shortcuts beside the power button
Windows 11 can display selected folders beside the power button in Start. This provides quick access without consuming space in the pinned grid.- Open Start.
- Right-click the lower area of the Start menu.
- Choose Start settings.
- Select Folders.
- Turn on the folders to display.
- Documents
- Downloads
- Music
- Pictures
- Videos
- Network
- Personal folder
Control Taskbar Clutter Through Settings
Taskbar customization does more than manage app icons. Windows 11 also lets users control the visibility of system features that occupy taskbar space.Right-click an empty part of the taskbar and select Taskbar settings. From there, the interface can be simplified by adjusting several options.
Taskbar items
The Taskbar items section can be used to show or hide features such as:- Search
- Task view
- Widgets
Taskbar behaviors
Expand Taskbar behaviors for controls that affect how the taskbar looks and responds. Depending on the Windows 11 edition, hardware, and update level, options can include:- Taskbar alignment
- Automatically hide the taskbar
- Show badges on taskbar apps
- Show flashing on taskbar apps
- Show the taskbar on all displays
- Optimize the taskbar for touch interactions
- Select the far corner of the taskbar to show the desktop
- Share a window from the taskbar in supported collaboration apps
- Combine taskbar buttons and hide labels
Keyboard and Accessibility Controls for Pinned Apps
Mouse-based pinning is convenient, but Windows 11 also supports keyboard navigation for people who prefer not to use a pointer or who use accessibility tools.Pin an app from Start with the keyboard
A common keyboard route is:- Press the Windows key to open Start.
- Press Tab until the pinned area or All section is selected.
- Use the arrow keys to select the app.
- Press Shift + F10 to open the context menu.
- Select Pin to taskbar or another available pin command.
- Press Enter.
Unpin a taskbar app with the keyboard
- Press Windows key + T until the desired taskbar app is selected.
- Press Shift + F10.
- Choose Unpin from taskbar.
- Press Enter.
Managed PCs Can Override Personal Choices
A work or school PC may not behave exactly like a personal Windows 11 device. Organizations can use management policies to define Start layouts, recommended apps, and taskbar pins.This can lead to several scenarios:
- An app returns after being unpinned.
- Certain apps cannot be removed.
- Start menu views or customization options are restricted.
- Taskbar icons reappear after a sign-in, restart, or policy refresh.
- The organization’s business tools are positioned in a specific order.
The practical first step is simple: try the ordinary unpin and reorder controls. If the layout reverts, the behavior is likely being managed by the organization rather than caused by a local Windows malfunction.
Common Pinning Problems and Practical Fixes
“Pin to Start” or “Pin to taskbar” is missing
The shortcut may be restricted by company policy, the app may not be installed correctly, or the selected item may not support the chosen pin location. Try searching for the actual installed app rather than a file, installer, or temporary shortcut.For classic desktop software, opening the program first and pinning its running taskbar icon can sometimes succeed when a Start-based option is unavailable.
A pinned app opens the wrong item
This can happen after an app update, a reinstall, or a web shortcut change. Unpin the existing shortcut, locate the app again through Search, and create a new pin.For websites, confirm that the pinned item leads to the correct page. A shortcut may point to a temporary sign-in page, a redirect URL, or a browser profile that is no longer in use.
The taskbar is overcrowded
Unpin anything that is not launched nearly every day. The Start menu and Search are better homes for occasional utilities.It can also help to use Start folders for categories that do not need constant taskbar access. This preserves the taskbar for active work while keeping less frequent tools only a few clicks away.
Start feels cluttered despite folders
Reduce duplication. There is rarely a need to pin the same app to Start, the taskbar, the desktop, and File Explorer’s Quick access area. Choose the location that makes the most sense for the frequency and context of use.A useful rule is:
- Taskbar: open constantly
- Start: launch regularly
- Folder in Start: related tools used occasionally
- Search only: rare or one-off utilities
A Better Way to Think About Windows 11 Pinned Apps
The most effective pinned-app setup is not the one with the most icons. It is the one that removes friction from repetitive actions without making Windows harder to scan.Use the taskbar as a compact command strip for the applications that define the day. Use Start as a broader, structured library for workflows, folders, web tools, and secondary software. Use folders to prevent Start from becoming a wall of icons, and use Search whenever an app does not deserve a permanent place.
Windows 11’s pinning tools are simple by design, but they are more flexible than they first appear. With a few minutes of cleanup, the desktop can become a deliberate workspace where the tools that matter are always close and everything else stays out of the way.
References
- Primary source: Technobezz
Published: 2026-07-24T17:06:26.810000+00:00
How to Pin Apps in Windows 11 and Manage Pinned Apps | Technobezz
Learn how to pin apps in Windows 11, remove pins, organize Start folders, and manage taskbar shortcuts.www.technobezz.com - Official source: learn.microsoft.com
Configure the Windows Taskbar Pinned Apps with Policy Settings | Microsoft Learn
Learn how to configure the applications pinned to the Windows taskbar.learn.microsoft.com - Official source: download.microsoft.com
LAB1 Exploring the New Windows 8 Modern User Interface (UI) and Windows 8 Apps
PDF documentdownload.microsoft.com