Set Up Dual Monitors with Per-Display Scaling in Windows 10/11
Difficulty: Beginner | Time Required: 10 minutesUsing two monitors can make Windows feel much more productive: you can keep a browser or chat window on one screen while working in an app on the other. But if your monitors have different sizes or resolutions—for example, a 14-inch laptop screen plus a 27-inch external monitor—text and apps may look too tiny on one display or oversized on the other.
That’s where per-display scaling helps. Windows 10 and Windows 11 let you set a different scale percentage for each monitor, so text, icons, menus, and apps are easier to read on each screen.
This tutorial walks you through setting up dual monitors and adjusting scaling separately for each display.
Prerequisites
Before you begin, make sure you have:Quick walkthrough
- A Windows 10 or Windows 11 PC
- Two displays connected, such as:
- Laptop screen + external monitor
- Two desktop monitors
- Monitor + TV
- The correct cable or adapter, such as HDMI, DisplayPort, USB-C, DVI, or VGA
- Updated graphics drivers if possible
Note: The steps are very similar in Windows 10 and Windows 11, but the Settings app looks slightly different.
Step 1: Connect Your Second Monitor
- Turn on your second monitor.
- Connect it to your PC using the appropriate cable.
- Wait a few seconds for Windows to detect it.
- If nothing appears, press Windows key + P on your keyboard.
- Choose one of the display modes:
- PC screen only – uses only your main display
- Duplicate – shows the same image on both screens
- Extend – gives you separate desktop space on each screen
- Second screen only – uses only the external display
Tip: “Extend” is the best option if you want to drag windows between monitors and use both screens independently.
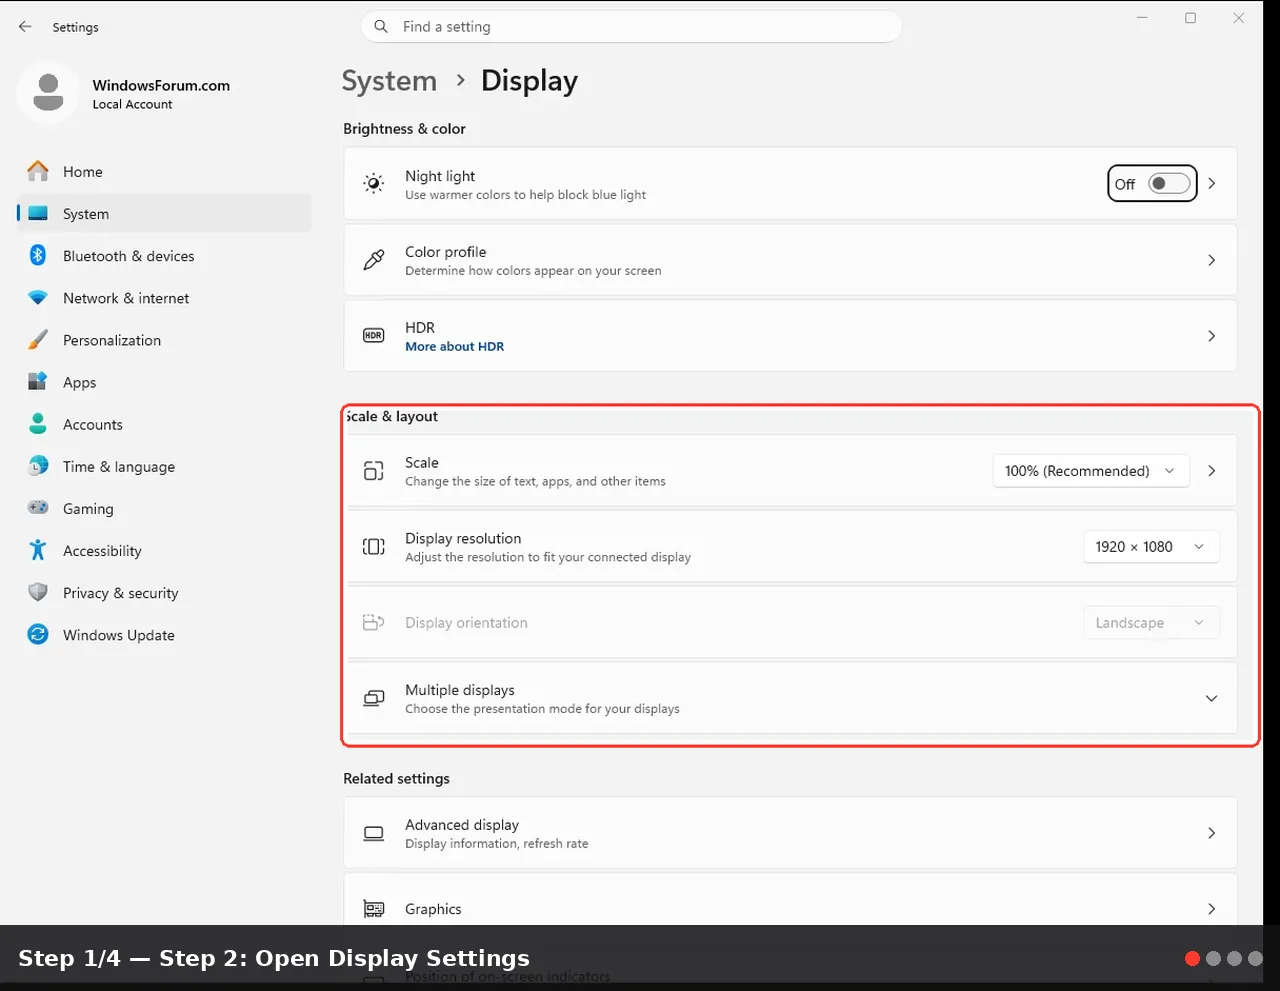
Step 2: Open Display Settings
In Windows 11
- Right-click an empty area of the desktop.
- Select Display settings.
In Windows 10
- Right-click an empty area of the desktop.
- Select Display settings.
- Press Windows key + I to open Settings.
- Go to System.
- Select Display.
Step 3: Identify Your Monitors
At the top of the Display settings page, you should see boxes labeled 1, 2, and possibly more if you have additional displays.- Click Identify.
- Windows will briefly show large numbers on each physical screen.
- Note which monitor is 1 and which is 2.
Tip: If only one monitor appears, click Detect. If Windows still does not find it, check the cable, monitor input source, docking station, or graphics driver.
Step 4: Arrange the Displays Correctly
Windows needs to know how your monitors are physically arranged.
- In Display settings, drag the numbered monitor boxes to match your real desk setup.
- If your external monitor is to the right of your laptop, place display 2 to the right of display 1.
- If one monitor is above the other, stack them vertically in the layout.
- Click Apply.
Note: If your mouse gets “stuck” at the edge of a display, your monitor arrangement may not match your physical layout. Return to Display settings and adjust the boxes.
Step 5: Choose Your Main Display
Your main display is where Windows shows the taskbar icons, Start menu, desktop icons, and many apps by default.- Click the monitor box you want as your primary display.
- Scroll down to Multiple displays.
- Check Make this my main display.
Tip: Many users choose the larger external monitor as the main display when using a laptop at a desk.
Step 6: Set Per-Display Scaling
Now you can set a different scale level for each monitor.
- In Display settings, click the first monitor box, such as 1.
- Scroll to Scale & layout.
- Find Scale.
- Choose a recommended option, such as:
- 100%
- 125%
- 150%
- 175%
- 200%
- Click the second monitor box, such as 2.
- Repeat the process and choose a scale that looks comfortable on that display.
| Display Type | Common Scaling |
|---|---|
| 24-inch 1080p monitor | 100% |
| 27-inch 1440p monitor | 100% or 125% |
| 13–15-inch laptop 1080p screen | 125% or 150% |
| 4K monitor | 150%, 175%, or 200% |
Important: Per-display scaling works best when using Extend mode. In Duplicate mode, both displays may be limited by shared resolution or scaling behavior.
Step 7: Sign Out or Restart Apps if Needed
Most modern apps adjust automatically when you change scaling. However, some older desktop programs may look blurry, too large, too small, or may not update until restarted.If something looks wrong:
- Close and reopen the affected app.
- If that does not help, sign out of Windows and sign back in.
- If the issue continues, restart your PC.
Note: Microsoft’s high-DPI guidance explains that older desktop apps may not always respond perfectly when moved between monitors with different scaling values. This is normal for some legacy software.
Step 8: Adjust Display Resolution
Scaling and resolution are related, but they are not the same thing.
- Resolution controls how many pixels your display uses.
- Scaling controls how large text, icons, and apps appear.
- Select a monitor in Display settings.
- Under Scale & layout, find Display resolution.
- Use the option marked Recommended whenever possible.
- Click Keep changes if the screen looks correct.
Warning: Using a non-recommended resolution can make text look fuzzy or stretched. For the sharpest image, use your monitor’s native resolution.
Step 9: Fine-Tune Text Size if Needed
If scaling is mostly correct but text still feels too small, you can adjust text size separately.Windows 11
- Open Settings.
- Go to Accessibility.
- Select Text size.
- Move the slider.
- Click Apply.
Windows 10
- Open Settings.
- Go to Ease of Access.
- Select Display.
- Use the Make text bigger slider.
- Click Apply.
Tips and Troubleshooting
Apps Look Blurry on One Monitor
Try these fixes:- Close and reopen the app.
- Move the app to the monitor where you want to use it, then restart it.
- Sign out and sign back in.
- Update the app if a newer version is available.
- Update your graphics driver.
The Second Monitor Is Not Detected
Try the following:- Click Detect in Display settings.
- Make sure the monitor is powered on.
- Check that the correct input source is selected on the monitor.
- Try a different cable or port.
- Restart the PC.
- Update your graphics driver from Windows Update or the manufacturer’s website.
Windows Keeps Moving My Windows Around
This can happen when a monitor disconnects, a laptop sleeps, or a docking station resets.Helpful options include:
- Open Settings.
- Go to System > Display.
- Expand Multiple displays.
- In Windows 11, look for options such as remembering window locations based on monitor connection.
Which Scaling Value Should I Use?
There is no single perfect value. Choose what feels comfortable.A good rule of thumb:
- Use 100% for standard 1080p desktop monitors.
- Use 125% or 150% for smaller high-resolution displays.
- Use 150% or higher for 4K monitors.
- Use the Recommended value first, then adjust if needed.
Conclusion
Setting up dual monitors with per-display scaling makes Windows much easier to use, especially when your screens have different sizes or resolutions. By arranging your monitors correctly, choosing a main display, setting each display’s scale independently, and using the recommended resolution, you can get a cleaner, sharper, and more comfortable workspace in just a few minutes.Whether you are using a laptop with an external monitor or a full desktop dual-screen setup, per-display scaling helps keep text readable and apps properly sized across both screens.
Key Takeaways:
- Use Extend mode for the best dual-monitor experience.
- Arrange displays in Settings so mouse movement matches your physical setup.
- Set scaling separately for each monitor under System > Display.
- Use the Recommended resolution for the sharpest image.
- Restart older apps if they look blurry after changing scale.
- Per-display scaling is especially helpful when mixing 1080p, 1440p, 4K, laptop, and external monitors.
This tutorial was generated to help WindowsForum.com users get the most out of their Windows experience.
Last edited: