Set Up Python, pip, and VS Code Virtual Environments in Windows 10/11
Difficulty: Beginner | Time Required: 20 minutesPython is one of the easiest programming languages to start with on Windows, but many beginners run into the same problem: packages get installed in the wrong place, VS Code uses a different Python version than expected, or a project works one day and breaks the next. The fix is to set up Python,
pip, and a project-specific virtual environment correctly from the beginning.A virtual environment keeps each Python project isolated. That means one project can use one set of packages while another project uses something completely different. In this tutorial, you’ll install Python, confirm
pip is working, install Visual Studio Code, create a virtual environment, and connect it to VS Code on Windows 10 or Windows 11.Prerequisites
Before you begin, you need:Quick walkthrough
- A Windows 10 or Windows 11 PC.
- An internet connection.
- A standard user account with permission to install apps.
- Windows Terminal, PowerShell, or Command Prompt.
Tip: Windows Terminal is included on many Windows 11 systems and is available for Windows 10 from the Microsoft Store. PowerShell works fine for all commands in this guide.
Step 1: Install Python
You have two beginner-friendly options: install Python withwinget, or install it manually from the official Python installer.Option A: Install Python using winget
- Right-click Start.
- Select Terminal or Windows PowerShell.
- Run:
winget install Python.Python.3- Wait for the installation to finish.
- Close and reopen PowerShell.
Note: If Windows sayswingetis not recognized, use the manual installation method below.
Option B: Install Python manually
- Download the latest Windows installer from the official Python website.
- Run the installer.
- On the first installer screen, check:
Add python.exe to PATH- Select Install Now.
- When setup completes, close the installer.
- Open a new PowerShell window.
Warning: Do not skip the Add python.exe to PATH option unless you already know how to manage PATH manually. Beginners should enable it.
Step 2: Verify Python is installed
In PowerShell, run:py --versionYou should see something like:
Python 3.x.xNow also try:
python --versionOn most properly configured systems, this should also show your Python version.
Tip: On Windows, thepycommand uses the Python Launcher, which is helpful when multiple Python versions are installed. For beginner use,pyis often the safest command.
Step 3: Verify pip is installed
pip is Python’s package installer. It is used to install libraries such as requests, flask, django, numpy, and many others.Run:
py -m pip --versionIf
pip is installed, you will see its version and the Python folder it belongs to.Next, upgrade
pip:py -m pip install --upgrade pipIfNote: Usingpy -m pipis usually better than typing onlypip, because it makes surepipruns with the Python version selected by the Windows Python Launcher.
pip is missing, try:py -m ensurepip --upgradeThen check again:
py -m pip --versionStep 4: Install Visual Studio Code
If you already have VS Code installed, you can skip this step.Install with winget
Open PowerShell and run:winget install Microsoft.VisualStudioCodeOr install manually
- Download Visual Studio Code from the official VS Code website.
- Run the installer.
- During setup, enable the options to add VS Code to PATH and add “Open with Code” actions if you want them.
- Finish the installation.
Step 5: Install the Python extension in VS Code
- Open Visual Studio Code.
- Select the Extensions icon on the left sidebar.
- Search for:
Python- Install the official Python extension from Microsoft.
- If prompted, also allow related Python tools or environment extensions to install.
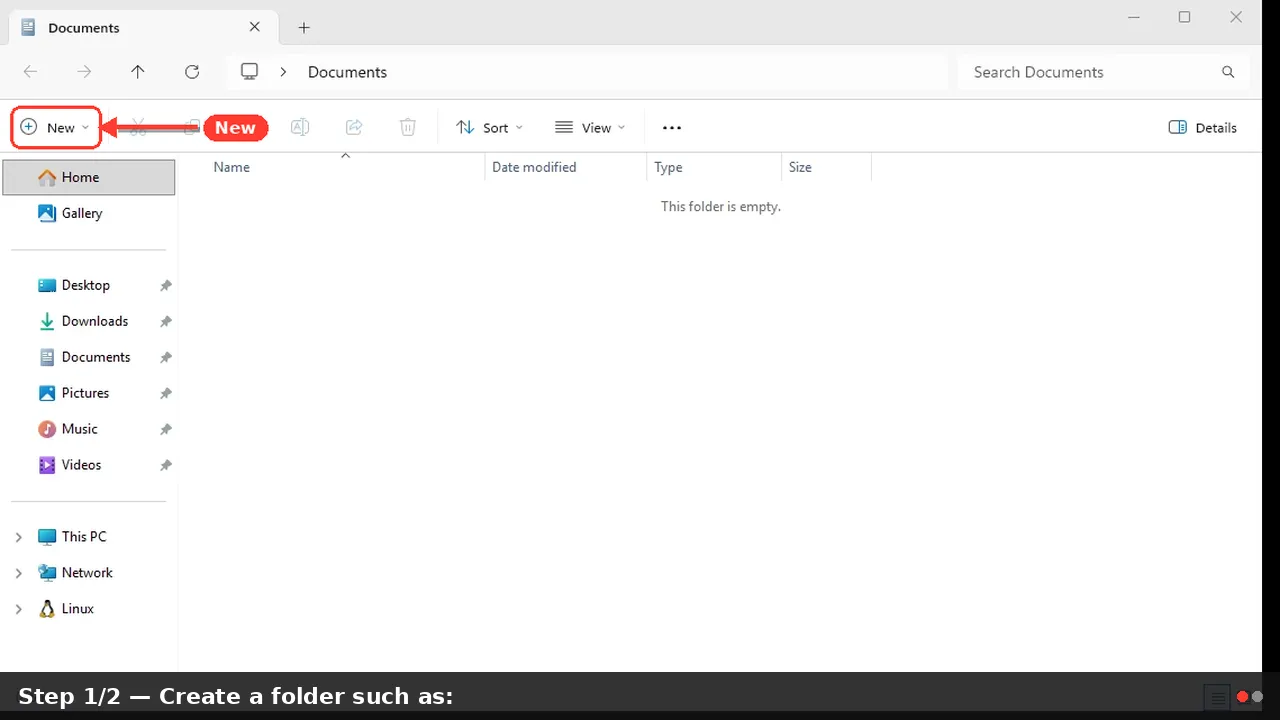
Step 6: Create a project folder
Now create a clean folder for your first Python project.- Open File Explorer.
- Create a folder such as:
Documents\PythonProjects\hello-python- Open VS Code.
- Select File > Open Folder.
- Choose your
hello-pythonfolder.
Tip: Always open the project folder itself in VS Code. This makes environment detection and settings much easier.
Step 7: Create a virtual environment
In VS Code:- Select Terminal > New Terminal.
- Make sure the terminal opens in your project folder.
- Run:
py -m venv .venvThis creates a hidden-style project folder named
.venv. It contains a private Python interpreter and package location for this project.Note:.venvis a common name for virtual environments in Python projects. It is easy for VS Code to detect and easy for other developers to understand.
Step 8: Activate the virtual environment
In PowerShell, run:.\.venv\Scripts\Activate.ps1After activation, your prompt should show something like:
(.venv) PS C:\Users\YourName\Documents\PythonProjects\hello-python>That
(.venv) prefix means the virtual environment is active.If PowerShell blocks the activation script, you may see an execution policy message. For a beginner-friendly fix, run:
Set-ExecutionPolicy -Scope CurrentUser -ExecutionPolicy RemoteSignedThen try activating again:
.\.venv\Scripts\Activate.ps1If you prefer Command Prompt instead of PowerShell, activate with:Warning: Only run scripts from sources and projects you trust. Changing the execution policy for the current user is common for development, but you should still be careful with downloaded scripts.
.venv\Scripts\activate.batStep 9: Select the virtual environment in VS Code
VS Code often detects.venv automatically. If it does not:- Press Ctrl+Shift+P.
- Search for:
Python: Select Interpreter- Choose the interpreter inside your project’s
.venvfolder.
.\.venv\Scripts\python.exeOnce selected, VS Code uses that environment for running, debugging, IntelliSense, and package discovery.
Step 10: Test your setup
Create a new file in VS Code named:hello.pyAdd this code:
print("Hello from Python on Windows!")Run it by selecting the Run Python File button, or use the terminal:
python hello.pyYou should see:
Hello from Python on Windows!Step 11: Install a package with pip
With the virtual environment still active, install a test package:python -m pip install requestsNow create a file named:
test_requests.pyAdd:
Code:
import requests

print("Requests is installed correctly.")
print(requests.__version__)python test_requests.pyIf you see the installed version number, your virtual environment and
pip setup are working.Tip: Once inside an activated virtual environment,python -m pip install package-nameinstalls packages into that environment, not globally into Windows.
Step 12: Save dependencies with requirements.txt
To record the packages used by your project, run:python -m pip freeze > requirements.txtThis creates a file listing installed packages and versions.
Later, you or another user can recreate the same package setup with:
python -m pip install -r requirements.txtBest Practice: Do not copy the.venvfolder between computers. Share your code andrequirements.txt, then recreate the environment on each PC.
Tips and troubleshooting
VS Code is using the wrong Python version
Press Ctrl+Shift+P, run Python: Select Interpreter, and choose the interpreter from.venv.pip installs packages globally instead of in .venv
Make sure your prompt starts with:(.venv)If not, activate the environment again.
The python command opens the Microsoft Store
Use:py --versionIf Python is installed properly,
py should find it. You can also check Windows app execution aliases in Settings > Apps > Advanced app settings > App execution aliases.I created the venv in the wrong folder
Delete the unwanted.venv folder, open the correct project folder in VS Code, and run:py -m venv .venvHow do I exit the virtual environment?
Run:deactivateYou can reactivate it any time from the project folder.
Conclusion
You now have a clean Python development setup on Windows 10 or Windows 11. Python is installed,pip is working, VS Code knows which interpreter to use, and your project has its own isolated virtual environment. This setup helps prevent package conflicts, keeps projects organized, and makes it much easier to share or rebuild your work later.Key Takeaways:
- Install Python and verify it with
py --version. - Use
py -m piporpython -m pipfor reliable package installation. - Create one
.venvvirtual environment per project. - Select the
.venvinterpreter in VS Code. - Use
requirements.txtto save and recreate project dependencies.
This tutorial was generated to help WindowsForum.com users get the most out of their Windows experience.
Structured References
- Microsoft Learn: Windows Python development environment setup, including Python, VS Code, and the Python extension. (code.visualstudio.com)
- Visual Studio Code documentation: Python tutorial, interpreter selection, environments, package management, running, and debugging behavior. (code.visualstudio.com)
- Python documentation:
venvvirtual environments and Windows activation commands. (docs.python.org) - Python and pip documentation:
ensurepip,python -m pip, package installation, and requirements-file usage. (docs.python.org)
References
- Citation: code.visualstudio.com
Python environments in VS Code
Configuring Python Environments in Visual Studio Codecode.visualstudio.com - Citation: docs.python.org
venv — Creation of virtual environments
Source code: Lib/venv/ The venv module supports creating lightweight “virtual environments”, each with their own independent set of Python packages installed in their site directories. A virtual en...docs.python.org - Related coverage: pip.pypa.io
- Related coverage: packagemanager.org

Installation Guide - pip - PackageManager.org
Learn how to install and configure pip on your system
packagemanager.org
- Related coverage: pip-python3.readthedocs.io
- Related coverage: packaging.python.org

Installing Packages - Python Packaging User Guide
packaging.python.org
- Related coverage: pip-test.readthedocs.io
- Related coverage: docs.pyth.onl
ensurepip — Bootstrapping the pip installer
Source code: Lib/ensurepip The ensurepip package provides support for bootstrapping the pip installer into an existing Python installation or virtual environment. This bootstrapping approach reflec...docs.pyth.onl - Related coverage: pip.dokyumento.jp
- Related coverage: pradyunsg-pip.readthedocs.io
- Related coverage: app.readthedocs.org
- Related coverage: assets-global.website-files.com
Last edited: