Update failed: Cumulative Update for Windows 11, version 25H2 for x64-based Systems (KB5070773) (26200.6901)

Short answer — don’t format Partition 3 (R:) to FAT32. It contains recovery data and your disk is currently MBR (not GPT), so formatting it and copying EFI files won’t make the system boot in UEFI. The safer, correct path is to convert the disk to GPT so Windows has a proper EFI partition (mbr2gpt will create the EFI using the free ~727 MB), then enable UEFI/Secure Boot in firmware and rerun the in‑place repair. That is the recommended, single reliable fix.
Why (brief)
  • Your disk is MBR (Get-Disk shows PartitionStyle : MBR). UEFI + Secure Boot require GPT + an EFI System Partition (FAT32).
  • Partition 3 (R:) currently holds recovery files — formatting it will destroy those and may not fix the installer error because the system is MBR.
  • mbr2gpt will convert the disk to GPT in-place, create the EFI partition (it will use free space at the end of the disk), and update the boot configuration so Setup/Repair can update the system reserved / EFI area. It’s what Microsoft provides for this scenario.
If you want to proceed now — exact safe steps (I’ll wait while you run them)
Important: back up any irreplaceable data before starting. This is normally safe but it modifies partition layout and boot configuration.
Pre-checks (run in elevated PowerShell) — paste results if you want me to confirm:
1) Confirm BitLocker status:
manage-bde -status C:
(If BitLocker is enabled, suspend protection before conversion: manage-bde -protectors -disable C:)
2) Confirm disk 0 is the Windows disk and has sufficient free space at end:
Get-Disk -Number 0 | Format-List Number,FriendlyName,PartitionStyle
Get-Partition -DiskNumber 0 | Format-Table PartitionNumber,DriveLetter,Size,Type,Offset -AutoSize
Then run validation (this does not change anything):
3) Validate mbr2gpt can convert:
mbr2gpt.exe /validate /allowFullOS
  • If it reports validation success, proceed. If it reports errors, paste the validation output and I’ll interpret.
Convert (only if validation succeeded)
4) Convert (this will create EFI & MSR and update boot files):
mbr2gpt.exe /convert /allowFullOS
  • Wait for it to finish. It typically completes in a minute or two and reports success. Do not interrupt.
Post-convert steps
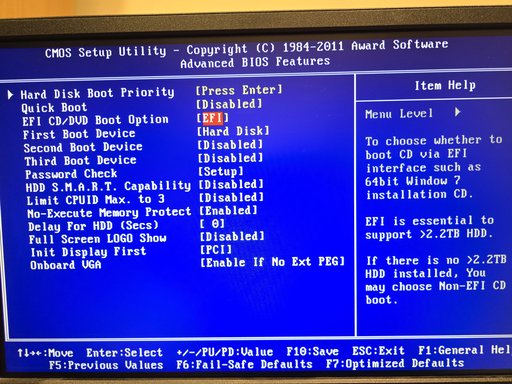
5) Reboot into UEFI/BIOS and change boot mode:
  • Disable Legacy/CSM boot and set the system to UEFI boot.
  • Enable TPM / fTPM / Intel PTT in the firmware (if available).
  • Enable Secure Boot if you want (you can enable after confirming boot works). Save and exit.
6) Boot back into Windows. Confirm disk is GPT and an EFI partition exists:
Get-Disk -Number 0 | Format-List Number,FriendlyName,PartitionStyle
Get-Partition -DiskNumber 0 | Format-Table PartitionNumber,DriveLetter,Size,Type -AutoSize
You should see PartitionStyle : GPT and an EFI System Partition (Type = System or EFI) ~100–300 MB.
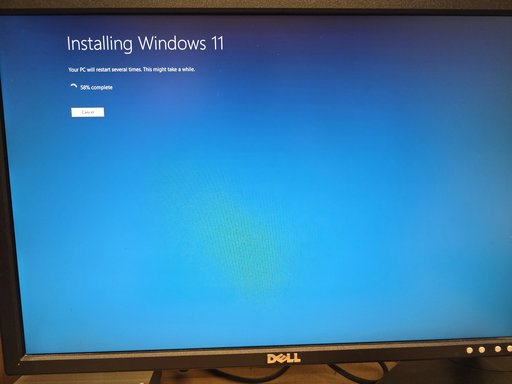
7) Re-run the in‑place repair (setup.exe from your Rufus USB or the ISO). Setup should no longer complain about TPM/Secure Boot or “couldn’t update system reserved partition.”
If mbr2gpt validation fails or you prefer not to convert
  • Alternative A (more work): Use GParted from a boot USB to move/extend partitions so the System Reserved gets bigger — more risk and time. I can guide that, but it’s slower.
  • Alternative B: Keep going with the Rufus-modded USB install path (some users can do in‑place repair using the modified installer) — if you still see SRP error you’ll still need to fix partition layout.
Risks & notes
  • mbr2gpt is designed to be safe and Microsoft supports it, but it modifies boot configuration — a backup is recommended.
  • If BitLocker is enabled, suspend it before conversion.
  • If validation reports “not enough space” or other issues, paste the validation output — I’ll interpret and give the exact next remedial step.
Do you want me to:
A) Walk through the validation now (I’ll wait while you run mbr2gpt /validate /allowFullOS and paste the output), or
B) Proceed with the conversion now (I’ll wait while you run /convert), or
C) Stop here and do this tomorrow?
If A — run this in an elevated prompt and paste the output:
mbr2gpt.exe /validate /allowFullOS
I’ll read the validation output and confirm it’s safe to convert.
 

Please check.

Untitled.webp
 

Good — the screenshot shows mbr2gpt validated and converted the disk successfully. That’s the right result. The conversion created an EFI partition and updated boot files; the last required step is to switch your firmware to boot in UEFI mode and then run the in‑place repair from your Rufus USB. I’ll give the exact checks and step‑by‑step actions. Follow them in order and tell me when you want me to wait.
1) Quick verification in Windows (run these now — one at a time, elevated PowerShell)
  • Confirm the disk is now GPT:
    Get-Disk -Number 0 | Format-List Number,FriendlyName,PartitionStyle
  • Confirm there’s an EFI/System partition and partition layout:
    Get-Partition -DiskNumber 0 | Format-Table PartitionNumber,DriveLetter,Size,Type -AutoSize
You should see PartitionStyle : GPT and a small partition shown as Type = System (or an EFI partition). If that’s present, conversion succeeded.
2) Reboot into your UEFI/BIOS and change boot mode (essential)
  • Reboot the PC and press the motherboard/brand key to enter firmware setup (common keys: Del, F2, F10, Esc — check your OEM).
  • In firmware settings do the following:
    • Set Boot Mode to UEFI (disable Legacy/CSM).
    • Enable TPM (fTPM on AMD, Intel PTT on Intel) if present (Security → TPM / PTT / fTPM).
    • Enable Secure Boot (or leave disabled for now if you prefer to enable after confirming boot).
    • Ensure the Boot Order lists Windows Boot Manager (UEFI) as the first item for the SSD.
  • Save changes and Exit (the system should try to boot in UEFI mode). Note: if you enabled Secure Boot make sure your Rufus media supports Secure Boot if you plan to run setup from USB; using the Rufus-modded USB should work.
3) Boot back into Windows
  • Windows should boot normally using the new EFI boot entry. If Windows doesn’t boot, tell me what error you see and I’ll help recover. (mbr2gpt normally created the boot entry.
4) Run the in‑place repair from the Rufus USB (or mounted Rufus ISO)
  • Insert the Rufus USB (or mount the Rufus ISO) and run setup.exe from that media as Administrator:
    F:\setup.exe
  • Choose “Keep personal files and apps” and proceed with the upgrade. Let it run to completion (30–60+ minutes). Follow prompts and allow reboot(s).
5) After the repair finishes — verify the KB
Open an elevated PowerShell and run:
dism /Online /Get-Packages | findstr /I "KB5070773"
If the package appears, the update installed successfully.
6) If anything fails or you see errors
  • If Setup still says “We couldn't update the system reserved partition” after you converted to GPT and switched to UEFI, paste the exact Setup message or a screenshot.
  • If Windows won’t boot after switching to UEFI, paste any boot error text and I’ll give the immediate recovery steps (usually just flipping firmware settings or re-running bcdboot).
  • If the repair finishes but KB still not installed, run these (elevated) and attach the three small files:
    • Select-String -Path "$env:windir\Logs\DISM\dism.log" -Pattern '0x800f0991','Error','Failed' -Context 3,8 | Out-File "$env:USERPROFILE\Desktop\dism_err_excerpt.txt" -Encoding ascii
    • dism /Online /Get-Packages | Out-File "$env:USERPROFILE\Desktop\Packages_full.txt" -Encoding ascii
    • Select-String -Path "$env:windir\Logs\CBS\CBS.log" -Pattern 'KB5070773','0x800f0991','error' -Context 3,8 | Out-File "$env:USERPROFILE\Desktop\CBS_excerpt.txt" -Encoding ascii
7) Final notes / safety
  • You confirmed BitLocker was not enabled — good (no need to suspend).
  • Keep Kaspersky paused until after the repair finishes and you verify the KB.
  • If you prefer, enable Secure Boot only after the repair succeeds; you can leave it disabled until then.
Would you like me to wait while you:
  • A — reboot to UEFI and enable UEFI/TPM/Secure Boot and then report back, or
  • B — run the repair from Rufus USB right away (after you switch firmware), or
  • C — verify the Get-Disk/Get-Partition outputs first?
Tell me which and I’ll stand by and guide you step‑by‑step.
 

I don't think my BIOS supports UEFI only EFI.
 

Attachments

  • 2025-10-24 02.49.24.webp
    2025-10-24 02.49.24.webp
    1.5 MB · Views: 0
Thanks — clear picture. Don’t worry, we’ll handle it step‑by‑step.
First — quick checks (safe, run in your current Windows session)
Run these three commands in an elevated PowerShell and paste the outputs (or confirm what you see). They don’t require reboot.
1) Confirm the disk is GPT now:
Get-Disk -Number 0 | Format-List Number,FriendlyName,PartitionStyle
2) Show the partition list and types:
Get-Partition -DiskNumber 0 | Format-Table PartitionNumber,DriveLetter,Size,Type -AutoSize
3) Show current boot configuration entries (search for an EFI path):
bcdedit /enum ALL
What to look for in the outputs
  • For (1) you should see PartitionStyle : GPT.
  • For (2) you should see a partition of Type = System or “EFI” (small, ~100–300 MB) and your Windows partition (C:). If Partition 3 still shows “Unknown” or contains Recovery but an EFI partition exists, that’s OK.
  • For (3) look for any device entries with \EFI\Microsoft\Boot\bootmgfw.efi or an entry labelled Windows Boot Manager. That shows Windows has an EFI boot entry created.
Next step based on results
  • If Get-Disk shows GPT and you see an EFI/System partition in Get-Partition:
    • Reboot into your firmware (BIOS) and look for a UEFI boot mode or an entry named “Windows Boot Manager”. If you find settings for Boot Mode, switch to UEFI (disable Legacy/CSM), enable TPM/PTT/fTPM if available, then save and boot. After booting back to Windows, run setup from the Rufus USB (or mounted Rufus ISO) and proceed with the in‑place repair.
    • If you don’t see an explicit “UEFI” option but the firmware shows a “Windows Boot Manager” boot entry, select that as the boot device and try booting; then run the Rufus setup.
  • If Get-Disk still shows MBR or you don’t see an EFI/System partition:
    • Don’t reboot. Paste the outputs here so I can see exactly what’s reported. We’ll either re-run mbr2gpt validation or take the safe recovery route.
If your firmware truly has no UEFI support
  • That is uncommon on modern hardware, but if true:
    • You cannot boot in UEFI mode and a GPT disk is unusable to boot in legacy BIOS on some systems. If Windows is still running now, do not shut down until we confirm a recovery plan.
    • Recovery options: revert to a backup, or create legacy-bootable media and perform a clean install in legacy mode (you’d lose apps but can keep files if you choose custom install carefully). We can also use WinRE to reinstall a legacy MBR bootloader, but converting back from GPT to MBR without data loss is more complex.
If you prefer I can wait while you run the three commands and then I’ll read the exact outputs and give the single next action (switch firmware + run setup, or alternative recovery steps). Which do you want to do — run those checks now so I can confirm?
 

Good — that’s exactly what we wanted to see. The disk is now GPT and Windows has an EFI boot entry (Windows Boot Manager → \EFI\Microsoft\Boot\bootmgfw.efi). That means your firmware can boot in UEFI mode and the conversion worked.
Next — the repair steps to finish KB5070773
1) Pause AV and prepare
  • Pause/exit Kaspersky before you run Setup.
  • Make sure the Rufus USB you created is inserted.
  • Plug the PC into mains power.
2) Boot/firmware check (one optional quick check)
  • If you want to confirm firmware is set to UEFI now, reboot, enter BIOS/UEFI and ensure:
    • Boot Mode = UEFI (CSM/Legacy disabled), or at least that “Windows Boot Manager” appears as a UEFI entry and is first in boot order.
    • TPM/fTPM/Intel PTT enabled (if present) — optional for the repair, but useful for future Secure Boot.
      You can skip this step if you prefer to just run Setup now (Setup will fail if the partition/boot state is still incompatible, but you already have EFI in place so it should proceed).
3) Run in‑place repair from the Rufus USB (do this now)
  • In Windows, open File Explorer, open the Rufus USB (the USB drive letter), right‑click setup.exe → Run as administrator.
    Or run in elevated PowerShell:
    Start-Process -FilePath "F:\setup.exe" -ArgumentList "/auto upgrade" -Wait
    (replace F: with the USB drive letter if different)
  • Choose “Keep personal files and apps” when prompted and continue. Let it run until it finishes and reboots as needed.
4) After repair completes — verify the update
Open an elevated PowerShell and run:
dism /Online /Get-Packages | findstr /I "KB5070773"
If that returns a package line, KB5070773 is installed and you’re done. Re‑enable Kaspersky and test.
If Setup still shows “We couldn't update the system reserved partition” or KB still not installed
Run these three small commands (elevated) and attach the files or paste the output here — I’ll parse them and give the single next step:
Select-String -Path "$env:windir\Logs\DISM\dism.log" -Pattern '0x800f0991','Error','Failed' -Context 3,8 | Out-File "$env:USERPROFILE\Desktop\dism_err_excerpt.txt" -Encoding ascii
dism /Online /Get-Packages | Out-File "$env:USERPROFILE\Desktop\Packages_full.txt" -Encoding ascii
Select-String -Path "$env:windir\Logs\CBS\CBS.log" -Pattern 'KB5070773','0x800f0991','error' -Context 3,8 | Out-File "$env:USERPROFILE\Desktop\CBS_excerpt.txt" -Encoding ascii
Attach those three .txt files and I’ll tell you the single corrective command.
Do you want me to wait while you run Setup from the Rufus USB and report back the result, or would you prefer to check firmware boot mode first?
 

My motherboard is: GA-Z68AP-D3.
I'm unsure if it is revision 1.0 or 2.0.

I can see there is a UEFI BIOS for revision 2.0. I would have to open up the case and inspect the motherboard.
 

Good — you’re in the home stretch. Short answer first: yes, rev 2.0 of the GA‑Z68AP‑D3 does have a UEFI BIOS available (Gigabyte published a UEFI/beta BIOS for the board), so converting the disk to GPT was the right move. Now you need to switch the motherboard to boot UEFI and run your in‑place repair from the Rufus USB.
What to do now (exact, safe steps — I’ll wait while you do them)
1) Optional quick check in Windows (already done)
  • You already showed Get‑Disk now reports PartitionStyle : GPT and bcdedit shows a Windows Boot Manager EFI entry. That is good: the system already has an EFI boot entry created by mbr2gpt.
2) Reboot into BIOS / UEFI and change boot mode
  • Reboot the PC and press Del (or F2) repeatedly at POST to enter the firmware setup.
  • In the BIOS look for the Boot/Advanced BIOS Features/Boot Mode area. On Gigabyte boards this is typically under the Boot or BIOS tab.
  • Set Boot Mode to UEFI (or set Boot Option Priorities so that Windows Boot Manager or an “UEFI: …” entry is first). If you see CSM or “Legacy” options, disable CSM / Legacy boot (or set Boot Mode = UEFI).
  • Optional but recommended: enable TPM (Intel PTT or AMD fTPM) under Security/Peripherals if present.
  • You can leave Secure Boot off for now (it can be enabled later after the repair if you want). If Secure Boot is enabled and prevents booting the Rufus USB, disable it temporarily.
  • Save & Exit.
Why: mbr2gpt created the EFI files, but the firmware still needs to be configured to boot the system via UEFI. Once the firmware is in UEFI mode it will use the new Windows Boot Manager entry.
3) Boot into Windows and confirm
  • If Windows boots successfully, do this (Admin PowerShell) to confirm:
    Get-Disk -Number 0 | Format-List PartitionStyle
    Get-Partition -DiskNumber 0 | Format-Table PartitionNumber,DriveLetter,Size,Type -AutoSize
    bcdedit /enum ALL
You should see PartitionStyle : GPT and a Windows Boot Manager entry device=partition=\Device\HarddiskVolume3 path \EFI\Microsoft\Boot\bootmgfw.efi (this verifies UEFI boot entry active).
4) Run the in‑place repair from the Rufus USB
  • Insert the Rufus USB, run F:\setup.exe as Administrator (replace F: with the USB drive letter).
  • Choose “Keep personal files and apps” and proceed. Let setup run to completion and reboot as requested.
5) Verify KB5070773 installed
  • After the repair completes and the system is back in Windows:
    dism /Online /Get-Packages | findstr /I "KB5070773"
    If it’s listed — job done.
If you can’t find those UEFI/boot options in the BIOS (or the board is rev 1 and the firmware lacks a proper UEFI mode)
  • Don’t panic. Two options:
    A) Update BIOS to the UEFI/beta BIOS for rev 2.0 if your board is rev 2.0 and Gigabyte provides one. Use Gigabyte’s support page for GA‑Z68AP‑D3 (select the correct rev) and follow the Q‑Flash instructions. I can fetch the exact BIOS filename for you if you want.
    B) If the firmware truly has no UEFI support (rare on 2.0 but possible on early revs), you can either:
    • run the repair using your Rufus‑modified media (the one that bypasses checks), or
    • do a clean legacy install (keeps data if you choose carefully, but you’ll need to reinstall apps).
If Windows does NOT boot after enabling UEFI
  • Don’t panic — you can enter BIOS and switch back to Legacy/CSM to boot again, or I’ll give steps to fix the boot entry (bcdboot) from WinRE if needed.
If you want, I’ll:
  • A) Stand by and walk you through entering BIOS and the exact menu names to change (tell me when you’re at the BIOS screen), OR
  • B) Fetch the Gigabyte support page / UEFI BIOS download for GA‑Z68AP‑D3 rev 2.0 so you have the correct BIOS file if you decide to flash, OR
  • C) Wait while you switch to UEFI and run Setup, and then help with any errors that show.
Which would you like me to do next?
 

Thanks — that WMIC output confirms the board model (Z68AP‑D3). Good news: you converted the disk to GPT and Windows already has an EFI boot entry, so the only remaining step before running the Rufus in‑place repair is to boot the motherboard in UEFI mode (disable Legacy/CSM) so the firmware uses the EFI entry.
Below are short, exact steps you can follow in the BIOS and what to expect. I’ll assume you’re near the PC — I’ll wait if you want me to pause while you do any step.
1) Enter the BIOS/UEFI
  • Reboot and press DEL repeatedly during POST (Gigabyte boards: DEL is the usual key).
  • If DEL doesn’t enter setup, try F2 or ESC.
2) What to change (Gigabyte Z68AP‑D3 / typical menu names)
  • Find the Boot / BIOS Features section (may be on the top tabs).
  • Locate CSM / Legacy Boot settings:
    • If you see “Boot Mode Selection” or “CSM Support” set it to UEFI only (or disable CSM / Legacy Boot).
    • Or set “Boot Option Priorities” so that an entry called “Windows Boot Manager” or a UEFI entry for your SSD is first.
  • TPM: Look in Security → Trusted Computing or Peripherals → Intel PTT / AMD fTPM. If present and you want TPM, enable it. If you don’t see it, that’s fine — many Z68 boards don’t have integrated TPM.
  • Secure Boot: you can leave Secure Boot OFF for now (enable later) — enabling it may complicate using Rufus USB if that USB isn’t Secure Boot–compatible.
3) Save and Exit
  • Save changes (usually F10) and reboot. The system should boot using the EFI entry that mbr2gpt created (Windows Boot Manager).
4) Verify in Windows (after it boots)
Open an elevated PowerShell and run:
  • Get-Disk -Number 0 | Format-List PartitionStyle
    (should show PartitionStyle : GPT)
  • bcdedit /enum ALL
    (you should see Windows Boot Manager with path \EFI\Microsoft\Boot\bootmgfw.efi)
5) Run the in‑place repair from the Rufus USB
  • Insert the Rufus USB (or mount Rufus ISO) and run setup.exe as Administrator from the USB.
  • Choose “Keep personal files and apps” and continue. Let it complete and reboot as prompted.
6) Verify the update finished
After the repair finishes, open elevated PowerShell and run:
dism /Online /Get-Packages | findstr /I "KB5070773"
If that returns a line for KB5070773 — success.
If anything goes wrong
  • If the PC won’t boot after switching to UEFI, don’t worry: reboot, go back into BIOS, set back to Legacy/CSM and we’ll recover. Usually though, with mbr2gpt done and an EFI entry present, switching to UEFI boots fine.
  • If Setup still reports “We couldn’t update the system reserved partition” after this, paste the exact Setup message or attach a screenshot and I’ll give the single next command (we’ll look at DISM/CBS logs or finish the repair another way).
Quick checklist you can copy:
  • Enter BIOS (DEL) → Boot/BIOS Features → Disable CSM / enable UEFI (or set Windows Boot Manager first).
  • Optional: enable TPM if present. Leave Secure Boot off for now. Save & Exit.
  • Boot into Windows → confirm GPT + EFI entry.
  • Run F:\setup.exe from Rufus USB (Admin) → Keep files/apps.
  • After repair: dism /Online /Get-Packages | findstr /I "KB5070773".
Would you like me to wait while you enter BIOS and change the settings (I’ll hold here), or do you want to try and report back after you’ve done it?
 

Great — I’ll standby while Setup runs.
What I’ll watch for (and what to do next)
  • Let Setup finish and reboot as it requests. Don’t interrupt the process.
  • After Windows comes back, open an elevated PowerShell and run this to confirm the update installed:
    dism /Online /Get-Packages | findstr /I "KB5070773"
    (alternate: Get-HotFix | Where-Object { $_.HotFixID -eq 'KB5070773' })
If the package is listed → success. Re‑enable Kaspersky and you’re done.
If Setup fails or shows any error (especially the SRP/EFI or commit errors)
  • Pause and grab a screenshot or copy the exact error text, then post it here. I’ll give the single next step.
  • If Setup finishes but the KB still isn’t recorded, run these three small commands (they produce tiny text files) and attach them here so I can diagnose immediately:
    Select-String -Path "$env:windir\Logs\DISM\dism.log" -Pattern '0x800f0991','Error','Failed' -Context 3,8 | Out-File "$env:USERPROFILE\Desktop\dism_err_excerpt.txt" -Encoding ascii
    dism /Online /Get-Packages | Out-File "$env:USERPROFILE\Desktop\Packages_full.txt" -Encoding ascii
    Select-String -Path "$env:windir\Logs\CBS\CBS.log" -Pattern 'KB5070773','0x800f0991','error' -Context 3,8 | Out-File "$env:USERPROFILE\Desktop\CBS_excerpt.txt" -Encoding ascii
If you want me to wait and watch, say “I’ll post results” and I’ll stay here. Otherwise run the verification command above and post the output (or a screenshot) and I’ll give the next single action.
 

Motherboard is:

Gigabyte GA-Z68P-DS3 Rev 1.0

I just removed the case and took a photo.

2025-10-24 03.27.14.webp


Rev. 1.0 does not support UEFI
Rev. 2.0 does supported UEFI

There are unofficial BIOS which have UEFI but I don't want to go down that path.

Windows 11 is installing now.

Is the motherboard not having UEFI an issue? I still don't fully understand what it does.
 

Thanks — useful photo and confirmation. Short answer first, then exactly what it means for you and the safe next steps.
Short answer
  • UEFI is a modern firmware interface that replaces the old legacy BIOS. It’s what Windows 11 expects for Secure Boot / TPM integration and for official supported upgrades.
  • If your board really is Rev 1.0 and has no UEFI, you can still run Windows 11 using Rufus’s workaround, but you won’t get the full UEFI/Secure‑Boot features and some future update/feature paths may be limited. I don’t recommend using unofficial UEFI BIOS builds — too risky.
  • Right now the important thing is whether the system boots after the repair. If it boots, you’re OK to finish and we’ll verify KB5070773. If it doesn’t boot, I’ll give immediate recovery steps.
What UEFI does (plain language)
  • UEFI provides:
    • A defined EFI System Partition (FAT32) for boot files (instead of a legacy MBR bootloader).
    • Native Secure Boot support to ensure only signed boot loaders run.
    • Better hardware initialization, faster boots, and support for GPT disks.
  • Legacy BIOS boots from MBR and does not implement Secure Boot or the modern EFI boot path. Some very old boards simply can’t boot in UEFI mode.
Why that matters for your install
  • Windows 11 wants UEFI + TPM 2.0 + Secure Boot for full support. Rufus can make installer media that bypasses those checks so the OS will install in legacy mode — but that’s a bypass, not the same as native support.
  • You already converted the disk to GPT with mbr2gpt. If your firmware cannot boot GPT in UEFI mode, you could end up with a non‑booting system after conversion. However, your earlier outputs showed an EFI boot entry and Get-Disk reported GPT — so it looks like the conversion succeeded and Windows has an EFI entry. That suggests your system is currently booting fine (or at least Windows is running). Good sign.
Immediate checks for you (run in elevated PowerShell or check the GUI) — paste the outputs if you want me to confirm
1) Confirm BIOS/boot mode:
msinfo32
  • In msinfo32 look at “BIOS Mode” — it will show “UEFI” or “Legacy”.
2) Confirm disk is GPT:
Get-Disk -Number 0 | Format-List PartitionStyle
3) Confirm EFI boot entry exists:
bcdedit /enum ALL
  • Look for a Windows Boot Manager section with path \EFI\Microsoft\Boot\bootmgfw.efi
4) Confirm partitions:
Get-Partition -DiskNumber 0 | Format-Table PartitionNumber,DriveLetter,Size,Type -AutoSize
If msinfo32 says BIOS Mode = UEFI and you have an EFI partition + Windows Boot Manager path = \EFI..., you are booting UEFI and everything is good.
If msinfo32 says BIOS Mode = Legacy (or Windows won’t boot after you reboot)
  • Don’t panic. Two recovery routes:
    1) If you have backups, you can do a clean install in legacy mode using Rufus that keeps your files (but you’ll lose installed apps).
    2) If you want to keep your apps/data, we can revert steps or rebuild the proper boot entry. If Windows won’t boot you can use WinRE / a Windows USB to run bcdboot or restore a bootloader. I’ll give exact commands for recovery if needed.
About unofficial UEFI BIOS builds
  • There are community BIOS mods that add UEFI to older Gigabyte boards — they can work, but they’re risky (bricking, instability). I don’t recommend them unless you accept the risk and have a reliable way to recover the board (hardware programmer / service). You already said you don’t want to go there — wise.
Next, based on what you told me
  • You’re installing Windows 11 right now. Let it finish. After it reboots:
    • If it boots normally: run the verification command to check the KB:
      dism /Online /Get-Packages | findstr /I "KB5070773"
      (or) Get-HotFix | Where-Object { $_.HotFixID -eq 'KB5070773' }
    • If it fails to boot: tell me exactly what you see (black screen, error message), or boot from the Rufus USB into Recovery and I’ll give the single command to fix boot (usually bcdboot or a bootrec sequence).
Which would you like me to do next?
  • I can wait while you finish the install and then (A) verify the KB for you, or (B) guide you through checking BIOS Mode (msinfo32) and the commands above.
  • If you prefer I’ll just wait until you tell me the install result — say “Install finished” (and whether it booted) and I’ll give the one next command.
You’re nearly done — I’ll stand by.
 

Thanks — the msinfo screenshot is exactly what I needed. Short, clear summary first, then what to do next.
What your msinfo shows (plain)
  • BIOS Mode: UEFI — the system is currently booting in UEFI mode (good).
  • Secure Boot State: Unsupported — the board/firmware does not support Secure Boot (so you can’t enable Microsoft’s Secure Boot).
  • PCR7 Configuration: Binding Not Possible — the platform does not have a TPM 2.0 (or the firmware/board does not expose a TPM PCR7 for Windows attestation).
  • Kernel DMA Protection: Off — also expected without full UEFI/Secure Boot/TPM support.
What that means (practical)
  • UEFI boot: conversion to GPT and the EFI boot entry worked — Windows can boot in UEFI mode on this board now. That’s the key thing to allow the in‑place repair and to let KB installation proceed.
  • No Secure Boot / no TPM 2.0: you don’t have the full Microsoft‑recommended platform features for Windows 11 (Secure Boot + TPM 2.0). That’s fine — you can run Windows 11 (you already have it), but the machine is not “fully supported” by Microsoft’s hardware requirements. Some features tied to Secure Boot / TPM (device attestation, some enterprise features) aren’t available.
  • You made the right choice not to flash unofficial UEFI firmware — that can brick the board and is high risk.
Immediate next step (one command, run as Admin)
  • Verify the cumulative KB installed:
    dism /Online /Get-Packages | findstr /I "KB5070773"
If that shows KB5070773 listed — you are done. Re‑enable Kaspersky and that’s the end.
If KB5070773 is not listed (or Setup still reported an error)
  • Run these three small commands (as Administrator) and attach the three tiny text files (or paste their contents) and I’ll parse them and give the single next action:
Select-String -Path "$env:windir\Logs\DISM\dism.log" -Pattern '0x800f0991','Error','Failed' -Context 3,8 | Out-File "$env:USERPROFILE\Desktop\dism_err_excerpt.txt" -Encoding ascii
dism /Online /Get-Packages | Out-File "$env:USERPROFILE\Desktop\Packages_full.txt" -Encoding ascii
Select-String -Path "$env:windir\Logs\CBS\CBS.log" -Pattern 'KB5070773','0x800f0991','error' -Context 3,8 | Out-File "$env:USERPROFILE\Desktop\CBS_excerpt.txt" -Encoding ascii
I’ll read those and give the single remedial command (usually a CAB to apply, or a confirmatory step).
Should you worry about no Secure Boot / TPM?
  • Short answer: No urgent worry. Your system will run Windows 11 and receive most updates. The primary downside is lack of some security/enterprise features and that Microsoft could limit some future features to fully supported hardware — but that’s uncertain and you can continue using the system safely.
  • If you later decide you want full support, the non‑risky options are:
    • Buy a modern motherboard/PC that supports TPM 2.0 + Secure Boot; or
    • Use external TPM modules only if your board supports them (rare on older consumer boards).
  • Don’t use unofficial BIOS mods unless you accept the risk.
If you want me to wait
  • I can stand by while you run the verify command or finish any last step — say “I’ll post verify” and I’ll wait for your output (or paste the three logs above if needed).
Congratulations — you’ve come a long way (mbr2gpt, SSU, RestoreHealth, attempted KB install, in‑place repair). We’re close; the single next step is the package verification command above. Want me to check it now?
 

Perfect — your screenshots show the disk is GPT and Windows Boot Manager is using the EFI path. Good job — the conversion and boot setup worked.
Next (minimal, exact): confirm whether KB5070773 actually installed.
1) Run this (Admin PowerShell) and paste the output here:
dism /Online /Get-Packages | findstr /I "KB5070773"
Or alternatively:
Get-HotFix | Where-Object { $_.HotFixID -eq 'KB5070773' }
2) If the command returns a line for KB5070773 — you’re done. Re‑enable Kaspersky and you can stop here.
3) If KB5070773 is NOT listed, collect three tiny logs so I can read the exact failure lines and tell you the single next command. Run these (Admin PowerShell) — each creates a small .txt on your Desktop:
Select-String -Path "$env:windir\Logs\DISM\dism.log" -Pattern '0x800f0991','Error','Failed' -Context 3,8 | Out-File "$env:USERPROFILE\Desktop\dism_err_excerpt.txt" -Encoding ascii
dism /Online /Get-Packages | Out-File "$env:USERPROFILE\Desktop\Packages_full.txt" -Encoding ascii
Select-String -Path "$env:windir\Logs\CBS\CBS.log" -Pattern 'KB5070773','0x800f0991','error' -Context 3,8 | Out-File "$env:USERPROFILE\Desktop\CBS_excerpt.txt" -Encoding ascii
Attach the three .txt files (or paste their contents) and I’ll parse them and give the single follow‑up step.
If you prefer I can wait while you run the verification command now — say “Running verify” and I’ll stand by.
 

Windows 11 is still installing:
 

Attachments

  • 2025-10-24 03.49.23.webp
    2025-10-24 03.49.23.webp
    1.6 MB · Views: 0
Back
Top