

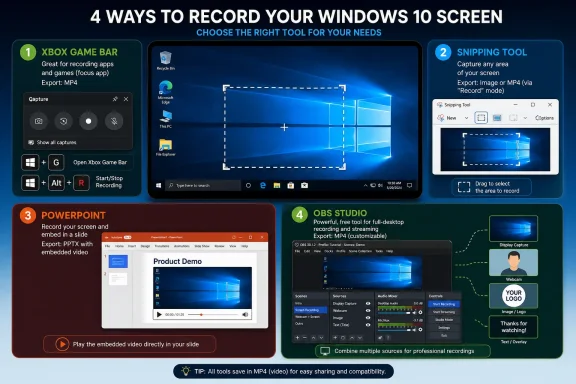
HP’s 2026 Windows 10 screen-recording advice is useful if you apply one simple decision rule first: use Xbox Game Bar only when you need a fast MP4 of one focused app; use Snipping Tool when you need to record a selected area and your Windows 10 install has the updated recorder; use PowerPoint when the clip belongs in a slide deck; use OBS Studio when you need full-desktop, multi-source, or production-style control. If Xbox Game Bar fits, press Windows Key + G, start or stop with Windows Key + Alt + R, and find the MP4 in This PC → Videos → Captures.
That is the fastest answer, and it should stay first. But it is not the whole answer. The practical question for Windows 10 users in 2026 is not simply “How do I record my screen?” It is “Which free or available recorder can capture the exact thing I need?”
HP’s “How to Screen Record on Windows 10: 4 Easy Methods (2026 Guide)” correctly leads with the simplest built-in method: Xbox Game Bar. For a quick recording of a single app, it is still the fastest route.
Use this decision rule:
That choice matters because Xbox Game Bar is not a full-desktop recorder. It is best understood as an app recorder. It can be the right tool for a browser demo, software walkthrough, or app bug report, but it is the wrong default if the user needs to show the desktop, Start menu, taskbar, File Explorer, or multiple windows.
The shortest useful guidance is this:
This PC → Videos → Captures
That folder is the first place to check when a user says the recording “disappeared.” Many users expect new files to land on the desktop or in Downloads. Game Bar does not work that way by default.
HP’s guide says Snipping Tool recording works on Windows 11 and on updated versions of Windows 10. That caveat needs to be stated plainly: Snipping Tool screen recording is not guaranteed to be present on every Windows 10 machine. It works only on Windows 10 installs that have received the updated Snipping Tool with recording support.
On older Windows 10 images, locked-down managed PCs, or systems that have not received the relevant app update, the recording button may not appear. In that case, use PowerPoint if Office is installed, or OBS Studio if third-party software is allowed.
HP identifies the path as Insert → Screen Recording, which is the key detail. The feature is not a Windows 10 feature by itself; it depends on having Microsoft PowerPoint installed.
OBS works differently from Xbox Game Bar, Snipping Tool, and PowerPoint. Instead of simply recording an app or selected rectangle, OBS uses scenes and sources. That model is more complex, but it is also why OBS can handle full-desktop captures, multiple windows, different audio sources, and streaming workflows.
This is especially important because Windows 10 systems in 2026 can differ from one another. One PC may have an updated Snipping Tool with recording support. Another may not. One workplace may allow OBS. Another may block third-party software. One user may have PowerPoint. Another may not. A good guide should acknowledge those differences instead of implying every method is available everywhere.
The decision should begin with the recording target:
But before escalating, confirm the user is trying to record a supported target. Xbox Game Bar works best after the user clicks inside a normal app and makes that app active. If the user is sitting on the desktop, Start menu, taskbar, or File Explorer, the problem may be scope, not setup.
But vague recording instructions create bad evidence. If a user tries to capture File Explorer with Xbox Game Bar, the most important step may be missing. If they record the wrong window, the clip may not show the failure. If they cannot find the output file, the support process stalls before anyone sees the problem.
The fix is to write capture instructions by incident type:
That level of specificity prevents avoidable failure. It also helps organizations standardize what kind of evidence they receive.
If an organization supports Xbox Game Bar, the internal instructions should say plainly that it is for a focused app and that files land in Videos → Captures. If an organization supports Snipping Tool recording, it should verify that the managed Windows 10 build actually includes the recording feature. If OBS is approved, the organization should provide a baseline configuration instead of leaving each user to discover sources and output folders alone.
The more accurate version is:
“Free” is helpful. “Available on this PC and suitable for this capture target” is better.
That limitation explains why the same shortcut can produce different outcomes depending on what the user is doing. In a browser or app, Game Bar can be quick and smooth. On the desktop or in File Explorer, it can feel as if recording is unavailable or incomplete.
The right response is not to force the shortcut. It is to match the method to the task:
But the better 2026 answer is method-based:
That is the fastest answer, and it should stay first. But it is not the whole answer. The practical question for Windows 10 users in 2026 is not simply “How do I record my screen?” It is “Which free or available recorder can capture the exact thing I need?”
 The Fastest Answer Is Xbox Game Bar, But Pick the Method by Capture Target
HP’s “How to Screen Record on Windows 10: 4 Easy Methods (2026 Guide)” correctly leads with the simplest built-in method: Xbox Game Bar. For a quick recording of a single app, it is still the fastest route.Use this decision rule:
| If you need to record... | Use this method | Why |
|---|---|---|
| One focused app, quickly | Xbox Game Bar | Fastest built-in path; saves an MP4 automatically |
| A selected part of the screen, desktop area, or File Explorer workflow | Snipping Tool | Region-based recording, where available on updated Windows 10 installs |
| A clip for a lesson, demo, or presentation | PowerPoint Screen Recording | Records directly into a presentation workflow |
| Full desktop, multiple windows, streaming, or advanced audio/video setup | OBS Studio | Free advanced recorder with scene, source, and output controls |
The shortest useful guidance is this:
- Recording one app? Try Xbox Game Bar first.
- Recording a region or Windows navigation? Try Snipping Tool, if recording is available on that Windows 10 install.
- Recording for slides? Use PowerPoint.
- Recording a full production or stream? Use OBS Studio.
Method 1: Record One App Quickly with Xbox Game Bar
Xbox Game Bar is the best first choice when the thing you need to capture is a normal application window. It is built into Windows 10 systems where the Game Bar components are present and enabled, and it produces a standard MP4 file without asking the user to create a project.Exact steps
- Open the app you want to record.
- Click inside that app so it is the active window.
- Press Windows Key + G.
- In the capture controls, click the Record button.
- To start or stop faster, use Windows Key + Alt + R.
- When recording stops, open File Explorer.
- Go to This PC → Videos → Captures.
- Look for the saved MP4 file.
What output to expect
Xbox Game Bar saves a video file automatically as an MP4 in:This PC → Videos → Captures
That folder is the first place to check when a user says the recording “disappeared.” Many users expect new files to land on the desktop or in Downloads. Game Bar does not work that way by default.
When to use it
Use Xbox Game Bar for:- A browser walkthrough
- A single software demo
- A short app bug report
- A quick training clip in one application
- A simple recording where no editing workflow is needed first
When not to use it
Do not make Xbox Game Bar the default when the recording must show:- File Explorer
- The bare Windows desktop
- The Start menu
- The taskbar
- Multiple windows at the same time
- A full-desktop workflow
- Anything outside the focused app
Method 2: Record a Selected Area with Snipping Tool, If Your Windows 10 Install Supports It
Snipping Tool has become the more natural recorder for many Windows tasks because it lets the user select an area of the screen rather than forcing the recording to follow one active app.HP’s guide says Snipping Tool recording works on Windows 11 and on updated versions of Windows 10. That caveat needs to be stated plainly: Snipping Tool screen recording is not guaranteed to be present on every Windows 10 machine. It works only on Windows 10 installs that have received the updated Snipping Tool with recording support.
On older Windows 10 images, locked-down managed PCs, or systems that have not received the relevant app update, the recording button may not appear. In that case, use PowerPoint if Office is installed, or OBS Studio if third-party software is allowed.
Exact steps
- Open Start.
- Search for Snipping Tool.
- Open Snipping Tool.
- Look for the Record option or video camera-style control.
- Select Record.
- Click New.
- Drag to select the area of the screen you want to capture.
- Click Start.
- Perform the steps you want to record.
- Click Stop when finished.
- Review the recording.
- Choose Save.
- Pick a folder and file name.
What output to expect
Snipping Tool does not follow the same automatic Captures-folder model as Xbox Game Bar. The user saves the recording manually and chooses the location. That is useful for support workflows because the user can save directly to a known folder, project folder, or upload location.When to use it
Use Snipping Tool when you need to record:- A selected area of the screen
- A File Explorer action
- A dialog box
- A small desktop region
- A workflow where only part of the screen should be visible
- A short clip that should be saved manually to a chosen location
When it may be unavailable on Windows 10
Snipping Tool recording may be unavailable if:- The Windows 10 install has not received the updated Snipping Tool
- The Microsoft Store app update is blocked or unavailable
- The PC is on an older managed image
- The Snipping Tool interface shows screenshot options but no recording option
Method 3: Record a Screen Area from PowerPoint
PowerPoint’s screen recorder is easy to overlook because users think of PowerPoint as a presentation app, not a capture tool. But for lessons, business demos, classroom material, and internal training, it may be the most convenient recorder because the video can live directly inside the slide deck.HP identifies the path as Insert → Screen Recording, which is the key detail. The feature is not a Windows 10 feature by itself; it depends on having Microsoft PowerPoint installed.
Exact steps
- Open PowerPoint.
- Open an existing presentation or create a new one.
- Go to Insert on the ribbon.
- Select Screen Recording.
- Choose the screen area you want to record.
- Select whether to include options such as audio or pointer behavior, depending on the controls shown.
- Start recording.
- Perform the action you want to capture.
- Stop the recording using the PowerPoint recording controls.
- The recording appears in the slide.
- Keep it embedded in the presentation, or save/export it as a separate media file if needed.
What output to expect
PowerPoint places the recording into the slide. From there, the user can keep it as part of the presentation or save the media separately. That makes it different from Xbox Game Bar, which automatically creates an MP4 in the Captures folder, and different from Snipping Tool, where the user manually saves the recording.When to use it
Use PowerPoint when:- The recording is part of a presentation
- A teacher or trainer is building a lesson
- A business user is preparing a walkthrough
- The final destination is a slide deck
- Office is already installed and approved
When it is unavailable on Windows 10
PowerPoint screen recording is unavailable if:- Microsoft Office is not installed
- The installed PowerPoint version does not include the screen recording feature
- The organization blocks the feature through policy or installation choices
- The user is on a Windows 10 PC without access to PowerPoint
Method 4: Use OBS Studio for Full Desktop, Multiple Sources, or Production Work
OBS Studio is the advanced free option in HP’s list. It is not the fastest tool for a casual user, but it is the right answer when the recording needs more control than Windows’ built-in or Office-based tools provide.OBS works differently from Xbox Game Bar, Snipping Tool, and PowerPoint. Instead of simply recording an app or selected rectangle, OBS uses scenes and sources. That model is more complex, but it is also why OBS can handle full-desktop captures, multiple windows, different audio sources, and streaming workflows.
Exact basic setup
- Install OBS Studio from the official OBS project source or an approved organizational software portal.
- Open OBS Studio.
- In the Scenes area, create or use a default scene.
- In Sources, click Add.
- Choose the source type that matches your need:
- Display Capture for the full screen
- Window Capture for a specific app window
- Game Capture for supported game capture scenarios
- Audio Input Capture for a microphone
- Audio Output Capture for system audio, where supported
- Confirm that the preview shows the correct content.
- Open Settings → Output if you need to confirm recording settings.
- Open Settings → Output or Settings → Advanced as needed to check where recordings are saved.
- Click Start Recording.
- Perform the workflow.
- Click Stop Recording.
- Open the configured output folder to retrieve the recording.
What output to expect
OBS saves recordings to the output location configured in its settings. That location may not be obvious to a new user, so anyone recommending OBS should also tell the user where to find the file after recording. The file format depends on the OBS settings selected.When to use it
Use OBS Studio for:- Full-desktop recording
- Multi-window demos
- Creator workflows
- Streaming
- Repeated tutorial production
- Separate audio source control
- Recording setups that need predictable scenes and sources
When not to use it
Do not make OBS the first recommendation for a nontechnical user who only needs a quick app recording. OBS is powerful, but the setup can become the task. For a single app, Xbox Game Bar is faster. For a small region, Snipping Tool may be easier if available. For a slide-based lesson, PowerPoint may be more natural.What Changed in 2026 for Windows 10 Users
The practical change in 2026 is not that Windows 10 suddenly has one perfect screen recorder. It does not. The change is that users now have a clearer four-method choice:- Xbox Game Bar remains the fastest free built-in answer for one focused app.
- Snipping Tool is now a serious option for region recording, but only on updated Windows 10 installs that include recording support.
- PowerPoint remains useful where Office is already installed and the recording belongs in a presentation.
- OBS Studio remains the free advanced option when the built-in tools are too limited.
This is especially important because Windows 10 systems in 2026 can differ from one another. One PC may have an updated Snipping Tool with recording support. Another may not. One workplace may allow OBS. Another may block third-party software. One user may have PowerPoint. Another may not. A good guide should acknowledge those differences instead of implying every method is available everywhere.
Four Recorders, Four Assumptions About the User
The four methods are not interchangeable. Each one assumes a different kind of user and a different kind of job.| Method | Best fit | Capture scope | Cost/setup | Save behavior |
|---|---|---|---|---|
| Xbox Game Bar | Fast single-app recording | Current focused application | Free where built-in Game Bar is present and enabled | MP4 in This PC → Videos → Captures |
| Snipping Tool | Selected screen areas, desktop regions, File Explorer workflows | User-selected area | Available only on updated Windows 10 installs with recording support | User saves manually to a chosen location |
| PowerPoint Screen Recording | Presentations, lessons, business demos | User-selected area | Requires Microsoft PowerPoint | Embedded in slide, with manual save/export options |
| OBS Studio | Full desktop, multiple windows, streaming, production | Display, window, app, audio, and scene sources | Free third-party software; requires setup | Saved to the configured OBS output folder |
- Focused app: Xbox Game Bar
- Selected region: Snipping Tool
- Presentation asset: PowerPoint
- Full production: OBS Studio
The Most Common Failure Is Asking Game Bar to Record the Wrong Thing
HP’s troubleshooting advice starts with a useful check: open Settings → Gaming → Xbox Game Bar and make sure the feature is turned on. If the overlay does not open at all, that setting is worth checking.But before escalating, confirm the user is trying to record a supported target. Xbox Game Bar works best after the user clicks inside a normal app and makes that app active. If the user is sitting on the desktop, Start menu, taskbar, or File Explorer, the problem may be scope, not setup.
Xbox Game Bar troubleshooting sequence
- Ask what the user is trying to record.
- If it is File Explorer, the desktop, Start menu, taskbar, multiple windows, or the full desktop, switch to Snipping Tool, PowerPoint, or OBS.
- If it is one app, tell the user to click inside that app.
- Press Windows Key + G.
- If the overlay does not open, go to Settings → Gaming → Xbox Game Bar.
- Confirm Xbox Game Bar is enabled.
- If the system lacks required Xbox/Game Bar components, reinstall or restore them only where policy allows.
- Record again.
- Retrieve the MP4 from This PC → Videos → Captures.
Action checklist for admins
- Confirm the capture target before recommending a recorder.
- Use Xbox Game Bar only for one focused app.
- Tell users to click inside the app before pressing Windows Key + G.
- Tell users that Game Bar recordings are saved in This PC → Videos → Captures.
- Use Snipping Tool for selected regions only if the Windows 10 install has recording support.
- Use PowerPoint when Office is installed and the recording belongs in a presentation.
- Use OBS Studio for full-desktop, multi-window, or advanced audio/video workflows.
- Avoid telling users to “record your screen” without naming the tool and expected output location.
Windows 10 Support Workflows Need Better Recording Instructions
The hidden audience for a screen-recording guide is the help desk. A good screen recording can turn a vague support ticket into a clear reproduction: what the user clicked, what appeared, and where the workflow failed.But vague recording instructions create bad evidence. If a user tries to capture File Explorer with Xbox Game Bar, the most important step may be missing. If they record the wrong window, the clip may not show the failure. If they cannot find the output file, the support process stalls before anyone sees the problem.
The fix is to write capture instructions by incident type:
| Support scenario | Recommended method | Instruction to give the user |
|---|---|---|
| Bug inside one app | Xbox Game Bar | “Click inside the app, press Windows Key + Alt + R, reproduce the issue, stop recording, then send the MP4 from Videos → Captures.” |
| File Explorer or desktop behavior | Snipping Tool, if recording is available | “Open Snipping Tool, choose Record, select the area, reproduce the issue, stop, and save the file where you can upload it.” |
| Training or process documentation | PowerPoint | “Open PowerPoint, go to Insert → Screen Recording, select the area, record the workflow, and keep or export the clip.” |
| Multi-window or full-desktop reproduction | OBS Studio | “Use the approved OBS profile, confirm the preview shows the right display or windows, record, then retrieve the file from the configured output folder.” |
If an organization supports Xbox Game Bar, the internal instructions should say plainly that it is for a focused app and that files land in Videos → Captures. If an organization supports Snipping Tool recording, it should verify that the managed Windows 10 build actually includes the recording feature. If OBS is approved, the organization should provide a baseline configuration instead of leaving each user to discover sources and output folders alone.
The “Free” Story Is True, But It Needs Context
HP’s quick answer says Windows 10 users can record for free without extra software when Xbox Game Bar fits the job. That is a useful message. It should not be stretched into a claim that every screen-recording need is covered by one built-in tool.The more accurate version is:
- Xbox Game Bar is free and built into many Windows 10 setups, but it is limited to focused-app recording.
- Snipping Tool recording may be free on updated Windows 10 installs, but it is not universal across all Windows 10 machines.
- PowerPoint recording may already be available in workplaces with Office, but it depends on PowerPoint being installed.
- OBS Studio is free, but it is third-party software and requires setup.
- Paid tools such as Snagit and Camtasia may make sense where users need faster polished capture or a fuller editing workflow, but they are not required for basic recording.
“Free” is helpful. “Available on this PC and suitable for this capture target” is better.
The Desktop Is Still the Line Xbox Game Bar Does Not Cross Well
The most important limitation in HP’s guide is the one many users discover only after a failed attempt: Xbox Game Bar is not the right tool for recording the Windows desktop experience. It is an efficient app recorder, not a universal recorder for every Windows surface.That limitation explains why the same shortcut can produce different outcomes depending on what the user is doing. In a browser or app, Game Bar can be quick and smooth. On the desktop or in File Explorer, it can feel as if recording is unavailable or incomplete.
The right response is not to force the shortcut. It is to match the method to the task:
- If the user needs to show a software problem inside one application, use Game Bar.
- If the user needs to show where a file is located, use Snipping Tool if available or another region/full-screen recorder.
- If the user needs to show several windows together, use OBS.
- If the user needs the recording inside a training deck, use PowerPoint.
A Tighter Workflow for Ordinary Users
For most individual users, the guide can be reduced to a few quick scripts.Quick app recording
Use this when the action happens inside one app.- Open the app.
- Click inside it.
- Press Windows Key + Alt + R.
- Do the task.
- Press Windows Key + Alt + R again.
- Open This PC → Videos → Captures.
- Send or upload the MP4.
Quick selected-area recording
Use this when the recording must show a region, File Explorer, or part of the desktop, and your Windows 10 Snipping Tool includes recording.- Open Start → Snipping Tool.
- Choose Record.
- Click New.
- Select the area.
- Click Start.
- Do the task.
- Click Stop.
- Save the file to a known folder.
Quick presentation recording
Use this when the video belongs in a slide deck.- Open PowerPoint.
- Go to Insert → Screen Recording.
- Select the area.
- Record the workflow.
- Stop recording.
- Keep the clip in the slide or save it as media if needed.
Quick advanced recording
Use this when you need the whole desktop, multiple windows, or advanced audio/video control.- Open OBS Studio.
- Add the correct source, such as Display Capture or Window Capture.
- Confirm the preview.
- Check the recording output folder.
- Click Start Recording.
- Perform the workflow.
- Click Stop Recording.
- Retrieve the file from the configured folder.
Bottom Line: Start with the Target, Not the Shortcut
HP’s guide is right that the fastest Windows 10 screen-recording method is Xbox Game Bar: Windows Key + G to open it, Windows Key + Alt + R to start or stop, and This PC → Videos → Captures for the MP4. For one focused app, that remains the quickest free path.But the better 2026 answer is method-based:
- Xbox Game Bar for fast single-app MP4 capture.
- Snipping Tool for selected-area recording on updated Windows 10 installs that include the recording feature.
- PowerPoint for recordings that belong in slides.
- OBS Studio for full desktop, multi-window, streaming, or production work.
References
- Primary source: HP
Published: 2026-07-08T17:20:08.447762
How to Screen Record on Windows 10: 4 Easy Methods (2026 Guide) < Tech Takes - HP.com Malaysia
Learn how to screen record on Windows 10 using Xbox Game Bar, Snipping Tool, PowerPoint and OBS, plus what to do when Xbox Game Bar won't record.www.hp.com
