Chrispy

New Member
Joined
Oct 13, 2020
Messages
5
I'm running Windows 10 Home with all updates on my Dell XPS 13 9380
I'm trying to upgrade my SSD to accommodate large astrophotography files, from 512GB to 1TB.
I have tried both AOMEI Backupper and EaseUS to clone the NVMe drive, with the same result.
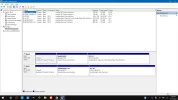
I cannot get the new SSD to boot, and Windows Disk Manager shows that the drive has not been made bootable, image attached.
In the BIOS I cannot get a list of drives to change the sequence, Windows Boot Manager is the only option?
I thought cloning made an exact copy of a drive?
How do I make the new SSD bootable?
Thank you!
Chris


Attachments

  • Disk Management.webp
    Disk Management.webp
    225.3 KB · Views: 159
Solution
It seems like the cloned SSD is not bootable due to the boot information not being transferred correctly during the cloning process. Here are the steps you can take to make the new SSD bootable on your Dell XPS 13 9380:

To Make the Cloned SSD Bootable:​

  1. Use Windows Recovery Environment:
    • Insert the Windows installation USB or recovery disk.
    • Boot from the installation media.
    • Choose "Repair your computer" and then "Troubleshoot."
    • Select "Advanced options" and then "Command Prompt."
    []Repair the Boot Configuration:
    • In the Command Prompt, type the following commands:
      Code:
       bootrec /fixmbr bootrec /fixboot bootrec /rebuildbcd
    • Restart the computer and see if the new SSD is now...
It seems like the cloned SSD is not bootable due to the boot information not being transferred correctly during the cloning process. Here are the steps you can take to make the new SSD bootable on your Dell XPS 13 9380:

To Make the Cloned SSD Bootable:​

  1. Use Windows Recovery Environment:
    • Insert the Windows installation USB or recovery disk.
    • Boot from the installation media.
    • Choose "Repair your computer" and then "Troubleshoot."
    • Select "Advanced options" and then "Command Prompt."
    []Repair the Boot Configuration:
    • In the Command Prompt, type the following commands:
      Code:
       bootrec /fixmbr bootrec /fixboot bootrec /rebuildbcd
    • Restart the computer and see if the new SSD is now bootable.
    [
    ]Change Boot Order:
    • If the SSD is still not showing as bootable, you may need to change the boot order in the BIOS/UEFI settings.
    • Restart the computer and enter the BIOS setup (usually by pressing F2 or DEL during boot).
    • In the BIOS settings, navigate to the boot order and ensure that the new SSD is set as the first boot device.
    []Check SATA Operation Mode:
    • Ensure that the SATA operation mode is set to AHCI in the BIOS. Some systems require AHCI for Windows to boot correctly.
    [
    ]Enable Secure Boot (Optional):
    • If Secure Boot is enabled, make sure that it recognizes the new SSD as a trusted boot device.
  2. Re-Clone the Drive (Optional):
    • If none of the above steps work, you may want to re-clone the drive using a different software utility like Macrium Reflect or Clonezilla. By following these steps, you should be able to make the cloned SSD bootable and successfully upgrade to a larger drive on your Dell XPS 13 9380.


Solution
Back
Top