

A deleted file in Windows is not always gone for good, but the path to recovery depends heavily on what happened after it disappeared. Whether the file was sent to the Recycle Bin, removed with
The most important rule is simple: stop using the affected drive as much as possible. Windows may mark the space occupied by a deleted file as available for reuse rather than immediately destroying the data. The more new files, updates, downloads, browser cache, and applications written to that drive, the more likely the old data will be overwritten.
For a recently deleted document, photo, spreadsheet, or video, the Recycle Bin remains the fastest route. For more serious situations, Microsoft’s Windows File Recovery utility, File History backups, OneDrive versioning, and specialist recovery tools may offer a second chance. But it is equally important to understand where recovery ends and prevention begins—especially on modern SSD-equipped Windows PCs.
When a file vanishes, the instinct is often to download recovery software, search the web, and install multiple utilities. That can be the worst possible reaction if the deleted file was stored on the Windows system drive.
A conventional hard drive and a solid-state drive handle deleted data differently, but both can lose recoverable content when new information is written to the same storage location. Installing a recovery application to
This is the most reliable recovery route because it restores the original file rather than attempting to reconstruct deleted data from unused storage sectors.
Unlike the Recycle Bin, this utility is not a simple graphical app. It uses a command-line interface, which makes it less approachable than many third-party recovery programs. However, it remains a valuable free option for users who can follow precise commands and have a separate destination drive ready.
The app opens in a command window. Its basic structure looks like this:
The
For example, if a file was deleted from the Windows drive and an external drive is available as
Recovered files are typically placed in a recovery folder created on the destination drive.
Example: recover a deleted Word document from Downloads.
Replace
Example: search for JPEG images formerly stored in Pictures.
Extensive mode can take considerably longer, particularly on large hard drives. Its broader search also means recovered content may include duplicate files, partial files, or items with generic names.
Useful filters include:
This approach reduces scan time and makes the recovery results easier to inspect.
Most SSDs support a feature called TRIM. When Windows deletes data, TRIM can tell the SSD that certain blocks are no longer needed. The drive may then erase or prepare those blocks internally to maintain future write performance.
That process means an SSD can make deleted information unrecoverable much sooner than a traditional mechanical hard drive.
Unlike Windows File Recovery, File History does not search deleted disk fragments. It restores a previously backed-up version, making it safer, faster, and far more reliable.
This is why File History should be treated as a preventive tool, not an emergency recovery tool. If it is not enabled, set it up after the immediate recovery effort is complete.
This is especially important because cloud-synced files can behave differently from files stored only on the PC.
For compatible OneDrive files, use Version history to review and restore an earlier version. This can be more appropriate than restoring a deleted file because it preserves the document’s identity, sharing context, and location.
The important lesson is that local deletion and cloud deletion are not always the same event. A file may exist in one recycle bin but not the other, depending on whether it was online-only, locally cached, shared, or synchronized at the time it was removed.
System Restore is intended to reverse changes to Windows system files, drivers, installed applications, registry settings, and configuration states. It is useful after a faulty driver installation, an unstable update, or problematic software deployment.
It is not a dependable method for restoring a deleted spreadsheet from Documents or a missing image folder from the desktop. For personal files, use the Recycle Bin, File History, OneDrive versioning, Windows File Recovery, or a backup.
That convenience comes with important trade-offs.
Warning signs include:
A strong approach follows the familiar 3-2-1 backup principle:
The strongest recovery prospects come from acting quickly, minimizing drive activity, restoring data to another drive, and understanding the limitations of SSDs and cloud synchronization. Windows File Recovery is a capable free utility for users willing to work at the command line, but it cannot overcome overwritten data, failing hardware, or an SSD that has already processed TRIM.
For the files that matter most, backups remain the only dependable answer. Recovery software can sometimes rescue deleted data; a tested backup ensures that accidental deletion never becomes a permanent loss.
Shift + Delete, lost from an external drive, or erased from a cloud-synced folder, Windows 11 and Windows 10 offer several recovery options—each with different limits, risks, and success rates.The most important rule is simple: stop using the affected drive as much as possible. Windows may mark the space occupied by a deleted file as available for reuse rather than immediately destroying the data. The more new files, updates, downloads, browser cache, and applications written to that drive, the more likely the old data will be overwritten.
For a recently deleted document, photo, spreadsheet, or video, the Recycle Bin remains the fastest route. For more serious situations, Microsoft’s Windows File Recovery utility, File History backups, OneDrive versioning, and specialist recovery tools may offer a second chance. But it is equally important to understand where recovery ends and prevention begins—especially on modern SSD-equipped Windows PCs.
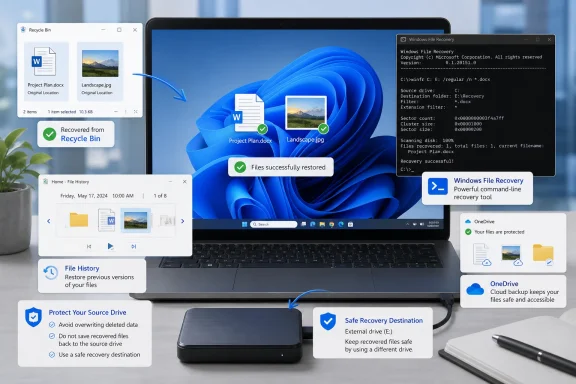 The First Minutes Matter After a File Is Deleted
When a file vanishes, the instinct is often to download recovery software, search the web, and install multiple utilities. That can be the worst possible reaction if the deleted file was stored on the Windows system drive.A conventional hard drive and a solid-state drive handle deleted data differently, but both can lose recoverable content when new information is written to the same storage location. Installing a recovery application to
C:, downloading large files, or even continuing routine work can reduce the likelihood of a successful restore.Immediate recovery checklist
Before trying any recovery method, take these precautions:- Stop saving files to the affected drive.
- Avoid installing recovery software on the same drive that held the deleted data.
- Pause cloud synchronization if a deleted file may be syncing across devices.
- Do not run disk cleanup tools or storage optimization utilities.
- Do not format the drive unless a qualified recovery specialist advises it.
- Use another drive—preferably an external drive—for recovered files.
Start with the Windows Recycle Bin
For ordinary deletions from local Windows drives, the Recycle Bin is the first place to look. Files deleted using the standardDelete key are usually moved there rather than erased immediately.This is the most reliable recovery route because it restores the original file rather than attempting to reconstruct deleted data from unused storage sectors.
How to restore deleted files from the Recycle Bin
- Open the Recycle Bin from the desktop.
- If its icon is not visible, search for Recycle Bin from the Start menu.
- Use the search box to locate a filename if the bin contains many items.
- Right-click the file or folder.
- Select Restore.
When the Recycle Bin will not help
The Recycle Bin is not a universal safety net. A deleted file may bypass it when:- The file was deleted with
Shift + Delete. - The Recycle Bin was emptied.
- The file was deleted from certain removable media, such as a USB flash drive or memory card.
- The file was larger than the Recycle Bin allocation.
- The file was deleted from a network location.
- A cleanup program automatically emptied the bin.
- The file existed only in cloud storage and was not locally available.
Windows File Recovery: Microsoft’s Free Deep-Recovery Tool
When the Recycle Bin has been emptied or bypassed, Windows File Recovery is Microsoft’s built-in-style option for restoring deleted files. It is distributed through the Microsoft Store and works on supported Windows 11 systems as well as Windows 10 version 2004 and later.Unlike the Recycle Bin, this utility is not a simple graphical app. It uses a command-line interface, which makes it less approachable than many third-party recovery programs. However, it remains a valuable free option for users who can follow precise commands and have a separate destination drive ready.
What Windows File Recovery can do
Windows File Recovery is designed to help locate deleted files from supported storage volumes. It can be useful for:- Recently deleted files on NTFS drives.
- Documents, photos, videos, archives, and other common file types.
- Data removed after emptying the Recycle Bin.
- Files deleted from some USB drives and memory cards.
- Older deletions or more complicated loss scenarios through deeper scan modes.
What it cannot reliably recover
Windows File Recovery has meaningful limitations:- It cannot recover data from cloud services or network locations as if they were ordinary local disks.
- It may be ineffective after extensive drive use.
- It is less likely to succeed on modern SSDs where TRIM has processed deleted blocks.
- It cannot repair a drive with severe physical damage.
- It does not replace a complete backup strategy.
- It requires a different destination drive for recovered data.
How to Use Windows File Recovery Safely
Install Windows File Recovery from the Microsoft Store, then open it through Windows Search. Approve the administrative prompt if Windows requests permission.The app opens in a command window. Its basic structure looks like this:
winfr source-drive: destination-drive: /mode /n search-filterThe
source-drive is where the deleted file originally lived. The destination-drive is a different drive where recovered files should be stored.For example, if a file was deleted from the Windows drive and an external drive is available as
E:, the source and destination would begin like this:winfr C: E:Recovered files are typically placed in a recovery folder created on the destination drive.
Choose the right recovery mode
Windows File Recovery includes modes intended for different loss scenarios.Regular mode
Use Regular mode first when all of the following are true:- The source drive uses NTFS.
- The deletion happened recently.
- The drive has not been used heavily since the file disappeared.
- The drive has not been formatted.
Example: recover a deleted Word document from Downloads.
winfr C: E: /regular /n \Users\YourName\Downloads\report.docxReplace
YourName with the Windows account folder name and report.docx with the correct filename.Extensive mode
Use Extensive mode when:- Regular mode fails to find the file.
- The deletion happened some time ago.
- The drive was formatted.
- The source is formatted as FAT or exFAT.
- The file was on a USB flash drive, memory card, or similar removable media.
- The file system or metadata may be damaged.
C: drive.winfr C: E: /extensive /n *.pdfExample: search for JPEG images formerly stored in Pictures.
winfr C: E: /extensive /n \Users\YourName\Pictures\*.jpgExtensive mode can take considerably longer, particularly on large hard drives. Its broader search also means recovered content may include duplicate files, partial files, or items with generic names.
Use focused searches whenever possible
A recovery scan becomes more useful when it is narrow. Search by a known filename, file extension, or original folder path rather than trying to recover an entire drive in one pass.Useful filters include:
*.docxfor Microsoft Word documents*.xlsxfor Excel workbooks*.pdffor PDF files*.jpgor*.pngfor images*.mp4for video files- A full path for a specific known file
winfr C: E: /regular /n "\Users\YourName\Documents\Quarterly Report.docx"This approach reduces scan time and makes the recovery results easier to inspect.
Why SSD Recovery Is More Difficult
Modern Windows PCs frequently use solid-state drives, and SSDs are excellent for speed, battery life, and responsiveness. They are not, however, ideal candidates for post-deletion recovery.Most SSDs support a feature called TRIM. When Windows deletes data, TRIM can tell the SSD that certain blocks are no longer needed. The drive may then erase or prepare those blocks internally to maintain future write performance.
That process means an SSD can make deleted information unrecoverable much sooner than a traditional mechanical hard drive.
The practical implication for Windows users
If a file was deleted from an SSD:- Attempt recovery immediately.
- Avoid restarting repeatedly or continuing ordinary activity.
- Do not download recovery utilities to that SSD if an alternative exists.
- Expect lower success rates after the Recycle Bin has been emptied.
- Prioritize backups and cloud version history over forensic recovery.
Restore Files from File History
File History is one of the most useful Windows recovery features—provided it was enabled before the file was lost. It saves versions of personal files to an external drive or network location, allowing users to go back in time and restore an earlier copy.Unlike Windows File Recovery, File History does not search deleted disk fragments. It restores a previously backed-up version, making it safer, faster, and far more reliable.
What File History protects
File History is primarily aimed at personal folders, including:- Desktop
- Documents
- Pictures
- Music
- Videos
Restore a file from File History
On both Windows 11 and Windows 10, File History restoration remains accessible through the classic Control Panel interface.- Open Control Panel.
- Select System and Security.
- Choose File History.
- Select Restore personal files.
- Browse through available versions using the navigation controls.
- Select the file or folder to restore.
- Click the green Restore button.
The major File History limitation
File History only works if it was configured in advance and the backup destination was available often enough to capture the needed version. It cannot retroactively create a backup of a file that was already deleted.This is why File History should be treated as a preventive tool, not an emergency recovery tool. If it is not enabled, set it up after the immediate recovery effort is complete.
Windows Backup and OneDrive Add Another Recovery Layer
Windows 11 increasingly emphasizes Windows Backup and OneDrive integration for protecting user settings and common folders. When Desktop, Documents, and Pictures are backed up to OneDrive, deleted content may be recoverable from OneDrive’s own Recycle Bin—even if it is no longer in the local Windows Recycle Bin.This is especially important because cloud-synced files can behave differently from files stored only on the PC.
Recover deleted OneDrive files
For a OneDrive personal account:- Open the OneDrive website and sign in.
- Select Recycle bin in the navigation pane.
- Find the deleted file or folder.
- Select it.
- Choose Restore.
Check file version history
Deletion is not the only failure scenario. A file may still exist but contain bad edits, ransomware-encrypted content, accidental overwrites, or a corrupted revision.For compatible OneDrive files, use Version history to review and restore an earlier version. This can be more appropriate than restoring a deleted file because it preserves the document’s identity, sharing context, and location.
Google Drive follows a similar model
Files deleted from Google Drive are normally sent to its Trash, where they are retained for a limited period before permanent deletion. If the file was synchronized to a Windows PC, check both the local Recycle Bin and the cloud service’s web-based trash.The important lesson is that local deletion and cloud deletion are not always the same event. A file may exist in one recycle bin but not the other, depending on whether it was online-only, locally cached, shared, or synchronized at the time it was removed.
Why System Restore Is Not a File-Recovery Tool
A common misconception is that System Restore can bring back deleted personal documents, photos, and downloads. It should not be relied on for that purpose.System Restore is intended to reverse changes to Windows system files, drivers, installed applications, registry settings, and configuration states. It is useful after a faulty driver installation, an unstable update, or problematic software deployment.
It is not a dependable method for restoring a deleted spreadsheet from Documents or a missing image folder from the desktop. For personal files, use the Recycle Bin, File History, OneDrive versioning, Windows File Recovery, or a backup.
When Third-Party Recovery Software Makes Sense
Third-party recovery tools can provide a graphical interface, file previews, filtering, and guided scans that may be easier to use than Windows File Recovery. Some tools also offer more advanced features for lost partitions, damaged file systems, memory cards, and removable media.That convenience comes with important trade-offs.
Strengths of third-party recovery software
A reputable recovery utility may offer:- A more approachable graphical interface.
- Preview support for photos, documents, and media files.
- Easier filtering by file type and location.
- Scan results organized by recoverability.
- Options for removable drives and memory cards.
- Better workflow guidance for non-technical users.
Risks to consider before installing anything
Recovery software should be approached carefully:- Never install it to the drive containing the missing files.
- Avoid unknown “free recovery” websites that bundle unwanted software.
- Be skeptical of tools that promise guaranteed recovery.
- Confirm whether a free version can actually save files or only scan them.
- Do not provide payment details to questionable vendors under pressure.
- Remember that no software can reliably recover overwritten or TRIM-cleared SSD data.
When Professional Data Recovery Is Worth the Cost
Software recovery works only when the storage device remains readable enough for Windows or a recovery program to scan it. If a drive has physical damage, failing electronics, bad sectors, encryption complications, or severe file-system corruption, professional intervention may be the only remaining path.Warning signs include:
- Clicking, grinding, or repeated spin-up sounds from a hard drive.
- A drive that appears and disappears in File Explorer.
- Windows asking to initialize or format a previously working drive.
- Extremely slow access or repeated read errors.
- A USB drive that reports zero capacity.
- A drive containing irreplaceable, high-value information.
Build a Recovery Plan Before the Next Deletion
The most effective deleted-file recovery strategy is a backup plan that makes recovery unnecessary. Windows users should combine local versioned backups with off-device or cloud-based protection.A strong approach follows the familiar 3-2-1 backup principle:
- Keep three copies of important data.
- Store them on two different types of media.
- Keep one copy off-site, such as a trusted cloud service.
A practical Windows 11 and Windows 10 setup
For most home users, the following combination is realistic:- Enable OneDrive backup for Desktop, Documents, and Pictures.
- Configure File History to an external drive for versioned local backups.
- Keep a second external backup drive disconnected except during backup sessions.
- Use a full-system backup solution if the PC contains important apps, projects, or configurations.
- Periodically test recovery by restoring a non-critical file.
The Bottom Line
Recovering deleted files in Windows 11 or Windows 10 begins with the simplest option: the Recycle Bin. If the file is not there, File History, OneDrive’s Recycle Bin and version history, and Microsoft’s Windows File Recovery tool provide progressively more advanced options.The strongest recovery prospects come from acting quickly, minimizing drive activity, restoring data to another drive, and understanding the limitations of SSDs and cloud synchronization. Windows File Recovery is a capable free utility for users willing to work at the command line, but it cannot overcome overwritten data, failing hardware, or an SSD that has already processed TRIM.
For the files that matter most, backups remain the only dependable answer. Recovery software can sometimes rescue deleted data; a tested backup ensures that accidental deletion never becomes a permanent loss.
References
- Primary source: HP
Published: 2026-07-22T21:51:08.021000+00:00
How to Restore Deleted Files in Windows 10 (Now 11) | HP® United Kingdom
Did you accidentally delete an important document or program? Find out how to recover deleted files in Windows 10 in this HP Tech Takes guide.www.hp.com
- Official source: support.microsoft.com
Restore deleted files or folders in OneDrive | Microsoft Support
Learn how to delete and restore files in OneDrive. Recover deleted files or folders from the OneDrive recycle bin.support.microsoft.com - Official source: learn.microsoft.com
restore recycled and deleted from the recycle bin files in win 10 - Microsoft Q&A
Restore a recycled and deleted from the recycle bin file in win 10learn.microsoft.com