

Create a table of contents that updates correctly by applying Word’s built-in Heading 1, Heading 2, and Heading 3 styles to section titles, inserting an Automatic Table of Contents, and choosing Update entire table whenever headings change. These instructions cover Word for Microsoft 365, Word 2024, Word 2021, Word for Mac, and Word for the web. Advanced customization requires desktop Word; direct field-code editing is primarily a Word for Windows desktop feature.
Word does not build an automatic table of contents from text merely because it is large, bold, centered, or underlined. It looks for heading styles and uses their outline levels to determine which entries belong in the table.
Use a consistent hierarchy:
Do not create the hierarchy by changing only the font size or indentation. A title formatted manually may look like a heading without being recognized as one.
Save the document after insertion.
Do not choose Manual Table if you expect Word to maintain the entries. A manual table is editable placeholder text and cannot be rebuilt automatically from headings.
To update fields throughout the main document:
Even with this option enabled, manually choose Update entire table after changing heading names or structure. That provides a chance to inspect the result before publication.
Changing this setting does not remove heading formatting from the document. It only changes which heading levels the table displays.
To change the appearance of each table level in desktop Word:
Word for the web preserves existing TOC styles but does not provide the complete desktop customization workflow. Use Open in Desktop App to restyle the levels.
In Word for Windows:
Warning: Incorrect field syntax can produce an error or an incomplete table. Save a backup copy before replacing a working TOC field manually.
To insert a TOC field in Word for Windows:
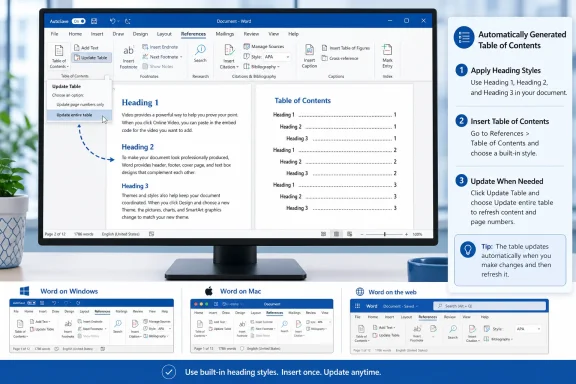 Prepare the document with heading styles
Word does not build an automatic table of contents from text merely because it is large, bold, centered, or underlined. It looks for heading styles and uses their outline levels to determine which entries belong in the table.Use a consistent hierarchy:
- Heading 1: Chapters or major sections
- Heading 2: Sections within a Heading 1 section
- Heading 3: Subsections within a Heading 2 section
- Normal: Regular body text that should not appear in the table
- Select the complete paragraph containing the first major section title.
- Open the Home tab.
- Find the Styles gallery.
- Select Heading 1.
- Select each second-level section title and apply Heading 2.
- Apply Heading 3 to any third-level subsections.
- Repeat until every title that should appear in the table has the appropriate heading style.
Do not create the hierarchy by changing only the font size or indentation. A title formatted manually may look like a heading without being recognized as one.
Check the heading structure in Word for Windows
The Navigation pane provides a quick way to catch missing or incorrectly nested headings before inserting the table:- Open View.
- Select Navigation Pane, or press Ctrl+F.
- Select the Headings tab in the Navigation pane.
- Confirm that all intended section titles appear.
- Expand the arrows beside major headings to inspect the hierarchy.
Insert an automatic table of contents in desktop Word
Place the table after a cover page or near the beginning of the document. A separate page usually keeps the table easier to maintain.- Click where the table should begin.
- If necessary, insert a page break by pressing Ctrl+Enter on Windows or Command+Enter on Mac.
- Open the References tab.
- Select Table of Contents.
- Choose one of the available Automatic Table designs.
Save the document after insertion.
Do not choose Manual Table if you expect Word to maintain the entries. A manual table is editable placeholder text and cannot be rebuilt automatically from headings.
Insert a table of contents in Word for the web
Word for the web supports heading-based tables of contents, although its customization options are more limited than desktop Word.- Make sure the document is in editing mode.
- Apply Heading 1, Heading 2, and other required styles from Home > Styles.
- Click where the table should appear.
- Open the References tab.
- Select Table of Contents or Insert Table of Contents, depending on the current ribbon layout.
- Insert the available automatic table.
Update the table after editing the document
An automatic table of contents is a Word field, but its displayed results do not necessarily refresh after every document edit. Update it after changing headings, moving sections, or altering pagination.Update from the References tab
- Click anywhere inside the table of contents.
- Open References.
- Select Update Table.
- Choose one of the following:
- Update page numbers only: Use this when the heading names and structure are unchanged, but text edits have moved them to different pages.
- Update entire table: Use this after adding, deleting, renaming, promoting, demoting, or reorganizing headings.
- Select OK.
Update from the context menu
In desktop Word:- Right-click inside the table.
- Select Update Field.
- Choose the required update option.
- Select OK.
Update with the keyboard in Word for Windows
To update only the selected table:- Click inside the table of contents.
- Press F9.
To update fields throughout the main document:
- Press Ctrl+A.
- Press F9.
- Respond to any update prompts that appear.
Make Word update fields before printing
Word for Windows can update fields automatically as part of the printing process. This reduces the risk of distributing a document with old page numbers.- Select File > Options.
- Select Display.
- Under Printing options, enable Update fields before printing.
- Select OK.
Even with this option enabled, manually choose Update entire table after changing heading names or structure. That provides a chance to inspect the result before publication.
Control page numbers and the number of heading levels
Desktop Word’s custom table dialog controls which levels appear and how page references are displayed.- Open References > Table of Contents.
- Select Custom Table of Contents.
- Configure the available options:
- Show page numbers: Displays or hides page numbers.
- Right align page numbers: Places page numbers at the right margin.
- Tab leader: Selects dots, dashes, a line, or no leader between entries and page numbers.
- Formats: Applies one of Word’s predefined table formats.
- Show levels: Determines how many heading levels are included.
- Review the preview.
- Select OK.
- If Word asks whether to replace the selected table, confirm the replacement.
2 to include Heading 1 and Heading 2 while excluding Heading 3 and lower levels.Changing this setting does not remove heading formatting from the document. It only changes which heading levels the table displays.
Restyle the table without changing document headings
The formatting inside the table is controlled by styles such as TOC 1, TOC 2, and TOC 3. These are separate from the Heading 1, Heading 2, and Heading 3 styles used in the document body.To change the appearance of each table level in desktop Word:
- Open References > Table of Contents.
- Select Custom Table of Contents.
- Select Modify.
- If Modify is unavailable, set Formats to From template.
- Select the table style to edit:
- TOC 1 controls first-level entries.
- TOC 2 controls second-level entries.
- TOC 3 controls third-level entries.
- Select Modify.
- Change the font, size, color, spacing, indentation, or other supported formatting.
- Select OK.
- Repeat for the remaining TOC levels.
- Select OK to apply the changes.
Word for the web preserves existing TOC styles but does not provide the complete desktop customization workflow. Use Open in Desktop App to restyle the levels.
Use numbered headings without breaking the table
If the document needs chapter numbering such as1, 1.1, and 1.1.1, connect numbering to Word’s heading styles instead of typing numbers manually.In Word for Windows:
- Apply the built-in heading styles throughout the document.
- Select the first Heading 1 paragraph.
- Open Home.
- In the Paragraph group, select Multilevel List.
- Under List Library, choose a design that shows numbering linked to headings.
- Update the entire table of contents.
Create a table from custom styles
Some templates use named paragraph styles instead of the built-in Heading styles. Desktop Word can map those styles to table levels through the custom table options where available.- Open References > Table of Contents.
- Select Custom Table of Contents.
- Select Options.
- Find the custom style in the list.
- Enter the table level that should use that style, such as
1or2. - Remove unwanted level assignments from styles that should not be listed.
- Select OK.
- Select OK again and confirm replacement of the existing table.
\t switch for custom style mappings. Field-code editing is best reserved for templates that cannot be configured through the standard dialog.Warning: Incorrect field syntax can produce an error or an incomplete table. Save a backup copy before replacing a working TOC field manually.
To insert a TOC field in Word for Windows:
- Click where the table should appear.
- Open Insert > Quick Parts > Field.
- Select TOC under Field names.
- Configure the supported field properties or options.
- Select OK.
- Press F9 if the result does not populate immediately.
Fix missing, incorrect, or duplicated entries
A heading is missing
- Select the missing title in the document body.
- Open Home > Styles.
- Apply the intended Heading style.
- Update the entire table.
A normal paragraph appears in the table
The paragraph probably has a heading style or outline level applied.- Select the unwanted paragraph.
- Apply Normal from Home > Styles.
- Update the entire table.
The heading indentation is wrong
A Heading 2 entry shown at the same level as Heading 1 usually indicates an incorrect style assignment.- Select the heading in the document.
- Apply the correct heading level.
- Check the hierarchy in the Navigation pane.
- Update the entire table.
Page numbers are incorrect
- Confirm that the document has finished repaginating.
- Update the entire table rather than updating page numbers only.
- Save the file.
- Check File > Print or export a new PDF and inspect the final page numbers.
Updates replace custom formatting
Directly formatting generated TOC entries is not durable. Reapply the desired formatting through References > Table of Contents > Custom Table of Contents > Modify, then edit the appropriate TOC styles.“Error! Bookmark not defined” appears
This usually means a generated link or referenced destination is damaged or no longer exists.- Save a backup of the document.
- Click inside the table.
- Choose References > Update Table.
- Select Update entire table.
- If the error remains, remove and recreate the table from the current headings.
Remove and rebuild a damaged table
Do not delete individual TOC lines one at a time. Use Word’s removal command so that the entire field is removed cleanly.- Open References.
- Select Table of Contents.
- Select Remove Table of Contents.
- Verify the document headings and their levels.
- Click where the replacement should appear.
- Open References > Table of Contents.
- Choose an automatic table.
- Update the entire table.
- Save the document and verify several entries by selecting them and confirming that they lead to the correct headings.
References
- Primary source: Technobezz
Published: 2026-07-13T16:48:47.746000+00:00
How to Create a Table of Contents in Word That Updates Properly | Technobezz
How to create a table of contents in Word using headings, automatic tables, customization, updates, and removal.www.technobezz.com - Official source: support.microsoft.com
Update a table of contents | Microsoft Support
Update tables of contents in your document when something changes.support.microsoft.com
