

Windows 11 has two separate places that affect the pointer’s appearance:
- Settings > Accessibility > Mouse pointer and touch changes the pointer’s size and color for visibility.
- Mouse Properties > Pointers manages complete cursor schemes and the individual cursor files used for Normal Select, busy, text selection, resizing, and other states.
If you downloaded a cursor pack, changed a theme, or selected a new scheme but still see the old arrow, work through the steps below in order.
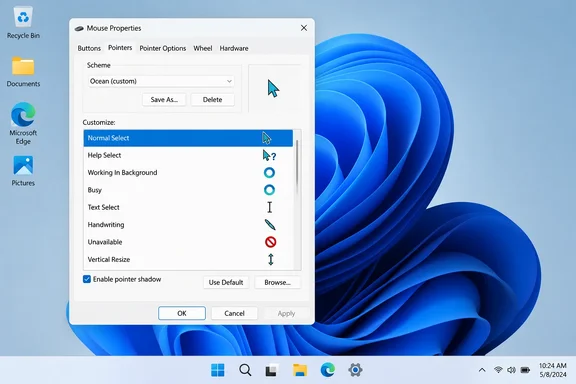 Before changing the cursor scheme
Have the following ready:
- A working mouse or touchpad. You can also navigate Windows with the keyboard if necessary.
- The downloaded cursor files, if you are using a custom pack. Windows cursor files normally use the
.curextension for still pointers and.anifor animated pointers. - Permission to change personalization settings on the PC. On a managed work or school computer, an administrator may enforce a theme or restrict personalization changes.
Warning: Do not run an executable installer just to change a cursor. A legitimate cursor scheme can be applied through Windows using.curor.anifiles. Treat downloaded cursor packs as untrusted until they have been scanned and obtained from a source you trust.
Also confirm that you are changing the mouse pointer, not the text insertion cursor. The blinking vertical line inside a document is controlled separately at Settings > Accessibility > Text cursor.
Apply a built-in cursor scheme from Mouse Properties
This is the main repair method when the selected pointer does not change or only some cursor states update.
- Press Windows key + I to open Settings.
- Select Bluetooth & devices.
- Select Mouse.
- Under Related settings, select Additional mouse settings.
The classic Mouse Properties dialog opens. - Select the Pointers tab.
- Open the Scheme drop-down list.
- Choose a built-in scheme, such as Windows Default (system scheme), Windows Black (system scheme), or another scheme available on your PC.
- Watch the preview image beside the Scheme list. It should change to reflect the selected scheme.
- Select Apply.
- Move the mouse over the desktop, a text box, a link, and a window edge. The arrow, text-selection beam, link pointer, and resize pointers should use the new scheme where appropriate.
- Select OK to save the change and close Mouse Properties.
A restart is not normally necessary. If Windows keeps the old cursor in one open program, close and reopen that program before assuming the change failed.
Change one cursor in a scheme
A cursor scheme is a collection of pointers. If you only want a different normal arrow, busy animation, text-selection beam, or link pointer, change the relevant entry instead of replacing every pointer.
- Open Settings > Bluetooth & devices > Mouse > Additional mouse settings.
- In Mouse Properties, select the Pointers tab.
- Under Customize, select the pointer role you want to change. Common entries include:
- Normal Select for the regular arrow.
- Help Select for context help.
- Working in Background and Busy for loading indicators.
- Text Select for the I-beam shown over editable text.
- Link Select for links in compatible apps.
- Resize and move pointers for window edges and movable objects.
- Select Browse.
- In the file picker, locate the
.curor.anifile you want to use, select it, and choose Open. - Confirm that the preview for the selected pointer role changes.
- Repeat for other pointer roles if needed.
- Select Save As if you want to preserve this combination as a named scheme. Enter a distinctive name, then save it.
- Select Apply, test the pointer in a few locations, and then select OK.
Saving a named scheme is useful because it lets you return to your customized combination later from the Scheme drop-down list. Without saving, a later theme change can make it harder to identify which individual cursor files you selected.
Stop a Windows theme from replacing your cursor
Windows themes can include cursor definitions. If Windows is allowed to let themes change mouse pointers, switching themes can replace the scheme you selected manually.
Use this setting when the cursor changes correctly, then reverts after you select a different desktop theme, apply a theme pack, or sign out and back in.
- Open Settings > Bluetooth & devices > Mouse > Additional mouse settings.
- Select the Pointers tab.
- Clear the checkbox labeled Allow themes to change mouse pointers.
- Select Apply.
- Select the cursor scheme you want from the Scheme list, or select your saved custom scheme.
- Select Apply again.
- Select OK.
To confirm that the theme was involved, open Settings > Personalization > Themes and check which theme is currently active. You can switch temporarily to another built-in theme, then return to Mouse Properties and verify that your selected cursor scheme remains in place.
If you actually want every part of a theme—including its pointer set—to control the appearance, leave Allow themes to change mouse pointers selected. The important point is that Windows cannot reliably preserve a manually selected scheme across theme changes when themes are permitted to replace the pointers.
Check Windows 11 Accessibility pointer settings
Windows 11’s Accessibility settings are helpful for making the pointer larger or easier to see, but they are not the place to install a full .cur or .ani scheme.
- Press Windows key + I.
- Select Accessibility.
- Select Mouse pointer and touch.
- Under Mouse pointer style, choose the style you want:
- White
- Black
- Inverted
- A custom color
- Use the Size slider to adjust pointer size.
- Return to Mouse Properties > Pointers and select Apply on your preferred scheme if you are troubleshooting a cursor pack that did not appear.
If your goal is a complete cursor theme, use the Pointers tab as the authoritative place to select the scheme and individual files. Use Accessibility settings primarily for visibility adjustments.
Reset a damaged or incomplete cursor scheme
A damaged scheme may show a new arrow but retain old busy, text, resize, or link pointers. It can also happen when a downloaded cursor file was moved, renamed, deleted, or stored on removable media after you applied it.
Reset to a built-in Windows scheme before trying the custom scheme again.
- Open Settings > Bluetooth & devices > Mouse > Additional mouse settings.
- Select the Pointers tab.
- Open the Scheme list.
- Select Windows Default (system scheme).
- Select Apply.
- Test the arrow, text-selection pointer, and busy pointer. The system defaults should now appear.
- If one specific entry still looks wrong, select that entry under Customize.
- Select Use Default to restore the default pointer for that entry.
- Select Apply, then select OK.
After confirming that the default scheme works, reopen Mouse Properties and apply your custom scheme again. If the custom scheme fails a second time, replace its cursor files from a known-good download or choose different .cur and .ani files manually with Browse.
Verify that the change really applied
Test several pointer states rather than checking only the desktop arrow:
- Move the pointer over an empty part of the desktop for Normal Select.
- Open Notepad and move the pointer over editable text for Text Select.
- Open a web browser and hover over a clickable link for Link Select, if the app uses that cursor state.
- Move the pointer to a resizable window edge or corner for a resize pointer.
- Open a program or dialog that takes a few moments to load to observe the working or busy indicator.
- Lock the PC with Windows key + L, sign back in, and check the normal arrow again.
If all of these show the expected pointer shapes, the scheme is applied correctly. If only one app shows an unexpected cursor, the app may be choosing its own cursor while the pointer is over its window or content. That does not necessarily mean the Windows cursor scheme failed.
Troubleshoot a cursor that still will not change
The new scheme appears selected, but the old arrow remains
Reset the scheme first:
- In Mouse Properties > Pointers, select Windows Default (system scheme).
- Select Apply.
- Select the desired built-in or custom scheme again.
- Select Apply and test on the desktop.
If only Normal Select is stuck, select Normal Select under Customize, use Browse to choose its cursor file again, then select Apply.
The cursor changes until you apply a Windows theme
Clear Allow themes to change mouse pointers on the Pointers tab, select Apply, and then reapply your preferred cursor scheme. This prevents themes from replacing the manually selected pointer set.
Some pointers change, but the loading or text cursor does not
The cursor pack may not contain every pointer role, or one of its files may be missing. In Mouse Properties > Pointers, select the missing role under Customize and either:
- Choose a replacement
.curor.anifile with Browse, or - Select Use Default to restore that one Windows cursor.
Select Apply after each correction.
Windows cannot find a downloaded cursor file
Do not keep active cursor files in a temporary download location, a USB drive, cloud-only folder, or archive file. Move the cursor pack to a permanent local folder before applying it, then use Browse to select the files again. If the files are gone, reset to Windows Default (system scheme) and reinstall the scheme from a fresh, trusted copy.
The pointer is visible but too large, too small, or the wrong color
Open Settings > Accessibility > Mouse pointer and touch. Adjust Mouse pointer style and the Size slider, then return to Mouse Properties > Pointers if you also need to reapply a full cursor scheme.
Changes revert on a work or school PC
Your organization may be applying a theme, profile policy, or device-management setting. Confirm whether the same change persists after a restart and whether you can select a built-in scheme. If it immediately reverts, contact your IT administrator rather than editing the registry or attempting to bypass device policy.