

Microsoft’s current mouse documentation directs Windows 11 users from Settings > Bluetooth & devices > Mouse > Additional mouse settings, and Windows 10 users from Settings > Devices > Mouse > Additional mouse options. Both routes open the same legacy Mouse Properties dialog. Select the Pointers tab; this is where Windows manages cursor schemes rather than basic mouse speed, buttons, or scrolling.
The split between Settings and Mouse Properties is worth understanding before you start. Settings is the quickest route when the problem is visibility. Mouse Properties is the correct tool when you want a coordinated custom cursor set that changes what Windows shows in different situations.
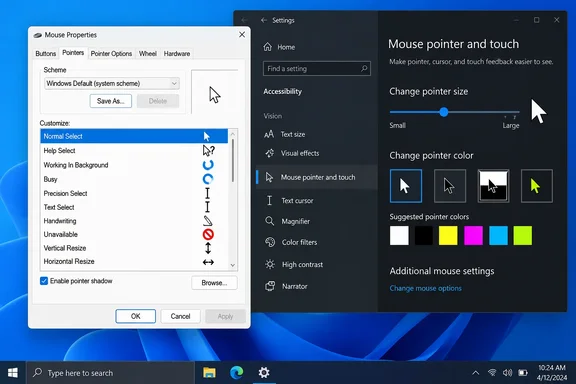 Open the Pointers tab and choose a built-in scheme
In Windows 11, open Settings, select Bluetooth & devices, choose Mouse, then select Additional mouse settings under Related settings. In Windows 10, open Settings > Devices > Mouse, then select Additional mouse options.
When Mouse Properties opens, select the Pointers tab. The Scheme drop-down menu at the top lists the cursor collections installed with Windows, including standard, large, and extra-large variants on many systems. Select a scheme, then use the preview pane to check how its arrows, busy indicators, link cursor, and resize cursors will look.
Click Apply to test the choice without closing the dialog. If the scheme works well across your desktop, File Explorer, browser, and apps, click OK to keep it. Use Cancel if you want to abandon changes made since the dialog was opened.
A cursor scheme is more than the arrow seen on the desktop. It is a collection of assignments for specific Windows states, including:
- Normal Select is the ordinary arrow used for most pointing and clicking.
- Working in Background and Busy are the indicators Windows uses while an app or the system is processing work.
- Text Select is the I-beam that appears over editable text.
- Link Select is the hand that appears over hyperlinks and other clickable web elements.
- Horizontal, vertical, and diagonal resize pointers appear at the edges of resizable windows.
Choosing an entire built-in scheme is the low-risk option because each of those roles has a matching cursor. It also avoids the common customization mistake of replacing only the normal arrow, then discovering that the old cursors still appear during loading, text editing, and window resizing.
Replace one cursor role at a time
To assign an individual cursor, select the role under Customize, then choose Browse. Microsoft documents this workflow for both Windows 10 and Windows 11: choose the item in the Pointers list, browse to the cursor you want, and open it.
For example, select Normal Select if you want a different main arrow, or select Link Select if you want a more visible hand over web links. After choosing a file, the preview next to that role changes immediately. Repeat the process only for the roles you actually want to alter.
Windows cursor files normally use the .cur extension for static cursors and .ani for animated ones. Microsoft’s Win32 theme-file documentation identifies both as cursor formats. Image files such as .png, .jpg, and .webp cannot simply be selected in Mouse Properties; they must first be converted into a proper cursor file by a trustworthy tool.
Keep custom cursor files in a permanent location before assigning them. A folder such as C:\Users\YourName\Documents\Cursors is more reliable than Downloads, a temporary extraction folder, USB storage, or a cloud folder that may later be removed or unavailable. The legacy cursor configuration records the selected cursor-file locations, as illustrated by Microsoft’s archived Scripting Blog examples. If the files are moved or deleted later, Windows may fall back to another cursor or leave the scheme partially broken.
Avoid cursor packages that ask you to run an unfamiliar installer merely to obtain artwork. A .cur or .ani file selected through the built-in Browse dialog is one thing; an executable, script, or registry-changing “theme installer” is software that deserves the same scrutiny as any other download. For a personal cursor collection, direct file selection through Mouse Properties gives you a clear view of what Windows is being asked to use.
Save the finished set before changing anything else
As soon as you have mixed built-in and custom cursor assignments into a set you like, select Save As on the Pointers tab. Give the scheme a distinctive name, such as High Visibility Blue 2026 or Minimal Dark Static, then click OK. Windows adds it to the Scheme menu for the current account.
Saving first is more than housekeeping. It creates a recovery point inside the cursor selector: if later experiments go badly, you can select your named scheme again instead of assigning every cursor manually. Use a name that tells you what the set is for, especially if you maintain one scheme for readability and another for appearance.
After saving, click Apply, test a few ordinary tasks, and then click OK. Check a browser, a Word document or text editor, File Explorer, and the edges of a resizable window. Those quick checks expose missing assignments that a desktop-only test will not show.
If you want a scheme to remain in place when switching Windows themes, look for Allow themes to change mouse pointers on the Pointers tab. Clear that checkbox if it is available and you do not want a theme selection to replace your cursor choices. Microsoft’s Windows theme controls include a mouse-cursor component, so a theme can be part of the reason a carefully chosen pointer set appears to have changed later.
The Delete button is for saved custom schemes, not the Windows-supplied defaults. Delete only a scheme you no longer need, and make sure it is not the active selection if you still want to preserve it.
Use Settings when visibility is the real goal
A custom cursor set can improve appearance, but it is not always the best answer to a pointer that disappears against bright applications, dark windows, games, or multiple monitors. Microsoft’s accessibility guidance provides controls designed specifically for visibility, without requiring a third-party cursor pack.
On Windows 11, open Settings > Accessibility > Mouse pointer and touch. On Windows 10, open Settings > Ease of Access > Mouse pointer. From there, increase pointer size and select a white, black, inverted, or custom-colored pointer. Microsoft also offers recommended bright colors and a color picker for a custom choice.
The inverted option is especially useful when your work moves between very light and very dark content because its contrast changes against the background. A larger black or bright-colored pointer is often easier to track than an animated novelty cursor, particularly on high-resolution displays where the default arrow can feel undersized.
These Settings controls serve a different purpose from the Pointers tab. They are fast and accessible, but they do not give you the same role-by-role editor for cursor files. Windows 11 Forum’s guide on pointer style and size also notes that changing those appearance settings can leave the classic scheme shown as “None,” reflecting unsaved custom pointer settings. The practical takeaway is simple: save a named Mouse Properties scheme before experimenting with Accessibility pointer styles or colors.
Mouse Properties also includes several visibility settings on the Pointer Options tab:
- Enable Display pointer trails if you need to follow the pointer during movement.
- Enable Show location of pointer when I press the CTRL key if you frequently lose it on a wide or multi-monitor desktop.
- Consider Hide pointer while typing if the arrow blocks text, but leave it off if you rely on a constantly visible pointer.
Microsoft documents pointer trails and the Ctrl-key locator in its current mouse-settings guidance. These are often better fixes for “Where did my cursor go?” than changing every icon in a scheme.
Restore the Windows defaults cleanly
To undo a complete custom set, return to Mouse Properties > Pointers, open the Scheme drop-down menu, select Windows Default (system scheme) or another Windows-supplied default listed on your PC, then click Apply and OK. This is the most reliable way to restore all pointer roles together.
If only one role looks wrong, select that entry under Customize and use Use Default rather than resetting everything. Then save the repaired arrangement under your existing custom scheme name or a new revision name.
For the pointer color and size configured in Settings, restore the standard white option in Accessibility > Mouse pointer and touch on Windows 11, or Ease of Access > Mouse pointer on Windows 10. Microsoft identifies that white selection as the route back to the default pointer color.
A named custom scheme, stored cursor files, and one minute of testing turn an old Control Panel dialog into a useful personalization tool. More importantly, they give you a clean exit when a decorative cursor package proves harder to see than the Windows defaults.