

Microsoft’s current Sound documentation continues to direct users from Settings to the Sound Control Panel for advanced audio tasks. Microsoft Learn also documents the Sounds tab as the place where Windows system sounds are changed, while Windows Central’s long-running Windows customization guide confirms that individual event sounds can be replaced with custom .wav files and then saved as a reusable scheme.
Before changing anything, decide whether you want a few subtle cues or a complete replacement. A short, quiet notification tone is usually useful; a long clip assigned to a frequent event quickly becomes disruptive. Microsoft’s own sound-design guidance recommends avoiding overly musical or highly recognizable sounds for routine alerts, partly because the purpose of a system tone is immediate recognition rather than entertainment.
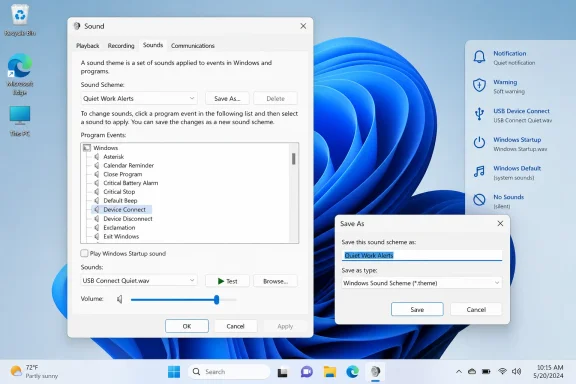 Open the Sounds tab from Windows Settings
On Windows 11, open Start > Settings > System > Sound. Scroll toward the bottom of the page and select More sound settings under Advanced. This opens the classic Sound window.
On Windows 10, open Start > Settings > System > Sound, then look for Sound Control Panel under Related settings. Depending on the Windows 10 build and the size of the Settings window, you may need to scroll to find it.
In the Sound window, select the Sounds tab. This is the control panel that manages Windows sound schemes and the individual entries under Program Events.
If Settings is difficult to navigate, press Windows key + R, type mmsys.cpl, and press Enter. The command opens the same Sound Control Panel directly. It is a useful fallback on managed PCs where Settings pages are rearranged, hidden, or slow to load.
The Sounds tab has three parts:
- The Sound Scheme menu selects an existing collection of event sounds, such as Windows Default or No Sounds.
- The Program Events list contains Windows and application events that have registered a selectable sound.
- The Sounds menu and Browse button let you assign a built-in or custom audio file to the selected event.
Do not confuse this with the Playback and Recording tabs. Those manage speakers, microphones, formats, enhancements, and default devices. The Sounds tab changes the audio cues Windows plays for particular events.
Change notifications, errors, and other program events
Start by selecting an event in the Program Events list. Windows groups many entries under headings, so expand a category if necessary and click the exact event you want to modify.
Common entries worth changing include:
- Asterisk, Exclamation, and Critical Stop, which are commonly associated with informational prompts, warnings, and errors.
- Default Beep, which some older desktop programs still use when requesting attention.
- Device Connect and Device Disconnect, useful if you regularly attach USB drives, docks, or peripherals.
- Notification or System Notification, where available, for Windows-level alerts.
- New Mail Notification, if a legacy mail client or installed application has registered that event.
With an event selected, choose a sound from the Sounds drop-down list to use one of Windows’ installed audio files. Click Test before committing the change. The test confirms that the file plays through the currently selected output device and helps prevent the common mistake of assigning a tone that is far louder than expected.
To use your own file, click Browse, select a compatible .wav file, and choose Open. Microsoft Learn’s Windows sound guidance specifies WAV as the format for these system sound assignments. An MP3, M4A, or streaming audio link may play perfectly in a media player but will not appear as a valid choice in this dialog.
Keep custom audio files in a folder you do not plan to delete, rename, clean automatically, or move to removable storage. A folder such as Documents\WindowsSounds is safer than Downloads, a temporary project folder, or a USB stick. Windows needs to be able to find the WAV file later when the event occurs.
After assigning a sound, click Apply. Trigger the event where practical, then return to the Sounds tab if you need to adjust it. You do not have to close the dialog after every edit.
Save the changes as a custom sound scheme
As soon as you change even one event, Windows will normally show the active sound scheme as modified. That is your cue to save it before switching themes or testing another set of sounds.
At the top of the Sounds tab, click Save As. Enter a clear name such as Quiet Work Alerts, USB Device Cues, or Classic Chimes, then select OK. The new name appears in the Sound Scheme menu and can be selected later like Windows Default.
A named scheme is valuable because it preserves the mapping between program events and the sounds you selected. It also gives you a known-good configuration to return to after experimenting. Microsoft’s Control Panel guidance describes schemes as named collections of settings intended for situations where users may need to switch configurations rather than rebuild them from scratch.
There is an important limitation: Save As does not turn your audio files into a self-contained backup package. If you use custom WAV files and later delete or move them, the scheme may remain listed but the assigned sounds can no longer play. Keep the original files with the PC profile, and copy them separately if you are moving to another Windows installation.
Windows themes can also affect sounds. Microsoft Support describes a Windows theme as a combination of background images, colors, sounds, and other personalization settings. If you apply another theme after building a sound scheme, check the Sounds tab afterward; the theme may select a different scheme or replace the event assignments you chose.
For a more complete personalization checkpoint, save your current Windows theme after saving the sound scheme. In Windows 11, go to Settings > Personalization > Themes and save the current theme. In Windows 10, go to Settings > Personalization > Themes and use the save option there. This is helpful for restoring the overall combination of wallpaper, color mode, cursor settings, and system sounds on the same PC.
Startup sound and the sign-in distinction
Windows treats startup and sign-in as different concepts, and the standard interface reflects that distinction. The checkbox labeled Play Windows Startup sound controls the familiar Windows startup chime; it does not necessarily create a separate sound every time a user unlocks or signs in to an existing session.
To manage it, open the Sounds tab and look below the Program Events list for Play Windows Startup sound. Select the checkbox to enable the startup chime or clear it to suppress that sound. Click Apply, then restart the PC to verify the result.
You may see old references online to Windows Logon, Windows Logoff, and Windows Exit Windows sounds. Do not assume they are available or reliably used on a current Windows 10 or Windows 11 installation. Microsoft has left the main sound-scheme interface in place, but modern sign-in behavior, Fast Startup, sleep, hibernation, and lock-screen transitions do not map neatly to the legacy events. Avoid registry edits or third-party “startup sound” utilities merely to force a sound onto a logon action; they add complexity to a cosmetic change and can behave inconsistently across updates.
A custom system notification also does not guarantee that every application will adopt it. The Program Events list only covers events Windows or a desktop program exposes to the shared sound system. Browsers, chat clients, games, collaboration tools, and media applications can use their own notification settings, their own audio files, or no sound at all. Check the application’s own notification or alert settings when one program continues to use a different tone.
Restore Windows Default or silence the system
To undo your customizations, return to Settings > System > Sound > More sound settings on Windows 11, or Settings > System > Sound > Sound Control Panel on Windows 10. Open the Sounds tab, select Windows Default from Sound Scheme, and click Apply followed by OK.
This restores the default assignments for the sound events Windows exposes in the dialog. If a particular sound still seems missing afterward, verify that the System Sounds volume is not muted in Volume mixer and that Windows is using the expected output device. Microsoft Support’s audio troubleshooting guidance specifically calls out the selected output device and volume state as first checks when expected sounds do not play.
For a silent desktop, choose No Sounds in the same Sound Scheme menu and apply it. This is cleaner than changing every event to “None,” and it makes the reversal simple: select Windows Default or your saved custom scheme later.
A sound scheme is a small personalization feature, but it is most useful when it stays intentional. Save one restrained scheme, keep its WAV files in a permanent location, and use Windows Default as the recovery point whenever an experiment becomes distracting or a theme changes more than you expected.