

\\PCNAME\Share is usually doing exactly what SMB file sharing is designed to do: it needs credentials that the sharing PC recognizes. The fix is often to remove a wrong saved identity, end an existing connection that is holding it open, and reconnect using the remote computer’s account name and actual account password.Microsoft’s support documentation confirms that Credential Manager stores saved sign-in information for networks, while Microsoft’s SMB documentation describes file sharing as user-level authentication followed by permission checks. Those are two different stages, and confusing them is why many “turn off password prompts” fixes either fail or leave a home network unnecessarily exposed.
Before changing sharing policies, clean up the client-side credential state. Then decide whether the share should require an identified user—which is the normal and safer configuration—or whether it is intentionally open to everyone on a trusted private network.
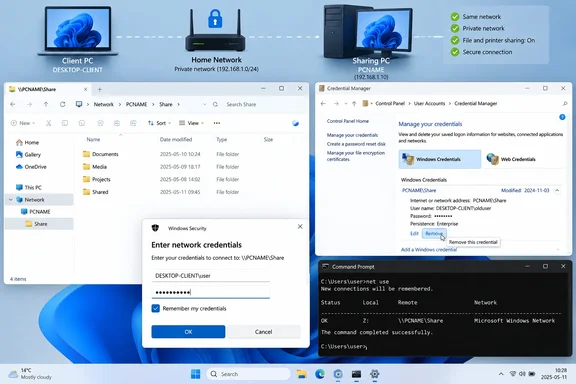 Identify Which PC Is Asking for Credentials
The computer containing the folder is the SMB server. The computer from which you browse to the folder is the SMB client. The password prompt appears on the client, but the username and password must be valid on the server.
For example, if a laptop opens:
\\DESKTOP-ARCHIVE\Photos
then DESKTOP-ARCHIVE is the machine whose accounts matter. Signing in to the laptop with a Microsoft account, a Windows Hello PIN, or a fingerprint does not automatically grant access to an account on DESKTOP-ARCHIVE.
A Windows Hello PIN is tied to the device on which it was created. Microsoft’s Windows Hello documentation describes it as device-specific rather than a reusable network password. When a share prompt asks for credentials, use the password for the account on the sharing computer—not the six-digit or four-digit PIN used to unlock your own PC.
First, confirm that you are opening the intended host. In File Explorer’s address bar, enter:
\\PCNAME\ShareName
Use the sharing PC’s actual computer name and shared-folder name. If you use an IP address sometimes and a computer name at other times, Windows can treat those as separate connection targets. That can produce apparently contradictory results: one path opens without a prompt while the other keeps asking.
Remove Incorrect Saved Windows Credentials
The most common cause of a repeated prompt is a saved Windows credential for the correct PC but the wrong account or an old password. This often happens after a password change, after replacing a PC while keeping its name, or after Windows first tried your current sign-in identity automatically.
On the client PC, open Credential Manager:
- Open Start, type
Credential Manager, and select the Control Panel result. - Select Windows Credentials.
- Look for entries that match the sharing PC’s computer name, its IP address, or a domain name used for the share.
- Expand the matching entry and select Remove.
Microsoft specifically documents Credential Manager as the place to view and delete saved network credentials. Removing an entry does not change the remote account’s password or delete files; it only tells Windows to stop retrying that saved identity.
Do not delete every credential unless you are deliberately resetting all stored network sign-ins. A typical PC may have saved credentials for NAS devices, Remote Desktop connections, work resources, and applications. Remove only entries clearly associated with the problematic file server.
For a command-line check, open Command Prompt and run:
cmdkey /list
Look for the computer name under a stored target. To delete a confirmed entry, run:
cmdkey /delete:PCNAME
Replace PCNAME with the target shown by cmdkey /list. Microsoft documents cmdkey for listing, adding, and deleting stored credentials on both Windows 10 and Windows 11.
Disconnect the Existing SMB Session
Credential Manager handles stored credentials, but an existing SMB connection can remain active in the current sign-in session. Deleting a credential while that connection is still open may make it look as if nothing changed.
In Command Prompt, run:
net use
This lists mapped drives and active network connections. If you see the affected PC or share, disconnect that one connection with:
net use \\PCNAME\ShareName /delete
If the share is mapped to a drive letter, you can also disconnect it by letter:
net use Z: /delete
Microsoft’s SMB troubleshooting guidance recommends Net Use to remove active or remembered shared resources. Be precise: the broad command below disconnects all network shares and mapped drives from the current Windows session.
net use * /delete
That can be useful on a personal PC when several stale connections exist, but it is disruptive on a work device. It will break currently open mapped drives and may interrupt applications using network files.
After removing the old credential and ending the old session, try the share again. Windows should present a fresh prompt.
Enter the Remote Account in the Right Format
At the new prompt, select More choices or Use a different account if Windows initially suggests the wrong user. The safest username format for a local account on the sharing PC is:
PCNAME\username
For the earlier example:
DESKTOP-ARCHIVE\alex
Enter the password for alex on DESKTOP-ARCHIVE. This must be an account that exists on that computer and has permission to the shared folder.
If the sharing PC uses a Microsoft account, try the Microsoft account email address with that account’s password. If that does not authenticate cleanly, use the computer-name-and-local-username format after confirming which account owns the shared folder. The critical point is that SMB is checking the identity available to the server, not the account Windows happened to choose on the client.
Check Remember my credentials only after the connection works. Saving a working credential is convenient; saving an unverified one creates the same recurring-prompt problem for the next attempt.
A successful sign-in followed by an “Access denied” message is progress. It means authentication worked and Windows moved to authorization. On the sharing PC, right-click the folder, choose Properties, and check both of these areas:
- On the Sharing tab, use Share or Advanced Sharing to confirm that the intended account—or an appropriate group—has the needed sharing permission.
- On the Security tab, confirm the same account has NTFS permission to read or modify the folder.
The effective result is limited by whichever permission is more restrictive. Giving a user “Full Control” on the Sharing tab does not override a denied or missing permission on the Security tab.
Keep Password-Protected Sharing On When You Can
Windows includes a setting called Password protected sharing. On Windows 11, open Settings > Network & internet > Advanced network settings > Advanced sharing settings, then expand All networks. Windows 10 exposes the equivalent settings through Settings or the legacy Advanced sharing settings page.
When password-protected sharing is enabled, people on the network need a recognized username and password on the sharing PC to access its shared folders. Microsoft’s file-sharing guidance describes this directly: users cannot access shared folders without credentials for an account on the hosting device.
For a home network, leave password-protected sharing enabled and create a dedicated standard local account on the sharing PC if necessary. Give that account permission only to the folder being shared. This avoids exposing every shared folder to anyone who joins the Wi-Fi network and avoids reusing an administrator account for routine file access.
Also verify the network profile on the sharing PC. A Public network profile hides the PC from other devices and prevents normal file and printer sharing. Use Private only on a network you trust, then ensure Network discovery and File and printer sharing are enabled under the Private profile. Microsoft’s current Windows support guidance places these controls in Advanced sharing settings.
Do not turn on SMB 1.0/CIFS merely to fix a password prompt. Windows 10 and Windows 11 use modern SMB versions for normal PC-to-PC sharing. SMB1 is a legacy protocol with serious security history; it addresses neither an incorrect saved password nor a missing account permission.
Policies That Can Override the Simple Fix
On Windows Pro, Enterprise, and Education editions, Local Security Policy and domain Group Policy can force authentication behavior that the normal sharing switches do not override. This is particularly relevant for office PCs, domain-joined systems, and devices managed through Intune or another endpoint platform.
Run secpol.msc on the sharing PC, then go to:
Local Policies > Security Options
Review these policies before making changes:
- Network access: Sharing and security model for local accounts controls whether local accounts authenticate as themselves or are mapped to the Guest account. Microsoft documents Classic – local users authenticate as themselves as the setting that supports individual account access and permission control.
- Accounts: Limit local account use of blank passwords to console logon only is enabled by default. A local account with a blank password cannot be used for a remote network logon when this protection is enabled.
- Deny access to this computer from the network can explicitly block an account or group even if the password and folder permissions are correct.
The blank-password policy deserves special attention. Turning off password-protected sharing does not reliably make a passwordless local account usable over SMB, and disabling the blank-password restriction weakens the computer. Microsoft recommends keeping that protection enabled. Give the account a real password instead.
On a managed computer, locally changing a security policy may not stick. A domain Group Policy or mobile-device-management policy can reapply its configuration. In that case, the repeated prompt may be the visible symptom of an enterprise security decision, and the correct fix is to have the administrator authorize the account or share rather than bypass the policy.
When Disabling Password Protection Is Acceptable
You can turn off Password protected sharing under All networks when the share is intentionally open to every person and device on a small, trusted private LAN. Microsoft includes this option in its consumer troubleshooting steps, but it should be treated as a convenience setting, not a universal repair button.
If you use it, make the scope deliberately narrow. Share only the intended folder, grant only the minimum read or change rights needed, leave the network profile set to Private only on trusted networks, and never use this setup on hotel, apartment-building, campus, or public Wi-Fi.
The durable fix for a persistent Windows share password prompt is therefore usually modest: delete the stale Windows credential on the client, disconnect the old SMB session, sign in as PCNAME\username with the remote account’s password, and verify both share and NTFS permissions. If Windows still refuses the correct account after that sequence, inspect the sharing PC’s local or managed security policies—the prompt is then an authentication rule being enforced, not a credential cache Windows simply forgot to clear.