

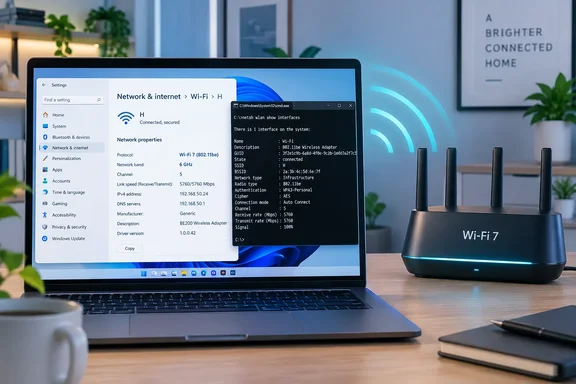
netsh wlan results. A 6 GHz connection alone does not prove Wi‑Fi 7: Wi‑Fi 6E also uses 6 GHz. For a full Wi‑Fi 7 verification, look for Wi‑Fi 7 (802.11be) or 802.11be as the active protocol/radio type.
 Check the PC, adapter, router, and Windows requirements
Before connecting, confirm that the required hardware and software are in place.
Quick walkthrough
- Windows version: Wi‑Fi 7 support starts with Windows 11, version 24H2. Windows 11 25H2 and later versions also meet that requirement.
- Wireless adapter: The adapter must support Wi‑Fi 7, identified by the IEEE name 802.11be. An adapter that supports only 802.11ax is Wi‑Fi 6 or Wi‑Fi 6E, not Wi‑Fi 7.
- Router or access point: It must support Wi‑Fi 7. It must also have Wi‑Fi enabled and a compatible security configuration.
- 6 GHz requirement: To use 6 GHz, both the router and adapter need 6 GHz support. Wi‑Fi 7 can also operate on 2.4 GHz or 5 GHz, so a Wi‑Fi 7 connection does not always use 6 GHz.
- Security: WPA3 is the preferred security type when the router and adapter support it. Avoid older options such as WEP. In a managed workplace, Wi‑Fi configuration may be controlled by an IT policy.

Confirm the installed Windows 11 version
- Right-click Start and select Settings.
- Select System.
- Select About.
- Under Windows specifications, check Version.
If the version is earlier than 24H2, install the available Windows updates before testing Wi‑Fi 7:
- Open Settings.
- Select Windows Update.
- Select Check for updates.
- Install all applicable updates.
- Restart the PC if Windows requests it.
A restart is particularly important after a feature update or wireless-driver update because the adapter driver may not fully reload until Windows starts again.
Confirm that Windows detects a wireless adapter
- Select Start.
- Type Device Manager, then open it.
- Expand Network adapters.
- Look for an adapter whose name includes terms such as Wireless, Wi‑Fi, WLAN, or the name of its manufacturer.
If no wireless adapter appears, Windows is not currently detecting one. On a laptop, also check for a physical wireless switch or function-key airplane-mode control. On a desktop, confirm that an add-in Wi‑Fi card or USB adapter is fully connected.
Check whether the adapter supports Wi‑Fi 7
The most reliable built-in capability check is netsh wlan show drivers. This does not change network settings.
- Right-click Start and select Terminal.
You can also open Command Prompt. - Enter the following command:
netsh wlan show drivers - Find the adapter section and locate Radio types supported.
For Wi‑Fi 7 capability, the list must include:
802.11be
Other common entries have different meanings:
- 802.11ax: Wi‑Fi 6 or Wi‑Fi 6E capability.
- 802.11ac: Wi‑Fi 5 capability.
- 802.11n: Wi‑Fi 4 capability.
Also find Authentication and cipher supported in infrastructure mode. If your router uses WPA3, confirm that the list includes WPA3-Personal or the WPA3 option required by your organization.
If 802.11be is missing, do not expect the PC to establish a Wi‑Fi 7 link, even if the router advertises a Wi‑Fi 7 network. Check the PC or adapter manufacturer’s specifications, then install the current driver supplied for that exact adapter model. A generic driver can restore basic connectivity but may not expose the adapter’s newest capabilities.
Warning: Do not download wireless drivers from unknown “driver update” sites. Use Windows Update or the PC, adapter, or chipset manufacturer’s official support channel.
Make the Wi‑Fi 7 or 6 GHz network easy to identify
Many routers use one network name, or SSID, for 2.4 GHz, 5 GHz, and 6 GHz. The router can then choose the band automatically. That is convenient, but it can make testing harder because the visible network name does not tell you which band is currently active.
If your router allows separate names for each band, use clearly different SSIDs, such as:
Home-2GHome-5GHome-6G
This is optional. Do not change router band, channel, security, or Smart Connect/Band Steering settings unless you have access to the router’s administration interface and understand the effect on other devices. Those changes can disconnect household or business devices that depend on the current settings.
For a router using one combined SSID, continue with the connection and verify the actual active band in Windows after connecting.
Connect Windows 11 to the correct wireless network
- Select the Network, Sound, or Battery area at the far right of the taskbar to open Quick Settings.
- Ensure Wi‑Fi is turned on.
- Select the arrow or Manage Wi‑Fi connections button next to Wi‑Fi.
- If the expected network is not shown, select Refresh network list.
- Select the Wi‑Fi 7, 6 GHz, or combined network name provided by your router or IT department.
- Select Connect.
- Enter the network security key when prompted, then select Next.
- Wait for Windows to show that the network is connected.
For a home network, the password is usually printed on the router label unless it was changed during setup. For a work or school network, do not substitute a personal router password for enterprise credentials; follow the network’s enrollment instructions.
If Windows asks whether to make the PC discoverable, choose carefully:
- Select Yes only for a trusted private network such as your home network.
- Select No for public Wi‑Fi, hotels, cafes, airports, and unfamiliar networks.
Verify Wi‑Fi 7, 6 GHz, signal, and link speed in Settings
Settings provides the clearest at-a-glance record of the connection Windows is using.
- Open Settings.
- Select Network & internet.
- Select Wi‑Fi.
- Select the Properties entry for the network that shows as connected. Depending on the Settings layout, this can appear as the connected network name or a Properties button beside it.
- Scroll through the network properties and record these fields:
- SSID: Confirms the network name.
- Protocol: Look for Wi‑Fi 7 (802.11be) to confirm an active Wi‑Fi 7 connection.
- Security type: WPA3-Personal is common on modern home Wi‑Fi 7 networks.
- Network band (channel): Look for 6 GHz to prove the current connection is using 6 GHz.
- Link speed (Receive/Transmit): Shows the negotiated Wi‑Fi link rate between the PC and access point.
- Manufacturer, Description, and Driver version: Useful when comparing your adapter and driver with the vendor’s support information.
With Multi-Link Operation (MLO), Settings can show more than one band in the Network band (channel) value, such as 5 GHz and 6 GHz. That indicates the connection supports MLO across those bands.
Interpret the results accurately:
- Protocol: Wi‑Fi 7 (802.11be); Network band: 6 GHz is a confirmed Wi‑Fi 7 connection on 6 GHz.
- Protocol: Wi‑Fi 7 (802.11be); Network band: 5 GHz is still Wi‑Fi 7, but not a 6 GHz connection.
- Protocol: Wi‑Fi 6 (802.11ax); Network band: 6 GHz is Wi‑Fi 6E, not Wi‑Fi 7.
- Protocol: Wi‑Fi 6 (802.11ax); Network band: 5 GHz is a normal Wi‑Fi 6 connection.
The displayed link speed is not an Internet speed test result. It is the negotiated local wireless rate, which varies with distance, signal quality, channel width, router capability, adapter streams, congestion, and power-saving behavior. Your real Internet speed can be lower because it is also limited by the broadband plan, router processing, and the destination server.
Verify the active connection with netsh
Use netsh to independently inspect the connected Wi‑Fi interface.
- Open Terminal or Command Prompt.
- Run:
netsh wlan show interfaces - Review the active Wi‑Fi interface. Important lines typically include:
- State: Should show
connected. - SSID: Should match the network selected in Quick Settings.
- Radio type: Look for
802.11beto confirm an active Wi‑Fi 7 radio link. - Channel: Identifies the channel in use.
- Receive rate (Mbps) and Transmit rate (Mbps): Current negotiated link rates.
- Signal: A percentage estimate of signal strength.
Run the command again after moving closer to the router or after reconnecting. Signal and negotiated rates can change dynamically.
To inspect visible access points before connecting, run:
netsh wlan show networks mode=bssid
This command adds the BSSID, signal, channel, and radio type for visible networks. It is useful when the same SSID is broadcast by multiple access points or when you need to see whether the expected Wi‑Fi 7 network is being detected.
Troubleshoot a missing Wi‑Fi 7 or 6 GHz connection
The adapter supports Wi‑Fi 7, but 802.11be is not active
A capable adapter can fall back to an older protocol when the router, selected band, security settings, or driver does not permit Wi‑Fi 7.
- Confirm that
netsh wlan show driverslists802.11be. - Check Settings > Network & internet > Wi‑Fi > connected network Properties to see the active protocol.
- Install the current adapter driver from the PC or adapter manufacturer.
- Restart Windows after updating the driver.
- Confirm in the router documentation that Wi‑Fi 7 is enabled for the SSID you selected.
- If the router has a firmware update available from its manufacturer, apply it using the manufacturer’s documented procedure.
The 6 GHz SSID does not appear
A missing 6 GHz network usually indicates a capability, range, or configuration issue.
- Confirm that the adapter supports 6 GHz. Wi‑Fi 7 support implies modern capability, but verify the adapter’s published specifications and driver status.
- Move close to the router. The 6 GHz band has shorter range and passes through walls less effectively than 2.4 GHz or 5 GHz.
- Confirm that another known-compatible device can see the 6 GHz network in the same location.
- Run:
netsh wlan show networks mode=bssid
If the network does not appear there, Windows is not seeing it during the scan. - Check that Airplane mode is off and Wi‑Fi is on.
- In Device Manager, right-click the Wi‑Fi adapter, select Properties, and check Device status on the General tab.
Windows connects, but uses 5 GHz instead of 6 GHz
This is common on combined SSIDs. Band steering may choose 5 GHz because of distance, current signal quality, router policy, or adapter behavior.
- Verify the active band in the connected network’s Properties page rather than relying on the SSID name.
- Move closer to the router and disconnect, then reconnect.
- If the router provides separate SSIDs, connect explicitly to its 6 GHz SSID.
- Do not force an adapter’s advanced band preference unless the adapter manufacturer documents the setting and you understand the effect. Driver option names and supported values vary by hardware.
Wi‑Fi is connected but Internet access fails
First distinguish a Wi‑Fi association problem from an Internet problem. If netsh wlan show interfaces says connected, the PC has joined the wireless network; the remaining issue could be DHCP, DNS, a captive portal, VPN software, router Internet service, or network policy.
On Windows 11, open Settings > Network & internet and run the available Network and Internet troubleshooter through the Get Help experience. If multiple devices on the same Wi‑Fi network have no Internet access, check the router or ISP connection before changing Windows settings.
For recurring drops or unexplained failures, generate a wireless report:
netsh wlan show wlanreport
Windows displays the location of the report after creating it. The report can contain network names, adapter identifiers, and connection history, so treat it as potentially sensitive before sharing it with support staff.