

C:\Users\<your-name>\OneDrive to a roomier internal drive can reclaim meaningful space on a small Windows system disk without removing anything from the cloud. The safe method in Windows 10 and Windows 11 is to let OneDrive finish syncing, unlink the PC, move the existing folder, then select that folder during setup. Do not simply drag the active OneDrive folder to another drive while the sync client is running.Microsoft Support’s current guidance uses that unlink–move–relink sequence. It is a small distinction with large consequences: OneDrive tracks a local sync root, file availability states, and in many cases protected Windows folders such as Desktop, Documents, and Pictures. Moving files while the client is still watching the old location can look like a large-scale deletion and re-upload operation rather than a controlled relocation.
The process applies to both personal OneDrive and OneDrive for work or school. On a managed work PC, however, an organization can limit folder backup, synchronization locations, or other OneDrive settings. If controls are locked or the account reconfigures itself after setup, stop there and check with IT rather than attempting registry edits or symbolic-link workarounds.
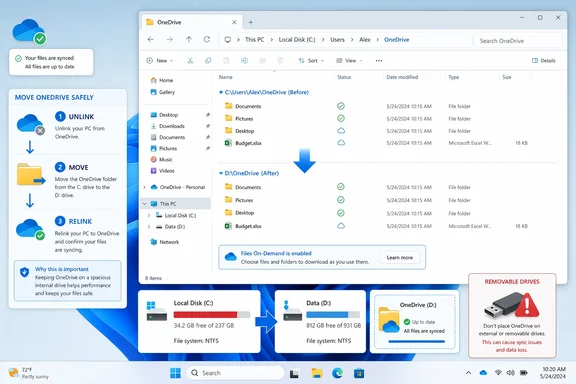 Choose a destination that OneDrive can keep using
An internal NTFS drive is the straightforward choice: for example, D:\OneDrive or D:\Users\<your-name>\OneDrive. Ensure the drive has enough capacity for the files you intend to retain locally, including any folders marked Always keep on this device.
Create the destination parent folder before changing anything. If you want the completed sync root to be D:\OneDrive, create D:\ if necessary but do not populate a random new D:\OneDrive folder with unrelated data. During setup, OneDrive will identify the moved folder and ask whether to use it. Mixing an existing OneDrive library with unrelated folders makes both cleanup and later troubleshooting harder.
An external drive deserves more caution. Microsoft says a OneDrive location on external storage must be non-ejectable and formatted as NTFS; removable USB drives are not supported as a normal OneDrive sync location. A portable SSD that can be unplugged may look like inexpensive extra capacity, but it also turns every disconnection into a potential sync interruption. Microsoft further warns that OneDrive folder backup—also called Known Folder Move or PC folder backup—cannot be configured when OneDrive is installed on external memory.
That means an external disk is a poor destination if you back up Desktop, Documents, or Pictures through OneDrive. Use a permanent internal secondary disk whenever possible. If the only objective is to free space on C:, Files On-Demand and selective folder sync are usually less disruptive than putting a continuously synced folder on hardware that may disappear.
Before beginning, also check the destination drive’s health and free space. OneDrive is not a substitute for a local backup of the drive itself: a sync client can faithfully propagate accidental deletions and file changes, while a failing disk can take locally available files with it.
Confirm the cloud copy before unlinking
First, make sure OneDrive is fully synchronized. Select the blue or white OneDrive cloud icon in the Windows notification area near the clock. The status should show that files are up to date, not “Processing changes,” “Sync pending,” or an error state.
If OneDrive is still working, wait. This is especially important after importing photos, moving a large archive into OneDrive, or recovering from an offline period. Unlinking does not delete cloud files, as Microsoft Support notes, but it is still a poor time to relocate the folder if the newest local changes have not reached the service.
Use the OneDrive web view to spot-check critical recent files if you have any doubt. Confirm that a newly edited document or a recently added photo folder appears there before continuing. This takes less time than resolving a conflict between an old cloud version and an unsynced local edit.
Record your current sync and backup choices as well. In OneDrive Settings, look at the Account tab to see which OneDrive folders are selected for this PC. Then open Sync and backup and select Manage backup to note whether Desktop, Documents, and Pictures are protected. Microsoft’s relocation instructions say folder-selection choices may need to be made again after the reset; the setup process changes the local root but does not make every prior preference self-explanatory.
If the destination is a smaller drive, identify folders that do not need a local copy. This can be done later, but deciding now prevents the common mistake of moving OneDrive off a full C: drive only to fill D: with the entire cloud library.
Unlink, move, and reattach the existing folder
Open the OneDrive cloud icon, choose the Help & Settings gear, then select Settings. On the Account tab, select Unlink this PC and confirm Unlink account. This disconnects the current Windows installation from that local sync root; it does not close the OneDrive account or remove cloud files.
Once OneDrive has been unlinked, close File Explorer windows that are open inside the OneDrive folder. Then move the entire existing OneDrive folder from its current location to the destination drive. Use Cut and Paste or the File Explorer Move command, rather than copying the folder and leaving two competing local trees behind.
For example, move:
C:\Users\Alex\OneDrive
to:
D:\OneDrive
For a work or school account, the folder may carry an organization name, such as OneDrive - Contoso. Preserve that complete folder and its contents rather than moving selected subfolders. If the files are large, the Windows move may take some time even between internal disks; it is still a local file operation, not a new cloud download.
When the move completes, launch OneDrive from Start if the setup window is not already open. Sign in with the same Microsoft account or work account used before. Continue through the wizard until it displays the proposed OneDrive folder location, then select Change location.
Browse to the folder you moved—for example, D:\OneDrive—and select it. OneDrive will warn that the destination already contains files. This is expected. Select Use this location, then finish setup. Choosing a different empty folder at this point can cause OneDrive to build a fresh local library and leave the moved copy stranded on the new drive.
Do not delete the old location until the new setup is complete and File Explorer shows the moved folder as the active OneDrive location. In a proper move, the original folder should no longer contain your live library anyway; if it does, compare the two locations carefully before removing anything. A duplicate created by a hurried copy is a troubleshooting problem, not extra protection.
Restore the settings that control local disk use
After relinking, open OneDrive Settings and verify that the account is connected and that the desired folders are selected on the Account tab. If you previously used selective sync, choose only the cloud folders that should appear on this PC. This is separate from moving the OneDrive root: selective sync controls which top-level OneDrive folders are shown and synchronized locally.
Then inspect Sync and backup and Manage backup. If Desktop, Documents, or Pictures were previously backed up, confirm that each folder still has the intended status. Microsoft’s documentation notes a significant behavior when folder backup is stopped: files already backed up stay in OneDrive and may cease appearing in the standard local Windows folder, with a shortcut left behind. Do not toggle backup off merely to “refresh” it unless you understand which copy you are choosing to keep.
Files On-Demand is the other setting that determines whether moving OneDrive actually saves space. Microsoft says it is enabled by default in modern OneDrive builds, and its current interface presents choices such as Free up disk space and Download all files under Advanced settings.
With Files On-Demand active:
- A blue cloud icon means a file is online-only and occupies no local disk space until it is opened.
- A green outlined check means the file is locally available and can be made online-only again with Free up space.
- A solid green circle with a white check means the file is pinned with Always keep on this device and will continue using local storage.
Check the folders containing large videos, ISO files, virtual-machine images, photo archives, and offline project data. A move to D: does not reduce their size; it merely changes the drive that bears the cost. Right-click files or folders you no longer require offline and choose Free up space. Conversely, mark essential working folders Always keep on this device if they must remain usable during travel or an outage.
Test the new sync root before treating the job as done
The final validation should take only a few minutes. In File Explorer, open the OneDrive folder on the new drive and create a small text file with an unmistakable name, such as OneDrive-move-test.txt. Wait for OneDrive to report that synchronization is complete, then confirm the test file appears in the OneDrive web view or on another signed-in device.
Next, modify that file from another device or the web, then verify that the edit returns to the new D: location. This tests both directions of synchronization rather than merely confirming that Windows can display the folder.
Finally, restart Windows once. After signing in, confirm that the OneDrive cloud icon starts normally, reports the expected account, and points File Explorer to the new location. Check Desktop, Documents, and Pictures if PC folder backup is enabled; they should still lead to the intended OneDrive-backed folders, not an abandoned path under the old C:\Users directory.
The practical result is simple: Windows and OneDrive continue using the same cloud library, but local cached content now resides on the drive you chose. Keep Files On-Demand enabled and resist using a removable USB disk as the permanent root—the first saves space predictably, while the second makes a routine sync setup fragile.