

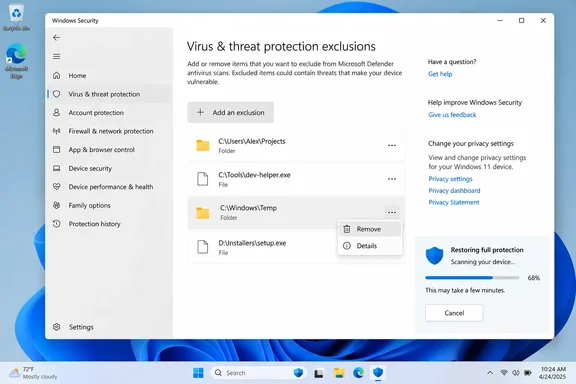
 Before you change an exclusion
An exclusion is not an “allow list” for a program in the normal sense. It creates a deliberate inspection gap. Depending on its type, Microsoft Defender may skip scanning a file, all contents of a folder, every file with an extension, or files opened by a process.
Use an exclusion only when all of the following are true:
- You can identify the precise application or file causing a repeatable problem.
- The software came from its developer, Microsoft Store, or another trusted source.
- The vendor specifically documents the need for the exclusion, or you have confirmed a genuine compatibility issue.
- The exclusion is as narrow as possible.
- You have a reason to review or remove it later.
A legitimate example might be a line-of-business application whose vendor documents a specific data folder that conflicts with real-time scanning. Even then, exclude only that documented folder—not the application’s entire installation directory, user profile, or drive.
Do not keep or create exclusions for these common high-risk targets:
- An entire drive, such as
C:\,C:, orC:\* - Your entire user profile, such as
C:\Users\ - Temporary folders, including
C:\Temp, Windows Temp folders, or a user Temp folder - Broad application folders under
C:\Program FilesorC:\Program Files (x86) - The Windows folder,
C:\Windows - File types commonly used to deliver or run code, such as script, executable, archive, or shortcut formats
- A generic process name without a full path, such as
update.exeorsetup.exe - Downloads, Desktop, removable media, or a folder used to exchange files with other people
Warning: Removing an exclusion can cause an application to slow down, fail to open a file, or have a file quarantined if the item is actually malicious. Before removing an exclusion that supports business software, note its current value, why it was created, and the application it appears to support. If the PC is managed by an employer or school, contact its IT administrator rather than changing managed security policy.
Confirm that Microsoft Defender is the active antivirus
Exclusions shown in Windows Security are Microsoft Defender Antivirus exclusions. They do not necessarily control another antivirus product installed on the PC.
- Open Start, type Windows Security, and select the app.
- Select Virus & threat protection.
- Under Who’s protecting me?, select Manage providers.
- Check the antivirus provider shown.
If Microsoft Defender Antivirus is active, continue with the review. If another antivirus product is the active provider, its own console may be responsible for real-time protection and its exclusions. Do not assume that deleting a Defender exclusion changes the other product’s settings.
On a work or school PC, the page may indicate that some settings are managed by your organization. That can mean exclusions are supplied through Microsoft Intune, Group Policy, Configuration Manager, or another management system. A local removal may be blocked, or a managed exclusion may return after policy refresh.
Open and inventory the current exclusions
The exclusion controls are in Windows Security on both Windows versions. Opening the app from Start avoids minor differences in the Settings layout.
- Open Windows Security.
- Select Virus & threat protection.
- Under Virus & threat protection settings, select Manage settings.
- Scroll to Exclusions.
- Select Add or remove exclusions.
The page lists custom exclusions by type. Expand each entry before deciding whether to remove it. Record entries you do not immediately recognize in a short note, including:
- The exclusion type
- The full path, extension, or process path
- The related application, if known
- The reason it was originally added
- Whether it appears to be a temporary workaround
Do not confuse this list with Microsoft Defender’s built-in exclusions. Microsoft automatically maintains exclusions needed for certain operating-system components. Those built-in entries do not normally appear in the standard Windows Security exclusion list and should not require you to recreate them.
Understand what each exclusion type means
Review each category with its scope in mind:
- File — excludes one file at one specific full path. This is usually the least broad option for a temporary exception.
- Folder — excludes the folder and its contents, including its normal subfolders. This is much broader than a single-file exclusion.
- File type — excludes every file with that extension wherever it exists on the device. This is usually too broad for a home PC.
- Process — excludes files opened by the specified process from real-time scanning. It does not simply exempt the program executable itself. A process exclusion can also reduce related protections that inspect activity from that process.
A process exclusion deserves especially close scrutiny. Prefer a full executable path, such as C:\Program Files\Vendor\App\App.exe, rather than a name such as App.exe. A name-only process exclusion can match a malicious file using the same filename in another location.
Also be cautious with wildcards and environment variables. A wildcard can make an exclusion cover far more files than its creator intended. Environment variables are evaluated in the antivirus service’s system context, which can resolve to a different folder than the one you expect from your signed-in account.
Remove exclusions that are no longer justified
Remove exclusions one at a time and test the related application after each removal. This makes it much easier to identify the setting that mattered if a genuine compatibility issue returns.
Warning: Do not remove a documented exclusion for critical business, database, backup, development, or security software without first checking the software vendor’s current requirements. If the device is organization-managed, make the change through the approved IT process instead.
- On the Exclusions page, select the exclusion you want to remove.
- Select Remove.
- Approve the User Account Control prompt if Windows asks for administrator permission.
- Wait for the item to disappear from the list.
- Repeat for the next unnecessary exclusion.
No restart is normally required for a local exclusion removal to take effect. However, restart the affected application before testing it, particularly if it was running while you made the change.
Start with the clearest candidates:
- An exclusion you added only to install, update, or test an application
- A folder for software that has been uninstalled
- An entry pointing to a missing drive, old user profile, or deleted folder
- A broad extension exclusion added to work around a single file
- A broad process exclusion that can be replaced by a precise file or folder exception
- An exclusion whose origin and purpose nobody can identify
If you see an exclusion for a path that looks deliberately suspicious—such as a Temp folder, a random-named directory, a startup-related location, or a folder containing unknown executables—remove it, then scan the location immediately.
Verify that protection is restored
Removing an exclusion restores Defender’s ability to inspect matching content; it does not automatically rescan every file that was previously skipped. Perform a focused scan after your cleanup.
- In Windows Security, select Virus & threat protection.
- Under Current threats, select Scan options.
- Select Quick scan and then select Scan now.
A quick scan checks common locations where malware is likely to start or persist. If you removed a broad exclusion, found unknown software, or are concerned that the excluded location was exposed to untrusted files, choose Full scan instead. A full scan can take a substantial amount of time and is best run while the PC is connected to power.
For a specific folder or file that was previously excluded:
- In File Explorer, locate the item.
- Right-click it.
- In Windows 11, select Show more options if necessary.
- Select Scan with Microsoft Defender.
- Review the result on the Scan options page.
Then return to Virus & threat protection and check Protection history. Review detections and remediation actions rather than immediately allowing an item because it belongs to a familiar-looking program. Malware often uses trusted product names and filenames.
Add a temporary exclusion as safely as possible
Sometimes a trusted installer, file, or application is falsely detected or conflicts with scanning. Before adding an exclusion, first confirm that you downloaded the current software from its official publisher and check whether the vendor offers an update or a documented solution. If Defender identified an item as a threat, use the details in Protection history to investigate it; do not create an exclusion simply to make an alert disappear.
When a short-term exception is unavoidable, use the narrowest type available.
Warning: Windows Security does not provide an automatic expiration timer for exclusions. A “temporary” exclusion remains active until you manually remove it. Set a calendar reminder before adding one.
- Open Windows Security > Virus & threat protection > Manage settings.
- Under Exclusions, select Add or remove exclusions.
- Select Add an exclusion.
- Choose the narrowest applicable option:
- Select File for one specific file.
- Select Folder only when the application genuinely requires access to a defined working folder.
- Avoid File type unless the vendor explicitly requires it and you understand that it applies everywhere.
- Avoid Process unless the vendor specifically identifies the process and provides its complete executable path.
- Browse to and select the exact file or folder when prompted.
- Confirm that the resulting value is the expected full path.
- Test only the task that required the exception.
- As soon as the task, installation, update, or troubleshooting test is complete, return to the same page, select the exclusion, and choose Remove.
- Run a targeted scan of the file or folder, then run a Quick scan.
For example, if one signed installer requires a short workaround, exclude that installer file—not the entire Downloads folder and not every file of the installer’s extension.
Use PowerShell only to audit or remove a known entry
The Windows Security app is the best method for most people. PowerShell is useful when the list is long, the UI does not make an entry clear, or an administrator needs a text-based inventory.
Warning: Run PowerShell as administrator only when you understand the exact entry you are changing. Do not use Set-MpPreference for this task unless you intend to replace an entire category of existing exclusions; it can overwrite the current list.
- Open Start, type PowerShell.
- Right-click Windows PowerShell or PowerShell and select Run as administrator.
- To display configured file-extension, path, and process exclusions, run:
$p = Get-MpPreference; 'ExclusionExtension','ExclusionPath','ExclusionProcess' | ForEach-Object { $t = $_; $p.$t | ForEach-Object {[pscustomobject]@{Type=$t; Value=$_}} } | Format-Table -AutoSize
- Compare the output with the Windows Security list. If an entry is managed or hidden by organizational policy, do not try to defeat that control locally.
- To remove one known folder exclusion, use its exact value. For example:
Remove-MpPreference -ExclusionPath "C:\Temp"
- Re-run the inventory command to confirm that the entry no longer appears.
- Run a Quick scan or a targeted scan of the affected location.
Use the matching parameter for the type you are removing:
Remove-MpPreference -ExclusionExtension ".example"
Remove-MpPreference -ExclusionProcess "C:\Program Files\Vendor\App\App.exe"
Troubleshoot common exclusion-review problems
“Add or remove exclusions” is missing or unavailable
First confirm that Microsoft Defender Antivirus is the active provider under Virus & threat protection > Manage providers. A third-party antivirus product can disable Defender’s active protection. If Microsoft Defender is active but the setting is unavailable or marked as managed, the PC may be controlled by work, school, or security-management policy. Contact the device administrator.
The exclusion reappears after removal
The entry is likely being deployed through management policy. Local changes can be overridden by Microsoft Intune, Configuration Manager, or Group Policy. Record the exact entry and contact IT with the software name, path, and reason it should be removed or narrowed.
The application stops working after an exclusion is removed
Do not re-add a broad exception immediately. First restart the application and reproduce the problem. Check the application’s logs and Windows Security’s Protection history for a detection or blocked item. If Defender is involved, update the application from its official source and check the vendor’s current support documentation for a precise exclusion requirement. If a temporary workaround is necessary, restore only the smallest documented exclusion and schedule a follow-up review.
A scan finds a threat in a previously excluded folder
Allow Defender to quarantine or remediate the item. Do not restore the exclusion to regain access to the detected file. Disconnect from untrusted networks if the alert involves an unknown executable, script, or remote-access tool, then run a Full scan. If detections persist or Windows behaves suspiciously, use Microsoft Defender Offline from Scan options, which restarts the computer and scans before normal Windows components are fully running.