
For most people, the best approach is straightforward: pause the individual feature causing the interruption when the need is temporary, or uninstall McAfee completely when it is no longer wanted. Avoid using unsupported methods such as ending security processes in Task Manager, changing registry values, or disabling McAfee services through services.msc. Those tactics can leave Windows in an unclear security state, interfere with updates, or cause the software to repair itself at the next restart.
This guide explains how to stop McAfee from running on Windows 11 and Windows 10 without creating unnecessary problems for the rest of the PC.
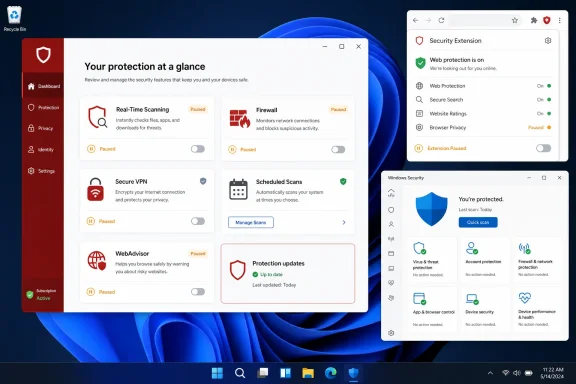 Understand What “McAfee Running” Actually Means
Before changing settings, identify the behavior that needs to stop. McAfee products now combine several protection and privacy tools under one interface, but each tool has its own controls.
Common reasons people want to stop McAfee include:
- Real-time scanning slows down a large download, game installation, or development build.
- A scheduled full scan begins at an inconvenient time.
- The firewall blocks an app, game launcher, network device, or local connection.
- Secure VPN reconnects automatically and changes network behavior.
- WebAdvisor displays browser warnings, modifies search behavior, or flags links.
- A browser extension creates alerts that appear to come from McAfee.
- A McAfee helper app opens each time the user signs into Windows.
- The PC has a trial, bundled installation, or an expired subscription that is no longer needed.
These situations are not identical. Turning off Real-Time Scanning will not disable the VPN. Removing a browser extension will not uninstall the antivirus suite. Disabling a startup item will not necessarily stop background protection.
The most reliable rule is simple: use the smallest change that resolves the immediate issue. If a game is blocked by the firewall, address the firewall rather than turning off all protection. If only browser alerts are distracting, investigate WebAdvisor or browser notifications first.
Important Security Considerations Before Disabling McAfee
Temporarily disabling security software can be useful for troubleshooting, but it should not become a permanent workaround. Real-time antivirus protection scans files as they are downloaded, opened, copied, or launched. Disabling it creates a window in which harmful files may run without being checked.
That matters most when the PC is:
- Downloading software, drivers, mods, or game files.
- Opening email attachments.
- Using file-sharing tools.
- Browsing unfamiliar websites.
- Connecting removable drives or USB devices.
- Being used by multiple family members.
- Storing important personal, financial, or work-related data.
If McAfee is installed on a work-managed computer, do not attempt to disable or remove it without approval from the organization’s IT department. Corporate policies may prevent settings changes, and the protection may be managed through a business security platform rather than the consumer McAfee app.
Also, do not run multiple real-time antivirus programs at once merely to replace McAfee. Windows includes Microsoft Defender Antivirus, but compatible third-party antivirus software normally causes Defender’s active antivirus protection to step back. After McAfee is removed, Windows should restore Microsoft Defender Antivirus automatically, but it is still worth confirming that protection is active after restarting.
Pause McAfee Real-Time Scanning
Real-time scanning is the part of McAfee responsible for continuously checking files and programs for threats. If the immediate problem is file-access delays, blocked installers, or a troubleshooting task that requires a short pause, this is usually the first setting to review.
How to turn off Real-Time Scanning
- Open the McAfee app from the Start menu or notification area.
- Select the My Protection or My Protection Widgets area in the left-hand navigation.
- Under Device, open Real-Time Scanning.
- Select Turn off.
- Choose when McAfee should turn protection back on.
- Confirm by selecting Turn off again.
McAfee may offer options such as resuming protection after a short period, after the next restart, or only when manually re-enabled. For a brief troubleshooting session, the temporary option is the safest choice.
What this setting does not stop
Turning off Real-Time Scanning does not switch off every McAfee feature. The following components may continue working:
- Advanced Firewall
- Scheduled Scans
- Secure VPN
- WebAdvisor
- Anti-tracker
- Browser-based scam or deepfake detection tools
- McAfee notifications
- Startup helpers and background launchers
This distinction explains why users may still see McAfee alerts or network filtering after they believe they have “disabled McAfee.”
When a temporary pause makes sense
A short pause is reasonable when testing whether McAfee is responsible for a specific conflict. For example, an installer repeatedly failing, a development environment locking files, or a game patch refusing to validate may point to real-time scanning as a possible cause.
However, if the problem only occurs with one known, trustworthy application, a better long-term answer may be adding an appropriate exclusion or correcting the app’s permissions. Repeatedly disabling antivirus protection every time the program runs is less safe and less convenient.
Turn Off McAfee Advanced Firewall
McAfee’s firewall monitors and controls network activity. It can prevent unfamiliar applications from accessing the internet, block inbound connections, or interfere with local network discovery. This can affect multiplayer games, printers, smart-home devices, file sharing, streaming tools, VPN connections, and remote desktop utilities.
Disable the firewall temporarily
- Open the McAfee app.
- Select My Protection Widgets.
- Under Device, choose Advanced Firewall.
- Use the on-screen toggle to turn the firewall Off.
- Confirm the warning prompt.
The exact name and layout can vary depending on the McAfee consumer plan and app version. Some installations may not show an Advanced Firewall section at all. In that case, the plan may not include the feature, or the apparent network issue may be caused by another McAfee component.
The risk of switching off the firewall
A firewall is different from antivirus scanning. It helps regulate network connections and can reduce exposure to unsolicited traffic, especially on public or untrusted networks. Turning it off may remove a useful layer of protection even if McAfee’s antivirus scanner remains enabled.
For that reason, use a firewall shutdown only as a narrow diagnostic step:
- Turn it off briefly.
- Test the affected app or connection.
- Turn it back on immediately.
- Look for an app-specific rule, network setting, or compatibility fix if the test succeeds.
If the issue is a single game or application, permanently disabling the entire firewall is usually disproportionate. A targeted firewall exception is safer.
Stop Scheduled McAfee Scans
Scheduled scans are separate from real-time scanning. They can run weekly or at another configured interval and may consume processor time, disk activity, and battery power—particularly on older PCs or laptops.
If McAfee starts large scans while the system is being used, disabling scheduled scans can preserve real-time protection while stopping automatic full-system scans.
Disable automatic scans
- Open the McAfee app.
- Select My Protection.
- Open Scheduled Scans from the antivirus or device protection area.
- Check the current status.
- If the control shows Turn off, select it to disable scheduled scanning.
This setting should not be confused with manually starting a scan. You can still run a scan later when it fits your schedule, such as overnight while connected to power.
A better compromise than removing protection
For many home users, scheduled scans are not essential if real-time protection is active and Windows is kept updated. But an occasional manual scan remains sensible after:
- Downloading software from an unfamiliar source.
- Recovering from a suspected malware incident.
- Connecting a drive that has been used on another PC.
- Seeing unusual browser behavior, redirects, or unexpected pop-ups.
- Installing a large collection of old files from backup media.
The key difference is control. Disabling scheduled scans prevents inconvenient automated activity without leaving the computer entirely unprotected.
Stop McAfee Secure VPN from Connecting Automatically
McAfee Secure VPN is independent of the antivirus engine. Turning off real-time scanning or the firewall will not necessarily disconnect the VPN, and turning off the VPN once may not prevent it from reconnecting later.
VPN behavior can be particularly noticeable when websites show a different location, streaming services behave differently, network printers disappear, or certain work and gaming services reject a connection.
Turn off the current VPN connection
- Open the McAfee app.
- Go to the Home tab.
- Find the Secure VPN tile.
- Toggle Secure VPN Off.
If the connection immediately returns after restarting Windows, waking the computer, or joining a Wi-Fi network, the auto-connect setting needs attention.
Disable VPN auto-connect
- Open Secure VPN settings in McAfee.
- Locate Auto Connect.
- Set it to Never connect automatically.
Some versions also include a feature called Safe Reconnect, designed to restrict internet access if the VPN connection unexpectedly drops. This can resemble a network failure because applications may lose access until the VPN reconnects.
To disable that behavior, open the Secure VPN settings under the web or privacy protection section and turn off Safe Reconnect separately.
When VPN controls require extra care
A VPN can protect privacy on public Wi-Fi and may be required for certain work resources. Before disabling automatic connection permanently, consider the networks used most often.
A practical middle ground is to prevent automatic connections on trusted home networks while enabling the VPN manually on hotel, airport, café, or other public Wi-Fi connections. That avoids unnecessary interference without discarding the privacy benefit entirely.
Stop McAfee WebAdvisor and Browser-Based Alerts
McAfee may continue appearing in Chrome, Microsoft Edge, or Firefox because browser protection operates separately from the main Windows app. McAfee WebAdvisor can flag risky search results, downloads, websites, and links. Depending on the installed plan, browser-facing features may also include Anti-tracker and scam detection tools.
Disable or remove McAfee WebAdvisor in Google Chrome
- Open Chrome.
- Select the three-dot menu in the upper-right corner.
- Choose Extensions and then Manage Extensions.
- Find McAfee WebAdvisor.
- Use the toggle to disable it, or select Remove to uninstall the extension.
Disabling the extension is useful for troubleshooting. Removing it is the cleaner option if WebAdvisor is not wanted in Chrome.
Disable or remove McAfee WebAdvisor in Microsoft Edge
- Open Edge.
- Select the Extensions button or open the three-dot menu.
- Choose Manage extensions.
- Locate McAfee WebAdvisor.
- Toggle it off or select Remove.
Disable McAfee WebAdvisor in Firefox
- Open Firefox.
- Open the application menu.
- Select Extensions and Themes.
- Choose Extensions.
- Find McAfee WebAdvisor and use the toggle to disable it, or remove it entirely.
Anti-tracker and website-specific controls
McAfee Anti-tracker may allow individual sites to be trusted. If one website does not function properly with tracking protections active, click the Anti-tracker icon in the browser toolbar and turn it off for that site.
This approach is safer than globally disabling privacy protection. A site-specific exception can restore compatibility with a banking portal, online store, streaming provider, or web app while retaining protection elsewhere.
Deepfake and scam alerts
Some recent McAfee browser features can detect or warn about potential scams, suspicious content, and manipulated media. If those alerts are too frequent or interfere with a workflow, open the McAfee or WebAdvisor browser icon and look for the relevant detector or alert controls.
Names and availability vary by subscription and region. If a particular feature is absent from the browser menu, it may not be included with that McAfee plan.
Distinguish Real McAfee Alerts from Fake Browser Notifications
Not every pop-up that uses the McAfee name actually comes from McAfee. Scam websites frequently send alarming browser notifications that imitate antivirus warnings. These notifications may claim that the computer is infected, that a subscription has expired, or that immediate payment is required.
A major warning sign is a message appearing inside the browser that urges an urgent phone call, payment, software download, or “clean now” button click. Legitimate security software should be managed through its installed application—not through an unknown webpage notification.
Remove suspicious notification permissions in Chrome
- Open Chrome.
- Open Settings.
- Select Privacy and security.
- Choose Site settings.
- Open Notifications.
- Review websites allowed to send notifications.
- Block or remove unfamiliar and suspicious entries.
Microsoft Edge and Firefox provide equivalent notification permission controls. Removing a fraudulent site’s permission can stop persistent fake “McAfee” alerts without changing the genuine McAfee installation.
Never enter payment details, call a telephone number, or download a “repair tool” from one of these pop-ups. Close the tab or browser window, clear the notification permission, and then run a scan using the installed security software.
Prevent McAfee Helpers from Opening at Startup
Windows allows some applications and helpers to launch automatically when a user signs in. Disabling an obvious McAfee startup entry may prevent a visible dashboard, notification helper, or VPN launcher from opening.
It is important to understand the limitation: disabling a startup item does not necessarily disable McAfee antivirus services. Core protection can continue running in the background.
Use Windows Settings
- Open Settings.
- Select Apps.
- Open Startup.
- Find a McAfee-related entry.
- Set its switch to Off.
Use Task Manager
- Right-click the Start button.
- Select Task Manager.
- Open Startup apps.
- Select the relevant McAfee entry.
- Choose Disable.
This is appropriate when the objective is reducing sign-in clutter rather than removing the security suite.
Do not force-stop security processes
Task Manager can end processes, but it is not a reliable way to disable an antivirus product. McAfee components may relaunch automatically, lose access to required services, or leave the system in an inconsistent state. Similar concerns apply to msconfig, services.msc, Task Scheduler, and registry edits.
Use McAfee’s own controls for temporary changes and Windows’ supported uninstall tools for permanent removal.
Uninstall McAfee Completely from Windows
When the goal is to stop McAfee from running entirely, uninstalling is the cleanest and most dependable method. This removes the primary application and allows Windows to return to its built-in protection model.
Remove McAfee through Windows Settings
- Open Start and select Settings.
- Go to Apps.
- Open Installed apps.
- Find the McAfee application to remove.
- Select the three-dot More menu.
- Choose Uninstall.
- Confirm the removal and follow the McAfee uninstaller prompts.
- Restart Windows if prompted.
Depending on the PC, there may be more than one McAfee-related entry. Examples can include the primary security suite, Secure VPN, WebAdvisor, Security Scan Plus, or other standalone utilities. Review each item carefully before removal.
Remove McAfee through Control Panel
The traditional Control Panel route remains useful on Windows systems where the Installed apps page does not display the program clearly.
- Open Control Panel.
- Select Programs.
- Open Programs and Features.
- Select the McAfee product.
- Choose Uninstall/Change.
- Follow the removal wizard.
- Restart the computer.
Removing standalone WebAdvisor
If the only unwanted part is WebAdvisor, it can often be removed from Programs and Features without uninstalling the broader McAfee security suite. First remove the Windows program, then check Chrome, Edge, and Firefox to confirm that the extension has disappeared.
If the extension remains, remove it directly through the browser’s extension manager.
Use MCPR Only When the Normal Uninstall Fails
McAfee provides a cleanup utility commonly known as the McAfee Consumer Product Removal tool, or MCPR. It is intended for consumer installations that fail to uninstall normally or leave behind components that prevent a clean removal.
MCPR should be a fallback, not the first choice. The regular Windows uninstall process is generally less disruptive and gives the application a chance to remove itself in the intended order.
When MCPR is appropriate
Consider MCPR when:
- Windows reports that McAfee cannot be uninstalled.
- The normal uninstaller fails repeatedly.
- McAfee remains listed after an apparently successful uninstall.
- A damaged installation prevents reinstalling or updating the product.
- McAfee services or interface elements persist after normal removal.
Safe MCPR workflow
- Attempt the standard Windows uninstall first.
- Obtain MCPR only from McAfee’s official consumer support materials.
- Run the tool with administrator permissions if prompted.
- Follow the on-screen instructions.
- Restart Windows when the tool completes.
- Confirm that the McAfee product is no longer listed under Installed apps.
Do not download removal tools from file-sharing sites, driver-update pages, or search advertisements. Security utilities are a common target for misleading downloads.
Also note that McAfee PC Optimizer may be treated as a separate product. If it remains installed, remove it through Windows Settings or Control Panel rather than assuming the antivirus cleanup utility will remove every McAfee-branded application.
Confirm Microsoft Defender Is Active After Removal
After McAfee is removed and Windows has restarted, verify that another antivirus solution is protecting the computer. For most home Windows 10 and Windows 11 systems, Microsoft Defender Antivirus should become active automatically once the non-Microsoft antivirus product is gone.
Check antivirus status
- Open Windows Security from the Start menu.
- Select Virus & threat protection.
- Review the protection status.
- If needed, select Manage providers to see which antivirus is active.
- Confirm that Microsoft Defender Antivirus is enabled and that protection updates are current.
Windows Security also provides access to quick scans, full scans, firewall status, account protection, app and browser controls, and device security settings.
Do not install another antivirus product immediately after removing McAfee unless there is a specific reason to do so. Two active third-party antivirus products can conflict with each other, reduce performance, and create instability. Microsoft Defender Antivirus is already integrated into supported versions of Windows and is designed to work with the operating system.
The Best Way to Stop McAfee Depends on the Problem
McAfee is easier to control once its separate layers are treated as separate tools. A temporary scan interruption calls for Real-Time Scanning controls. Network issues point to the Advanced Firewall or Secure VPN. Browser warnings should be handled through WebAdvisor, browser extensions, or notification permissions. Startup clutter belongs in Windows’ startup settings.
For a short-lived problem, disable only the relevant feature and restore it as soon as testing is complete. For a system where McAfee is no longer wanted, use Windows’ built-in uninstall process, restart the PC, and confirm that Microsoft Defender Antivirus has resumed protection.
That approach avoids the fragile workarounds that can leave security software half-disabled, keeps the PC protected during troubleshooting, and provides a clean path to a quieter Windows experience.
