
A good Windows screenshot workflow begins with one idea: do not capture more than you need. A tightly framed snip is easier to understand, safer to share, and far less likely to expose unrelated tabs, notifications, account details, or private messages. Windows 11’s integrated Snipping Tool, keyboard shortcuts, Microsoft Edge capture tools, and Surface-specific controls cover most everyday situations without requiring third-party software.
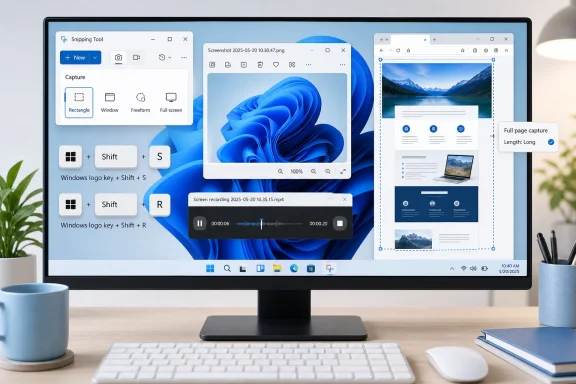 Overview: The Best Windows 11 Snipping Method for Each Job
The eight approaches below are not duplicates. Each solves a slightly different problem.
Windows + Shift + S— fastest way to capture a region, window, or display.- Snipping Tool app — best for selecting a mode, adding a delay, editing, OCR, and saving deliberately.
PrtScn— useful if you want one dedicated hardware key to open the Windows screen-snipping overlay.Windows + PrtScn— best for a full-screen image that should immediately become a file.- Snipping Tool delay — best for menus, hover states, pop-ups, and right-click context menus.
- Snipping Tool recording — best for a short selected-area tutorial or bug reproduction clip.
- Microsoft Edge Screenshot/Web Capture — best for capturing a full webpage, including content beyond the visible screen.
- Surface, pen, voice, and Microsoft 365 tools — useful alternatives for specific hardware, accessibility needs, and Office workflows.
Microsoft’s own Windows documentation now treats Snipping Tool as more than a basic screenshot utility: it supports freeform, rectangular, window, full-screen, and video captures, as well as editing and text extraction features after capture. Microsoft Support
1. Press Windows + Shift + S for the Fastest Snip
For most people, Windows logo key + Shift + S is the Windows 11 screenshot shortcut worth memorizing. It immediately opens the screen-snipping overlay, darkens the display, and lets you choose how much of the screen to capture.
Microsoft lists this shortcut as the command to select a region of the screen and copy the capture to the clipboard, with Snipping Tool available for markup and sharing afterward. Microsoft Support
How to use it
- Put the content you want to capture on screen.
- Press
Windows + Shift + S. - Choose a capture type from the small toolbar near the top of the screen.
- Drag across the target content, or select the window or display.
- Click the notification that appears to open the result in Snipping Tool for annotation, saving, or sharing.
The four principal image capture choices are:
- Rectangle — drag a conventional rectangular selection.
- Freeform — draw an irregular outline around the target.
- Window — capture a chosen app window or dialog box.
- Full screen — capture every active display area in the current desktop view.
These modes match Microsoft’s documented Snipping Tool choices, including the ability to capture an individual window or make a freeform selection when a simple rectangle would include too much clutter. Microsoft Support
Why this is the best default shortcut
The key advantage is speed without sacrificing choice. You do not need to launch an app, locate a toolbar, or take an oversized desktop screenshot and crop it later.
It also fits naturally into support and communication workflows. Capture an error box, paste it into Teams, Outlook, Word, a forum post, or a chat with Ctrl + V, and move on. The screenshot begins on the clipboard, which is ideal when you do not necessarily need a permanent image file.
The limitation to remember
This workflow is only as clean as the screen at the time you press the keys. Before capturing, check the edges of the intended selection for browser tabs, personal notifications, passwords, customer data, or other material that should not travel with the image.
A screenshot can be technically accurate yet still be a poor support artifact if it lacks context. When reporting an error, capture the full message, the relevant application area, and any visible button labels—not merely the most alarming sentence.
2. Open Snipping Tool When You Want Exact Controls
The full Snipping Tool app is the stronger choice when the screenshot needs more care than a quick clipboard paste. It gives you time to choose the mode, set a capture delay, make edits, extract text, crop the result, and decide exactly where it should be saved.
To open it, select Start, type Snipping Tool, and open the matching result. Microsoft documents that same route alongside the keyboard shortcut and the Print Screen option. Microsoft Support
Step-by-step: capturing a still image
- Open Snipping Tool from Start.
- Select Mode.
- Choose Rectangle, Window, Full screen, or Freeform.
- Select New.
- Make the selection.
- Use the editing window to review, mark up, crop, save, copy, or share the capture.
The app’s greatest strength is that it turns screen capture into a small, focused editing task instead of a separate chain of actions across different programs.
Editing tools that matter
After taking a snip, Windows 11’s Snipping Tool can provide several practical editing options:
- Pen and Highlighter for quick emphasis.
- Shapes for arrows, boxes, and visual callouts.
- Eraser to remove annotations.
- Crop to remove an accidental edge or excess desktop.
- Text actions to extract visible text from an image for copying. Microsoft Support
These tools are useful because screenshots are rarely self-explanatory. A red box around an error code, a short arrow pointing at a disabled setting, or a highlighted checkbox can eliminate several paragraphs of support instructions.
A new consideration for Copilot+ PCs
On eligible Copilot+ PCs, Microsoft says Snipping Tool can also offer Perfect screenshot, which automatically adjusts the capture region to frame visible content, and a Color picker for obtaining an on-screen color value. Microsoft Support
Those features are promising for designers and documentation writers, but they should not replace a final review. Automatic framing can improve speed, yet a human still needs to confirm that the image includes the intended context and excludes sensitive material.
3. Set the Print Screen Key to Launch Screen Snipping
The Print Screen key—often labeled PrtScn, PrtSc, or a similar variation—has traditionally been associated with taking a screenshot. In Windows 11, it can be configured to open the same modern snipping overlay used by Windows + Shift + S.
Microsoft’s current shortcut reference identifies PrtScn as a way to select a screen region for capture and notes that the behavior can be disabled through Settings > Accessibility > Keyboard using the Use the Print Screen button to open screen snipping option. Microsoft Support
How to turn it on
- Open Settings.
- Go to Accessibility.
- Select Keyboard.
- Find Use the Print Screen button to open screen snipping.
- Turn the toggle On.
The label can vary slightly across Windows 11 builds, but the intent is the same: pressing the dedicated key should launch the snipping interface instead of relying on older capture behavior.
Why this setup is worthwhile
For desktop users, especially those who take screenshots frequently, the physical Print Screen key is faster to reach than a three-key combination. It is a sensible configuration for:
- IT support staff documenting issues.
- Writers and students collecting visual references.
- Testers recording software behavior.
- Users who simply prefer a one-key capture trigger.
Potential conflict: keyboard habits and software shortcuts
This is also where Windows screenshot behavior can become confusing. Some keyboard utilities, remote-desktop applications, virtual machines, game overlays, and vendor hotkey suites may intercept PrtScn before Windows receives it.
If the key does not open the snipping overlay, check whether the keyboard has an Fn layer, whether a gaming or productivity app remapped the key, and whether the Windows accessibility toggle is enabled. The Windows shortcut reference also cautions that shortcut behavior can vary across applications, so a working Windows default can be overridden in practice. Microsoft Support
4. Save a Full-Screen Screenshot Directly to Pictures
Sometimes you do not want a clipboard item or an editing window. You want a complete screen capture saved immediately as a file. For that, press:
Windows + PrtScn
Microsoft documents this shortcut as capturing the entire screen and saving the file to the Screenshots subfolder inside Pictures. Microsoft Support
Where the file goes
Open File Explorer and navigate to:
Pictures > Screenshots
This method is particularly useful when building a chronological record: installation steps, device setup screens, web-based forms, configuration panels, or a series of status displays.
Active window only: Alt + PrtScn
If the visible desktop is busy but you only need the frontmost app, select that window and press:
Alt + PrtScn
Microsoft specifies that this copies a screenshot of the active window to the clipboard. Microsoft Support
Then paste the image into an application with Ctrl + V. This is particularly handy for reporting a program issue without exposing the entire desktop.
Full-screen capture is efficient—but not always ideal
The strength of Windows + PrtScn is that it creates an immediate file. Its weakness is that a full display image can include too much information. On multi-monitor setups, a full-screen capture may include every display, turning a simple screenshot into a sprawling, difficult-to-read image.
For most troubleshooting requests, a cropped Snipping Tool image is more useful. Reserve full-screen saving for situations where the overall desktop state itself is evidence: display arrangements, taskbar behavior, multiple app interactions, or system-wide visual problems.
5. Capture Menus, Pop-Ups, and Flyouts with Delay
Menus are notoriously awkward to screenshot. The instant you click elsewhere to begin a selection, the menu disappears. Windows 11 solves that problem with the Delay feature in Snipping Tool.
Microsoft’s guidance describes a workflow in which you choose a delay—such as five seconds—select a capture mode, start a new snip, open the target menu during the countdown, and then capture it once the display dims. Microsoft Support
How to capture a disappearing interface element
- Open Snipping Tool.
- Select Delay.
- Choose a duration, such as 5 seconds.
- Select your preferred Mode.
- Click New.
- Open the menu, tooltip, right-click menu, flyout, or hover state you need.
- When the screen dims, capture the relevant area.
The tool also includes the Alt + D shortcut for selecting a delay of one to five seconds. Microsoft Support
Best uses for delayed snips
A delayed screenshot is ideal for:
- Right-click context menus.
- Start menu or taskbar flyouts.
- Browser drop-down menus.
- Hover tooltips.
- Calendar pop-ups.
- Temporary error notifications.
- Settings menus that close when focus changes.
Why delay is more reliable than racing the mouse
Trying to open a menu and immediately press Windows + Shift + S can work, but it is inconsistent. A menu might close when modifier keys are pressed, when focus changes, or simply because the pointer moves away from the target.
Delay makes the process repeatable. That matters when documenting a bug or writing instructions because repeatability is more valuable than getting lucky once.
6. Record Part of the Screen with Snipping Tool
Screenshots communicate a moment. A screen recording communicates a process: where a button appears, what changes after a click, how a setting behaves, or how to reproduce a problem.
Windows 11’s Snipping Tool can record a rectangular portion of the display. Microsoft’s instructions are straightforward: select the Record button, choose New, drag a rectangle around the recording area, select Start, and then use Stop when finished. Microsoft Support
The keyboard shortcut for recording
Press:
Windows + Shift + R
Microsoft identifies that shortcut as opening the Snipping Tool recording overlay. Its current keyboard-shortcut documentation also states that the recording is saved by default as an MP4 file in Videos > Screen Recordings. Microsoft Support
When Snipping Tool recording is the right option
Use it for short, targeted clips such as:
- Demonstrating a Windows 11 setting.
- Recording an application crash sequence.
- Showing a support technician an intermittent UI issue.
- Creating a compact how-to clip.
- Capturing a browser interaction without recording the entire desktop.
The ability to select a limited area is important. It reduces clutter, makes the final clip easier to follow, and lowers the chance of recording unrelated private content.
Post-recording workflow
After recording, Snipping Tool can save the clip directly or pass it to Clipchamp for further editing. Microsoft specifically points to Clipchamp for adding captions or audio to a video snip. Microsoft Support
That creates a useful progression: Snipping Tool for fast capture; Clipchamp for presentation-ready output.
A practical caution about video capture
Before pressing Start, close notifications, chat apps, password managers, and unrelated browser tabs. Screen recordings can reveal more than still images because they preserve cursor movement, changing content, accidental window switches, and dynamic notifications.
For professional or support use, record the smallest possible area and take a moment to rehearse the sequence first. A 15-second focused clip is almost always better than a three-minute desktop recording.
7. Capture Full Webpages in Microsoft Edge
Snipping Tool is excellent for what is visible on the screen. It is not the natural tool for capturing an entire long webpage in a single image. For that, use Microsoft Edge’s Web Capture/Screenshot functionality.
Microsoft’s Edge command reference lists Ctrl + Shift + S as the default shortcut for starting Web capture. Microsoft Learn
How to capture a page in Edge
- Open the desired webpage in Microsoft Edge.
- Press
Ctrl + Shift + S, or use Edge’s screenshot option from its menu or page controls. - Choose Capture area for a selected region.
- Choose Capture full page when the page is longer than the visible viewport.
- Save, copy, or annotate the resulting capture.
Why Edge capture is better for web pages
A long webpage is not simply a tall screenshot. It may contain lazy-loaded images, sticky headers, floating controls, ads, or content that changes as you scroll. A full-page browser capture is designed around the web document rather than around the monitor’s current visible pixels.
That distinction matters for:
- Saving receipts and order pages.
- Preserving an article or reference page.
- Capturing long settings pages.
- Recording a complete online form before submission.
- Sharing a web layout issue with a developer or support team.
A limitation worth respecting
Full-page screenshots can produce very large images. They can also preserve more content than intended, including account information lower down the page or sidebars that were not obvious in the initial viewport.
Review the finished image before sharing. If the purpose is merely to show one item near the top of a page, a standard screen snip will be clearer, smaller, and safer.
8. Use Surface, Pen, Voice, or Microsoft 365 Screenshot Tools
Windows 11 screenshot options extend beyond conventional keyboards. Surface devices, pen workflows, accessibility tools, and Microsoft 365 apps all offer alternatives that may suit a particular device or task better.
Surface keyboard and hardware shortcuts
On supported Surface keyboards, Microsoft says users can press the dedicated Snipping key or use Windows + Shift + S. For saved full-screen images, use Windows + PrtScn or Windows + Snipping key. Microsoft Support
For Surface models with physical volume controls, Microsoft also documents the Power + Volume Up screenshot method—but explicitly notes that this shortcut does not work on Surface Laptop devices. Microsoft Support
That exception matters. Surface families look similar from a software perspective, but their hardware input options differ. When a screenshot shortcut seems broken, verify the exact device category before assuming Windows is at fault.
Pen-based access
For tablet and stylus users, placing Snipping Tool in the Windows pen menu can make capture easier than reaching for keyboard chords. This is especially useful when the device is docked, held in portrait orientation, or used in a meeting where a stylus is already in hand.
The larger point is usability: a screenshot shortcut is only “quick” if it is accessible from the way the device is currently being used.
Voice access and accessibility
Voice-driven workflows can issue the same screenshot shortcut through Windows accessibility features, allowing users to invoke screen capture without relying on a conventional keyboard gesture. This can be valuable for mobility needs, repetitive-strain concerns, or hands-busy environments.
However, voice control should be used thoughtfully around sensitive screens. A capture command can still record confidential information that happens to be visible, so accessibility convenience does not remove the need for content review.
Insert a snip directly into Word, Excel, Outlook, or PowerPoint
Microsoft 365 includes its own Insert > Screenshot and Screen Clipping workflow in Word, Excel, Outlook, and PowerPoint. Microsoft explains that the Screenshot command shows open application windows in an Available Windows gallery, while Screen Clipping lets users select part of the screen and insert it directly into the current Office file. Microsoft Support
This is a strong option for documentation because it removes the intermediate step of saving a file and manually inserting it later.
A typical workflow looks like this:
- Click the app or webpage you want to capture.
- Switch to the Word document, Excel workbook, Outlook message, or PowerPoint slide.
- Select Insert > Screenshot.
- Choose a full window from Available Windows or choose Screen Clipping.
- Drag to select the desired content.
- Edit the inserted image with the app’s picture tools.
Microsoft notes that minimized windows cannot be captured through the Available Windows gallery, which is a small but important limitation when preparing Office documentation. Microsoft Support
Choosing the Right Windows 11 Screenshot Workflow
The best method is the one that produces a clean, usable result with the least cleanup afterward.
| Need | Best Windows 11 option |
|---|---|
| Quick region screenshot | Windows + Shift + S |
| Reusable Print Screen behavior | Enable PrtScn for screen snipping |
| Full screen saved to disk | Windows + PrtScn |
| Current app window only | Alt + PrtScn |
| Menu or hover-state capture | Snipping Tool Delay |
| Short selected-area video | Windows + Shift + R |
| Complete long webpage | Microsoft Edge Web Capture |
| Screenshot directly into an Office document | Insert > Screenshot |
| Surface tablet capture | Surface hardware or Snipping key shortcuts |
Final Takeaway
Windows 11 has moved far beyond the old “press Print Screen and paste into Paint” era. The operating system now offers a mature set of screen capture options that can handle quick clipped images, saved full-screen files, delayed menu captures, selected-area recordings, scrolling webpage images, and direct Office insertion.
For everyday use, Windows + Shift + S remains the fastest and most flexible way to snip on Windows 11. For deliberate documentation, Snipping Tool’s editing, delay, text extraction, and recording tools offer more control. And when a webpage extends beyond the display, Microsoft Edge’s full-page capture approach is the cleaner answer.
The practical skill is not merely knowing the shortcuts. It is choosing the capture that shows the necessary evidence, preserves context, protects private information, and makes the next person understand the issue immediately.
Update: Snipping Tool adds a built-in route to Bing Visual Search (July 30, 2026)
How-To Geek highlights another Snipping Tool capability not covered above: after selecting an on-screen area, users can send that image to Bing Visual Search directly from the capture interface. The feature can help identify products, landmarks, objects, or visually similar results without first saving the screenshot and uploading it manually.
The search opens in the user’s default web browser rather than requiring Microsoft Edge, according to How-To Geek. For Windows users, that makes Snipping Tool useful not only for capturing and extracting information, but also for quickly researching something visible on screen.
This is best treated as a convenience feature, not a replacement for verifying results. Visual matches and AI-generated search interpretations can be incomplete or incorrect, particularly for technical hardware, software dialogs, or security-related content.
