
Windows 11 already includes the tools required for the job. There is no need to install a legacy cleanup utility, manually empty WinSxS, or follow outdated Windows 7-era instructions involving add-ons that do not apply to current PCs. Microsoft’s current storage tools are designed to identify removable temporary and system files while preserving the files Windows still needs to service, repair, or roll back updates.
 Background: What Windows Update Cleanup Actually Removes
Every Windows update is not merely a single downloaded installer. Windows maintains servicing data, component versions, cached downloads, and—in some cases—previous installation files so that updates can be repaired, superseded, or uninstalled. That makes update maintenance reliable, but it also means that a low-capacity SSD can slowly lose usable free space after months of servicing.
Windows Update Cleanup is the user-facing label for removing update-related files that Windows considers obsolete. It is not intended to remove current updates, personal files, installed applications, or the active operating-system components required to boot the PC.
The practical benefit is most obvious on systems where the C: drive is tight on space. Microsoft notes that inadequate free capacity can prevent Windows updates from installing and can affect overall performance, making storage maintenance a useful part of normal Windows 11 administration. Microsoft’s drive-space guidance also places cleanup options ahead of more disruptive remedies such as resetting or reinstalling Windows.
It is equally important to understand what this process does not guarantee. A Windows Update Cleanup pass might free several gigabytes after a major upgrade, or it might recover only a small amount after a routine patch cycle. The results depend on what Windows has already marked as removable. If the category is missing entirely, that normally means Windows has not identified eligible update files—not that the cleanup feature has failed.
The Safe Cleanup Hierarchy
For most Windows 11 users, the following order is sensible:
- Temporary files in Settings
- Cleanup recommendations
- Disk Cleanup with system files
- Storage Sense for recurring maintenance
- Previous Windows installation removal after an upgrade
- Component-store cleanup with DISM, only when justified
- SoftwareDistribution cache removal, only as update troubleshooting
This sequence matters because each stage has a different purpose. Settings and Disk Cleanup are ordinary maintenance tools. DISM component cleanup is a servicing operation. Clearing SoftwareDistribution is a repair technique for a damaged or incomplete update cache—not a routine substitute for Windows Update Cleanup.
Start in Settings: Temporary Files Is the Everyday Option
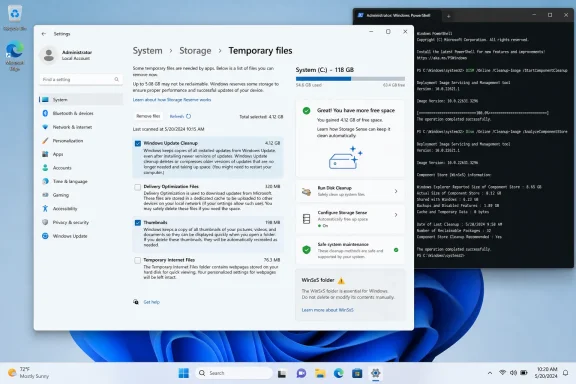
The most straightforward way to run Windows Update Cleanup in Windows 11 is through Settings.
- Open Start.
- Select Settings.
- Go to System > Storage.
- Select Temporary files.
- Review the categories Windows has found.
- Select Windows Update Cleanup, if listed.
- Select Remove files.
The advantage of this method is visibility. Windows presents cleanup categories together, allowing the user to see the likely storage impact before removal. This is preferable to indiscriminately deleting folders because Windows makes the eligibility decision for the update files.
Windows 11’s Storage page separates usage into categories such as installed apps, temporary files, and system or reserved storage. Microsoft explains that reserved storage exists partly to ensure enough capacity for temporary files, caches, and Windows Update operations, which is why storage totals do not always match a simple count of user files. The Storage settings documentation describes this reserved space as part of Windows’ effort to make updating and day-to-day operation more predictable.
Review Every Checkbox Before Removing Files
The Temporary files screen can include much more than Windows Update Cleanup. A typical list may include:
- Temporary files
- Recycle Bin contents
- Thumbnails
- Delivery Optimization Files
- DirectX Shader Cache
- Previous Windows installation(s)
- Temporary internet files
- Downloaded files, depending on configuration
The presence of a checkbox does not mean it is appropriate to select. The critical category to examine carefully is Previous Windows installation(s), sometimes shown as a previous version of Windows. That option can reclaim substantial space, but it has a material consequence: it removes the files needed to roll back to the earlier Windows installation.
For ordinary update cleanup, selecting Windows Update Cleanup alone is the conservative choice. Add other categories only after confirming what they contain and whether they affect a recovery path or data you intend to keep.
Delivery Optimization Files Are Related, but Separate
If space is at a premium, Delivery Optimization Files are worth reviewing alongside Windows Update Cleanup. Delivery Optimization is the Windows mechanism that helps deliver updates, Microsoft Store content, and other Microsoft downloads more efficiently. It can cache data locally, including content that may have been shared with other devices depending on configuration.
Microsoft documents that its Delivery Optimization cache is cleaned automatically over time or when it becomes too large, but it can also be cleared manually through Disk Cleanup. Microsoft’s Delivery Optimization documentation confirms that removing the cache is a supported way to recover space. Clearing it does not disable Windows Update; it simply removes cached download content that Windows may need to acquire again later.
On a work-managed PC, Delivery Optimization controls can be locked. That is expected in an environment where an IT department uses policy to regulate update bandwidth, peer downloads, or cache behavior.
Use Cleanup Recommendations for a Broader Storage Review
Windows Update Cleanup is often only one part of a larger storage issue. If the C: drive has become crowded, Cleanup recommendations provides a broader, guided review.
- Open Settings.
- Choose System > Storage.
- Select Cleanup recommendations.
- Review the categories Windows presents.
- Select the files or apps you want to remove.
- Choose Clean up for the applicable section.
Cleanup recommendations can identify:
- Temporary files and system files
- Previous Windows installation files
- Large or rarely used personal files
- Cloud-synced files
- Unused apps
Microsoft describes this feature as an analysis tool that offers personalized recommendations based on files and applications that may safely be removed. Its Storage settings support page specifically includes temporary files, previous Windows installations, large files, and unused applications among the categories it can identify.
This makes Cleanup recommendations useful when update cleanup has completed successfully but has not released enough capacity. It shifts the question from “How do I remove old update files?” to “What is actually consuming space on this PC?”
Why Cleanup Recommendations Is Better Than Guesswork
A low-storage warning often leads people to target the biggest-looking Windows folders first. That approach is risky because Windows system directories can appear large even when their apparent size does not reflect their real disk usage.
Cleanup recommendations avoids that trap by presenting supported removal categories. It is also a useful reminder that update files may not be the main problem. A handful of old virtual machines, game libraries, video files, local OneDrive copies, or unused software can consume more storage than months of Windows updates.
Disk Cleanup Still Has a Place in Windows 11
Despite the prominence of Settings, Disk Cleanup remains useful in Windows 11. It is especially helpful when the Windows Update Cleanup category does not appear in the Settings interface, when you want the classic checkbox-based workflow, or when you need access to system-file cleanup options.
- Select Search on the taskbar.
- Type Disk Cleanup.
- Open the Disk Cleanup app.
- Choose the system drive—usually
C:—and select OK. - Select Clean up system files.
- Choose
C:again if prompted. - Wait for the scan to complete.
- Check Windows Update Cleanup if it appears.
- Select OK.
- Confirm with Delete Files.
The crucial step is Clean up system files. The initial Disk Cleanup scan may not show all update-related cleanup categories. Running the elevated scan makes the utility evaluate eligible system files as well.
Microsoft’s documentation for component-store cleanup notes that Disk Cleanup can remove temporary and system files and that its update-cleanup option helps reduce the size of the component store. Microsoft Learn’s WinSxS cleanup guidance recognizes Disk Cleanup as a supported method rather than an obsolete relic.
Why the Category May Not Be Listed
Do not assume something is wrong if Windows Update Cleanup is absent. Windows exposes that category only when it has removable update data available. If recent updates are still needed, if cleanup has already occurred, or if the component store has nothing superseded to discard, the checkbox may not appear.
That behavior is desirable. A missing option is better interpreted as “nothing eligible was found” than as an invitation to manually erase servicing folders.
Clearing Delivery Optimization Cache in Disk Cleanup
Disk Cleanup is also the documented route for removing cached Delivery Optimization downloads:
- Search for and open Disk Cleanup.
- Select the system drive.
- Check Delivery Optimization Files.
- Select OK.
- Confirm Delete Files.
Microsoft explicitly provides these steps for clearing the Delivery Optimization cache. The official support article also notes that Windows normally expires cached content automatically, so manual deletion is best viewed as an occasional space-recovery action rather than a recurring requirement.
Turn On Storage Sense for Ongoing Maintenance
Manual cleanup works well when space is already low. Storage Sense is the better option for reducing the need for repeated cleanup sessions.
- Open Settings.
- Select System > Storage.
- Turn Storage Sense to On.
- Select Storage Sense to configure it.
- Choose when it should run.
- Review Recycle Bin, Downloads, and cloud-content settings.
- Save the configuration by leaving Settings; the options apply automatically.
Storage Sense can automatically remove unnecessary temporary files and can handle Recycle Bin content according to the rules chosen by the user. Microsoft’s Storage Sense guide states that the default behavior after enabling it is to run during low-disk-space conditions.
There are important limits:
- Storage Sense works on the system drive, ordinarily
C:. - It applies settings per user account.
- It cannot run unless the user is signed in and online for more than 10 minutes.
- Downloads and cloud files are not managed by default unless the user explicitly configures those options.
That last point deserves emphasis. Storage Sense can be convenient, but it should not be enabled blindly with aggressive Downloads-folder settings. A Downloads folder often contains installers, work files, driver packages, or documents that are not duplicated elsewhere.
Storage Sense Is Maintenance, Not a Substitute for Review
The strength of Storage Sense is automation. Its weakness is that automation cannot fully understand the value of personal files. Configure it to clean temporary system data and recycle-bin material, then make deliberate choices about Downloads and cloud-managed content.
For Windows Update Cleanup specifically, Storage Sense supports the broader goal of keeping temporary storage under control. It is not a magic command that guarantees the removal of every superseded component after each update.
Previous Windows Installation Files: The Highest-Impact Checkbox
Following a feature update, Windows can retain the previous installation in Windows.old and related recovery data. This is why users sometimes see Previous Windows installation(s) or Previous version of Windows in Temporary files or Cleanup recommendations.
The steps are simple:
- Open Settings.
- Go to System > Storage.
- Select Temporary files.
- Check Previous Windows installation(s).
- Select Remove files.
The decision is not simple, however. Removing these files ends the normal rollback path to the previous Windows version. Microsoft warns that deletion cannot be undone and that it removes the ability to go back to the earlier version. Microsoft’s free-space guidance notes that the previous Windows version is typically available as a removable system-file category for fewer than 10 days after an upgrade.
This is the right cleanup option only when:
- The upgraded PC has been tested.
- Critical applications and peripherals work correctly.
- Important data is backed up.
- There is no foreseeable reason to revert to the prior Windows installation.
The storage gain can be significant, particularly on devices with 64GB or 128GB internal drives. But this is not routine Windows Update Cleanup. It is a deliberate choice to trade rollback capability for recovered storage.
Component Cleanup and WinSxS: The Advanced Path
The C:\Windows\WinSxS folder is often misunderstood. It is the component store, containing the files Windows uses to service, update, repair, and manage operating-system components. It can look enormous in File Explorer, but manually deleting its contents is unsafe.
Microsoft’s guidance is unambiguous: deleting files from WinSxS, or deleting the folder itself, can severely damage Windows, prevent startup, and make the system impossible to update. Microsoft Learn’s component-store documentation directs users to built-in cleanup mechanisms instead.
Run the Scheduled StartComponentCleanup Task
Windows includes a servicing task named StartComponentCleanup.
- Open Start.
- Search for Task Scheduler.
- Open Task Scheduler.
- Navigate to:
Task Scheduler Library\Microsoft\Windows\Servicing
- Select StartComponentCleanup.
- Select Run.
This uses Windows’ own servicing infrastructure to clean up superseded components. Microsoft states that the automatic task waits at least 30 days after an updated component is installed before removing its previous version. When started manually through Task Scheduler, it has a one-hour timeout, meaning it may not complete every eligible cleanup action in a single run. Microsoft’s servicing documentation provides both of those operational details.
Use DISM When You Need More Direct Control
For a more direct component-store cleanup, open Windows Terminal or Command Prompt as administrator and run:
Dism.exe /online /Cleanup-Image /StartComponentCleanup
Microsoft says this produces results similar to the scheduled task but removes superseded component versions immediately, without the 30-day grace period and without the scheduled task’s one-hour timeout. The DISM cleanup guidance identifies this as an advanced option for reducing the size of the component store on a running Windows installation.
This command is appropriate when:
- Standard Temporary files cleanup did not reclaim enough space.
- Disk Cleanup found little or nothing removable.
- The system has had many updates over a long period.
- The available space problem is genuinely tied to servicing components.
It is not necessary to run after every Patch Tuesday. Windows already performs maintenance tasks, and routine manual DISM cleanup offers diminishing returns on a healthy PC with adequate storage.
Avoid /ResetBase for Routine Cleanup
A more aggressive variation adds /ResetBase:
Dism.exe /online /Cleanup-Image /StartComponentCleanup /ResetBase
This removes all superseded component versions and establishes the current state as the servicing baseline. The potential space savings may be attractive, but it comes with a major tradeoff: installed update packages can no longer be uninstalled afterward.
Microsoft explicitly warns that existing updates cannot be uninstalled after /ResetBase completes, although future updates can still be removed normally. Microsoft Learn’s warning makes this unsuitable for ordinary maintenance.
Do not treat /ResetBase as a monthly cleanup command. It is a last-resort measure for a stable system where reclaiming component-store space outweighs the ability to uninstall currently installed updates.
Do Not Confuse Cache Reset With Disk Cleanup
A common Windows fix involves stopping the Windows Update service, deleting the contents of C:\Windows\SoftwareDistribution, and then restarting the service. Those steps can work, but their purpose is troubleshooting corrupt, incomplete, or stuck update downloads—not regular disk hygiene.
Microsoft’s Windows Update troubleshooting instructions recommend this procedure specifically when cached update files may be corrupt:
- Press
Win + R. - Type
services.msc. - Press Enter.
- Find Windows Update.
- Right-click it and select Stop.
- Open
C:\Windows\SoftwareDistribution. - Delete the files and folders inside.
- Return to Services.
- Start Windows Update again.
Microsoft’s Windows Update support documentation presents this as a cache-clearing response to update errors, not as the standard way to free storage.
The distinction matters. Clearing SoftwareDistribution can force Windows to download updates again, which may temporarily consume bandwidth and delay the next update scan. Use it when Windows Update is malfunctioning or when guided by a specific troubleshooting path—not merely because the folder exists.
A Practical Decision Guide for Windows 11 PCs
Use this short framework to choose the appropriate tool.
Use Temporary Files when:
- You want the normal Windows Update Cleanup category.
- You are freeing space after regular cumulative updates.
- You want to review cleanup categories before deletion.
- You prefer the modern Windows 11 interface.
Use Disk Cleanup when:
- Windows Update Cleanup is not visible in Settings.
- You want to run the Clean up system files scan.
- You want to clear Delivery Optimization Files using Microsoft’s documented classic workflow.
- You prefer the older checkbox interface.
Use Cleanup Recommendations when:
- You need more than update cleanup alone.
- You want to identify large files, unused apps, cloud content, and previous installations.
- You are trying to understand why the system drive is full.
Use Storage Sense when:
- You want routine temporary-file maintenance.
- Your PC repeatedly runs low on storage.
- You are comfortable defining rules for Recycle Bin, Downloads, and cloud content.
Use DISM component cleanup when:
- Standard cleanup has not recovered enough capacity.
- You have a clear reason to target superseded component-store files.
- You can run an elevated terminal command and understand the difference between ordinary cleanup and
/ResetBase.
Use SoftwareDistribution deletion when:
- Windows Update fails, stalls, or reports cache-related errors.
- You are troubleshooting an update problem rather than performing routine cleanup.
Conclusion
Windows Update Cleanup in Windows 11 is safest when treated as a supported storage-management task rather than a manual hunt through Windows system folders. Begin with Settings > System > Storage > Temporary files, select Windows Update Cleanup when it appears, and review every additional category before deleting anything.
For deeper cleanup, Disk Cleanup remains useful, particularly after selecting Clean up system files. Storage Sense can reduce future clutter, while Cleanup recommendations provides a more complete picture of what is consuming disk capacity. More advanced component cleanup through DISM.exe /online /Cleanup-Image /StartComponentCleanup is available when necessary, but it should remain an exception—not a reflex.
The hard rules are straightforward: never manually delete WinSxS, avoid /ResetBase unless losing the ability to uninstall existing updates is acceptable, and reserve SoftwareDistribution deletion for genuine Windows Update troubleshooting. Following that hierarchy delivers the space-saving benefits of Windows Update Cleanup without turning a routine maintenance task into an unnecessary recovery project.
