
Microsoft’s documentation confirms that Windows keeps deleted local files in a hidden $Recycle.Bin folder and that the built-in rd command can remove a directory tree, including its contents. Microsoft also documents chkdsk as the tool for checking and repairing file-system errors. Those facts point to an important distinction that many quick-fix guides skip: a reset fixes the Recycle Bin’s container, not an underlying disk problem. If Windows reports corruption, repair the volume first.
Before doing anything, open the Recycle Bin and check whether there is an item you may need. The reset procedure permanently removes every item currently in the Recycle Bin for the drive you target. It does not erase live files elsewhere on the drive, but it also does not give you a confirmation dialog.
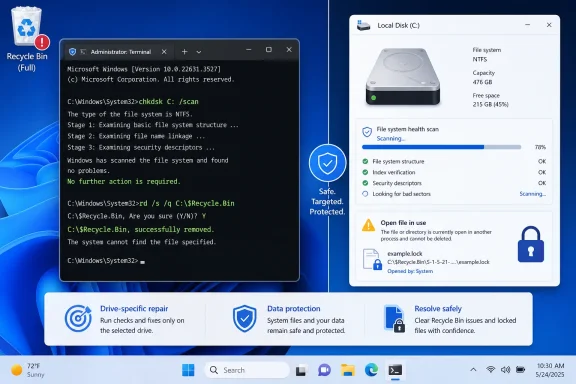 Identify whether one file or the whole bin is stuck
Try deleting one ordinary item from the Recycle Bin rather than using the global Empty Recycle Bin command. If one file refuses to go away with a message such as “the action can’t be completed because the file is open,” the issue is probably a process lock rather than a damaged Recycle Bin database.
Close apps that could be using the file, including preview panes, photo or video editors, archive utilities, cloud-sync clients, antivirus scans, and command windows opened in the file’s former location. Then restart Windows and try again. A restart clears ordinary handles held by apps and is the quickest way to separate a transient lock from a persistent problem.
If every item fails to delete, the Recycle Bin icon remains full after you empty it, or Windows returns errors about corruption or inaccessible files, move on to a disk check. Do not jump straight to a command that wipes the Bin; the error may be Windows warning that the drive needs attention.
Also note that the Recycle Bin is effectively maintained per local drive. A file deleted from D: goes into that drive’s hidden Recycle Bin area, not necessarily the one on C:. Resetting C: will not clear a stuck Bin on an external drive, a second internal drive, or a USB disk.
Scan the drive before attempting repairs
Open Terminal (Admin), Windows PowerShell (Admin), or Command Prompt (Admin). The account needs administrator rights to run repair operations.
For a first pass on the system drive, run:
chkdsk C: /scan
For another drive, replace C: with its letter:
chkdsk D: /scan
Microsoft describes /scan as an online NTFS scan: it looks for file-system problems without immediately taking the volume offline to repair them. This is the right first move when the Recycle Bin is acting strangely but the PC otherwise works normally.
If the scan reports errors, back up important files from that drive before repairing it. Then run:
chkdsk C: /f
On the Windows system drive, chkdsk will usually say that the volume is in use and ask whether to schedule the repair for the next restart. Type Y, press Enter, and restart the PC. Let the check finish; do not force the machine off during a scheduled repair.
For a non-system drive, close programs using that drive and run the same command with the correct letter:
chkdsk D: /f
The /f switch is the significant one: running chkdsk without a repair parameter reports status, but it does not correct detected logical file-system errors. Microsoft’s current chkdsk guidance also notes that a repair requires the volume to be locked, which is why Windows schedules the system drive check before startup.
Do not make chkdsk /r the automatic next step. The /r option includes /f, scans for bad sectors, and tries to recover readable data, but it can take a very long time because it performs a full surface read. It is appropriate when Windows repeatedly reports disk errors, the drive has I/O failures, or files repeatedly become corrupt. On an SSD, an occasional /r run is not inherently dangerous, but repeated full scans add unnecessary wear and are not a cure for a failing drive.
If chkdsk finds recurring errors, or Event Viewer logs file-system errors such as NTFS Event ID 55 or 98, treat the Recycle Bin failure as a storage warning rather than a cosmetic File Explorer annoyance. Microsoft’s storage troubleshooting guidance recommends checking the underlying hardware, storage drivers, and firmware if repairs do not hold.
Reset the Recycle Bin for the affected drive
Once the drive scan is clean—or after chkdsk /f has completed—reset the Recycle Bin if it still refuses to empty.
Open an elevated Command Prompt or Terminal and enter the following command for the affected drive:
rd /s /q C:\$Recycle.Bin
For a second internal disk or an external disk, change only the drive letter:
rd /s /q D:\$Recycle.Bin
The command means:
rdremoves a directory./sremoves the directory and everything below it./qsuppresses confirmation prompts.
The path is the part that deserves care. It must be exactly C:\$Recycle.Bin for the C: drive. Do not remove the drive letter, do not substitute C:\, and do not run a broad rd /s /q command against another path. Microsoft’s command reference is explicit that /s deletes the full directory tree and /q does so without prompting.
After the command completes, restart Windows. The Recycle Bin should return to normal operation as Windows recreates the folder structure it needs. Test it with a disposable text file: create a small file on the same drive, delete it normally, open the Recycle Bin, then empty it.
If the Recycle Bin problem is on multiple drives, repeat the command one drive at a time. This is safer than guessing which disk contains the stuck item and prevents an external drive’s deleted files from remaining untouched while C: appears fixed.
A reset is deliberately destructive to recycled items. If you discover after resetting that you needed one of those files, stop writing new data to that drive as much as possible. Microsoft’s Windows File Recovery guidance explains that deletion marks space as available for reuse; continued activity can overwrite data that might otherwise be recoverable.
Use Safe Mode when File Explorer still reports a lock
Safe Mode is useful when normal Windows keeps reporting that an item is open or in use after a restart. Microsoft describes Safe Mode as a limited startup state that loads only essential files, drivers, and services. That removes most third-party startup tools, shell extensions, sync clients, and background utilities from the equation.
In Windows 11, go to Settings > System > Recovery, then select Restart now beside Advanced startup. In Windows 10, the equivalent route is Settings > Update & Security > Recovery > Advanced startup.
After the restart, choose:
Troubleshoot > Advanced options > Startup Settings > Restart
At the Startup Settings screen, press 4 or F4 for Safe Mode. Use 5 or F5 only if you specifically need network access; ordinary Safe Mode is preferable for a deletion problem because it starts fewer services.
Once signed in, try emptying the Recycle Bin normally. If File Explorer still fails, open Command Prompt as administrator and reset only the relevant drive:
rd /s /q C:\$Recycle.Bin
Restart normally afterward. If the bin empties in Safe Mode but not during a normal startup, the evidence points away from disk corruption and toward a program or shell component that is locking files. A clean boot is the next diagnostic step: Microsoft distinguishes it from Safe Mode because it lets you isolate non-Microsoft services and startup applications more precisely.
What not to do when deletion errors continue
Do not repeatedly force-delete random folders, run chkdsk /r every week, or disable security software permanently just to empty the Recycle Bin. A persistent “file in use” message has a specific cause; a persistent corruption message may be an early sign of a storage or connection problem.
If the issue returns immediately after a successful reset, check which drive is involved and whether the problem follows a particular app, external disk, or network-synced folder. A Recycle Bin reset that works once but fails again after the same storage errors is not a permanent repair—it is evidence that the volume, its connection, or the software touching it still needs investigation.
Windows 10 users should also keep the wider support picture in mind. Microsoft ended free Windows 10 security updates and technical support on October 14, 2025. The Recycle Bin and chkdsk procedures remain applicable, but a PC that is still running Windows 10 and showing repeated storage faults deserves a current backup and a plan for supported Windows 11 hardware or an alternative supported operating system.
