

Canva for beginners on Windows is easiest when you use its web editor or the Canva desktop app, choose the correct design size first, then replace a template’s content and download or share the result. This guide covers Canva Free and paid accounts on Windows 10 and Windows 11, including the Canva desktop app and a current desktop web browser. Interface names can vary slightly as Canva updates its editor, but the core workflow remains the same.
Canva is cloud-based: designs are saved to your Canva account as you work, so you can begin in a browser and later open the same project in the Windows app.
You will then enter the editor. A typical desktop editor includes:
If elements overlap unexpectedly, select the object and look for a position or arrange control in the toolbar. Move the item forward or backward until it is visible in the intended layer order.
Canva’s whole-design resize features may depend on your plan. If Resize is unavailable, create a new design in the target size, then copy individual pages or elements across and adjust them manually.
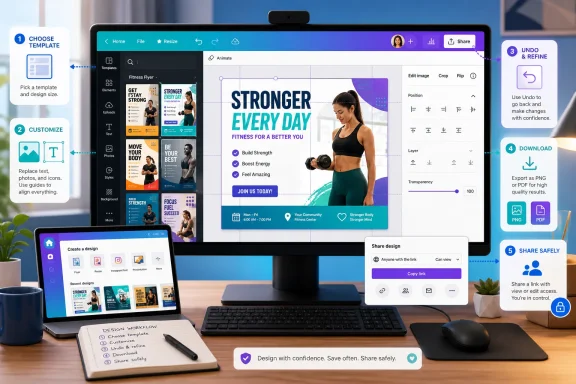 Choose Canva on the web or install the Windows app
Canva is cloud-based: designs are saved to your Canva account as you work, so you can begin in a browser and later open the same project in the Windows app.- Open Canva and sign in with the account you intend to use for the project.
- If you prefer an installed app, install the Canva desktop app for Windows. Canva lists Windows 10 or later as the supported Windows version.
- On the Canva home page, confirm you are in the correct workspace or team before creating a design. This matters if you have both a personal account and an employer, school, or organization team.
Start with the right design type
Choosing a design type before you edit prevents common problems such as blurry graphics, cropped social posts, or a document that does not print at the intended size.- From the Canva home page, select Create.
- Choose a common format such as Presentation, Poster, Instagram Post, Flyer, or Resume.
- To create a size not shown in the list, select Custom size.
- Enter the width and height, choose the available measurement unit, and select Create new design.
You will then enter the editor. A typical desktop editor includes:
- A central canvas showing the current page.
- A side panel for templates, uploaded files, elements, text, and apps.
- A toolbar that changes when you select an image, text box, shape, or page.
- A top menu with sharing and download controls.
Use a template without inheriting its sample content
Templates are the fastest route to a polished first design, but treat every photo, name, date, logo, and small-print line as placeholder content until you verify it.- In the editor, select Design or Templates in the side panel.
- Search for a layout that matches the project, such as “business flyer,” “birthday invitation,” or “YouTube thumbnail.”
- Select a template to apply it to the current design.
- Review every page before editing. Some templates contain multiple pages, alternative layouts, or hidden-looking details near an edge.
- Replace template text, images, colors, and branding with your own material.
Replace text, photos, and graphics
Work one object at a time. Click an object once to select it; click text twice to place the cursor and edit its wording.Edit text
- Double-click the text box you want to change.
- Delete the placeholder wording and type your own text.
- Use the floating editor toolbar to change font, size, color, alignment, spacing, or other available formatting.
- Click outside the text box when finished.
- To add new text, click the page and type
/, then search for a Heading, Subheading, or Body text option. You can also use the Text section of the side panel.
Upload and place your own files
- Select Uploads in the side panel.
- Select Upload files.
- Browse to the photo, logo, video, or other supported file on your Windows PC and select it.
- Wait for the file to appear in Uploads.
- Drag the uploaded item onto the canvas.
Resize, crop, and move an object
- Select the photo, graphic, shape, or text box.
- Drag a corner handle to change its size.
- Drag the object itself to reposition it.
- If a photo needs reframing, select it and choose Crop when that option appears in the toolbar.
- Adjust the image inside the crop area, then apply the crop.
Add Canva elements carefully
Canva’s Elements area can add shapes, lines, icons, illustrations, stickers, charts, and stock media.- Select Elements.
- Search for a specific item, such as “blue arrow,” “coffee icon,” or “abstract background.”
- Select an item to add it to the page.
- Resize and reposition it, then use the toolbar to change available colors or settings.
Correct mistakes and keep the page organized
Canva saves changes automatically, but automatic saving does not make every change desirable. Use Undo immediately when you move, delete, or resize the wrong item.- Select Undo in the editor controls after a mistake.
- Select Redo if you need to restore an undone action.
- On Windows, use Ctrl+Z to undo and Ctrl+Y to redo where supported.
- Press Delete after selecting an unwanted element to remove it.
- Use Ctrl+C and Ctrl+V to copy and paste selected text or objects where supported.
- Use Tab and Shift+Tab to move through selectable elements when precise mouse selection is difficult.
/ or Ctrl+E to open Canva’s Quick Actions search, then enter the name of the tool you need.If elements overlap unexpectedly, select the object and look for a position or arrange control in the toolbar. Move the item forward or backward until it is visible in the intended layer order.
Resize the whole design only when necessary
Dragging handles changes one selected object. Changing the entire page size is a different task.- Finish the main version of the design before changing formats.
- Select Resize if it is available for your account and design.
- Choose a preset output size or select Custom size.
- Enter the new dimensions.
- Choose the available option to resize the current design or create a copied version.
Canva’s whole-design resize features may depend on your plan. If Resize is unavailable, create a new design in the target size, then copy individual pages or elements across and adjust them manually.
Use Canva AI as a draft tool, not final approval
Canva AI can help create initial layouts, rewrite short copy, or generate images and design ideas. It is useful when you need a starting point, but you remain responsible for the finished content.- Open Canva AI from the home page or editor when it is available.
- Describe the result you need in plain language, including format, audience, visual style, and required wording.
- Review the generated result before adding it to the design.
- Check all names, dates, numbers, claims, spelling, and branding yourself.
- Replace any AI output that resembles protected artwork, logos, people, or content you do not have permission to use.
Download the correct file type
When the design is complete, download a copy to your PC. Use the file type that fits how the file will be used.- Select Share in the upper-right area of the editor.
- Select Download.
- Open File type and choose the format.
- Choose all pages, the current page, or specific pages if Canva provides page-selection options.
- Select Download.
- In the Windows app, choose a destination folder when prompted, then select Save.
- PNG: Best for sharp text, graphics, screenshots, and many online graphics.
- JPG: Useful for photographic images where a smaller file is more important than transparency.
- PDF: Best for multi-page documents and most print-oriented layouts.
- MP4 or GIF: Use for designs containing animation or video when those formats are offered.
- PPTX: Use only when you specifically need to open the result in Microsoft PowerPoint, then inspect every slide in PowerPoint before presenting.
Share safely with other people
Sharing a Canva design is different from downloading it. A shared link can give another person access to your editable source design.- Select Share.
- Add a person by email, or use the link-sharing settings.
- Select the least-permissive access level that accomplishes the task, such as viewing or commenting instead of editing.
- Review the link audience before selecting Copy link.
- Send the link only after confirming it does not expose private content, customer information, or unfinished pages.
Fix common beginner problems
- The design has a watermark: A premium Canva item is still in the design. Replace it with a free alternative or use the required paid access.
- A photo will not fit correctly: Select the photo, use Crop, and reposition the image inside its frame. Do not stretch it disproportionately.
- Text is missing after download: Check every page, confirm the correct pages were selected in Download, and verify that text was not placed outside the canvas.
- The downloaded design is blurry: Use a larger original photo, avoid enlarging a small upload, and choose an appropriate export format.
- You cannot use a feature shown in a tutorial: The feature may require a paid plan, may be restricted by an administrator, or may have been moved in a newer editor update.
- You deleted a design by mistake: Open Trash, locate the design, and select Restore before it is permanently removed. Canva generally retains deleted designs in Trash for 30 days unless they are permanently deleted sooner.
- The editor behaves incorrectly: Refresh the browser or restart the Canva desktop app, then sign in again. If the problem affects one design, create a copy and test whether the issue repeats there.
References
- Primary source: Technobezz
Published: 2026-07-19T17:43:38.599000+00:00
How to Use Canva for Beginners in 2026 | Technobezz
How to use Canva for beginners, from opening the right app to editing templates, using Canva AI, sharing, printing, and downloading.www.technobezz.com - Related coverage: canva.com
A beginner's guide to using Canva
Bring your design ideas to life fast and easily thanks to Canva. Here's a beginner's guide to using Canva Business and as an individual.www.canva.com
