

HP’s guidance for Windows 10 and Windows 11 provides a short, reversible way to turn off a laptop touch screen: open Device Manager, expand Human Interface Devices, right-click HID-compliant touch screen, select Disable device, and approve the confirmation prompt. To restore touch later, return to the same entry and select Enable device.
This is the practical WindowsForum answer: use the named touch-screen entry, test the result immediately, and avoid changing unrelated devices. No registry edit, third-party utility, or driver removal is needed for the basic procedure.
To reverse the change:
That shared path makes the procedure suitable for mixed Windows environments. A technician can begin with the same directions on either version and then account for differences in the hardware names displayed by a particular PC.
The important boundary is the device name. HID-compliant touch screen and HID-compliant touch screen controller are relevant possibilities. Other entries under Human Interface Devices may control keyboards, buttons, pointing devices, sensors, or vendor-specific functions. Their presence in the same category does not make them part of the touch screen.
Disabling keeps the entry visible in Device Manager and provides an obvious route back through Enable device. Uninstalling is a different troubleshooting action and is unnecessary when the goal is simply to stop touch input temporarily.
The distinction is especially important when working remotely or assisting someone over the phone. A disabled entry can still be identified and restored from the same menu. Removing an entry may introduce additional detection, restart, or driver-recovery steps that do not help with the original goal.
A concise support instruction should therefore sound like this:
The change is also not a repair. If the screen, controller, or another component is malfunctioning, disabling the entry may make the PC easier to use while the issue is investigated, but it does not correct the underlying fault.
This distinction matters when diagnosing unwanted pointer movement. Confirm which physical surface is involved before changing a setting. If the problem occurs while using the touchpad, begin with the Touchpad page in Settings. If direct contact with the display is the feature that must be suspended, use the touch-screen entry in Device Manager.
Start by recording what is visible. A screenshot of Device Manager can be useful on a support call, as can a written note of which entries were enabled before troubleshooting began. Then disable one clearly named touch-screen entry and test the display.
If touch remains active, return to Device Manager and evaluate the next clearly identified touch entry. If another function stops working, re-enable the most recently changed entry before continuing.
The goal is controlled testing:
Users with an external touch-enabled display should take extra care. Device Manager may show separate components for the laptop and the attached display, and the names may not immediately identify which screen each entry controls. One-at-a-time testing is the most practical way to distinguish them without making assumptions about the hardware layout.
First, right-click the identified touch-screen entry and select:
Update driver > Search automatically for drivers
Allow the search to complete, restart Windows, reopen Device Manager, and check the entry again. If the command remains unavailable, the next step depends on who controls the PC.
On a personally owned laptop, check the manufacturer’s support resources for the exact model. Use the full product or model identifier rather than relying only on the family name, because similar-looking laptops may ship with different screens and controllers.
On a workplace or school computer, contact the organization’s administrator or support desk. The device may be subject to configuration rules, and support staff should determine whether the change is appropriate.
Avoid registry modifications, random driver downloads, and bulk changes to the HID category. Those actions go beyond the quick, reversible procedure described here and can make the original issue harder to trace.
Common situations include:
Conversely, a symptom changing after the device is disabled is useful information, but it is not by itself a complete diagnosis. Record the result and provide it to the PC manufacturer or repair technician if further service is required.
Users should also consider how they normally operate the computer. On a clamshell laptop, turning off touch may have little effect on the everyday workflow. On a 2-in-1 or tablet-oriented device, the same change can make navigation inconvenient until touch is restored.
Test the controls you expect to use before leaving the device disabled for an extended period. Keep a mouse available if the PC’s design makes pointer navigation difficult without the screen.
If the entry is enabled but the screen still does not respond, use Update driver > Search automatically for drivers, restart the PC, and test again. If it remains missing or nonfunctional, move to model-specific manufacturer support rather than disabling additional hardware.
A useful support record should include:
It should not be presented as a repair, a battery-saving guarantee, a form of physical screen protection, or a substitute for manufacturer service. It also should not lead users into uninstalling drivers or disabling groups of similarly named devices.
The quickest reliable workflow remains intentionally small:
Device Manager > Human Interface Devices > HID-compliant touch screen > Disable device
To undo it:
Device Manager > Human Interface Devices > HID-compliant touch screen > Enable device
If that exact entry is missing, check HID-compliant touch screen controller, then System devices. If several plausible entries appear, test them one at a time. If the command is greyed out, use the automatic driver-search option, restart, and escalate if necessary.
That combination of a direct path, a limited decision tree, and an equally clear recovery step is what makes the procedure useful. Windows may not place the touch-screen switch in an obvious Settings page, but once the correct Device Manager entry is identified, users can turn touch off and restore it later without making broader changes to the PC.
This is the practical WindowsForum answer: use the named touch-screen entry, test the result immediately, and avoid changing unrelated devices. No registry edit, third-party utility, or driver removal is needed for the basic procedure.
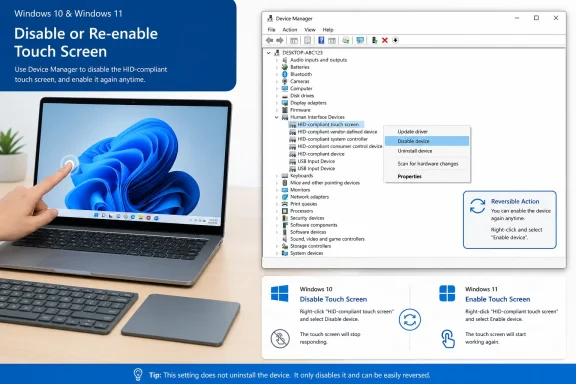 Turn Off the Touch Screen Through Device Manager
- Right-click Start or press Windows + X.
- Select Device Manager.
- Expand Human Interface Devices.
- Find HID-compliant touch screen.
- Right-click the entry and select Disable device.
- Approve the confirmation prompt.
- Tap the display to confirm that it no longer responds to touch.
To reverse the change:
- Open Device Manager again.
- Expand Human Interface Devices.
- Right-click HID-compliant touch screen.
- Select Enable device.
- Test the screen.
If you cannot find it
- Look for HID-compliant touch screen controller under Human Interface Devices.
- If it is not there, expand System devices and check for a clearly identified touch-screen controller.
- Do not disable unrelated HID entries simply because their names look similar.
- If the expected touch entry appears but is not working as expected, right-click it and select Update driver > Search automatically for drivers. Restart Windows afterward and check again.
Windows 10 and Windows 11 Use the Same Basic Path
HP’s instructions apply to both Windows 10 and Windows 11. The Start menu and surrounding interface differ between the two releases, but the relevant Device Manager sequence is the same.| Windows version | Quick entry point | Device Manager category | Device name to check | Turn touch off | Restore touch |
|---|---|---|---|---|---|
| Windows 10 | Right-click Start or press Windows + X | Human Interface Devices | HID-compliant touch screen | Disable device | Enable device |
| Windows 11 | Right-click Start or press Windows + X | Human Interface Devices | HID-compliant touch screen | Disable device | Enable device |
The important boundary is the device name. HID-compliant touch screen and HID-compliant touch screen controller are relevant possibilities. Other entries under Human Interface Devices may control keyboards, buttons, pointing devices, sensors, or vendor-specific functions. Their presence in the same category does not make them part of the touch screen.
WindowsForum decision tree
Use this sequence rather than making broad changes across Device Manager:- The expected entry is present: Disable it, approve the prompt, and test the display.
- The expected entry is missing: Check for HID-compliant touch screen controller, then inspect System devices for a clearly identified touch component.
- Several touch-screen entries appear: Change one entry at a time and test after each change. Re-enable an entry if it affects something you intended to keep.
- Disable device is greyed out or unavailable: Try Update driver > Search automatically for drivers, restart Windows, and check again. On a managed PC, contact the organization’s support team rather than changing other devices.
- No touch-related entry appears anywhere: Confirm that the exact laptop configuration includes a touch display, then consult the PC manufacturer’s support material if the hardware should be present.
Disable the Device; Do Not Remove It
For this task, choose Disable device, not Uninstall device.Disabling keeps the entry visible in Device Manager and provides an obvious route back through Enable device. Uninstalling is a different troubleshooting action and is unnecessary when the goal is simply to stop touch input temporarily.
The distinction is especially important when working remotely or assisting someone over the phone. A disabled entry can still be identified and restored from the same menu. Removing an entry may introduce additional detection, restart, or driver-recovery steps that do not help with the original goal.
A concise support instruction should therefore sound like this:
Before making the change, verify that another input method works. A laptop user will usually have a keyboard and touchpad available, but a tablet-oriented PC may depend more heavily on direct screen interaction. If necessary, connect a mouse before disabling touch.Right-click HID-compliant touch screen, select Disable device, confirm the change, and test the screen. Do not select Uninstall device.
The change is also not a repair. If the screen, controller, or another component is malfunctioning, disabling the entry may make the PC easier to use while the issue is investigated, but it does not correct the underlying fault.
Touch Screen and Touchpad Are Separate Controls
The touchpad is the pointing surface near the keyboard. The touch screen is the display surface. Disabling one should not be treated as the procedure for disabling the other.Touchpad callout: To turn off the laptop’s touchpad rather than its touch screen, open Settings > Bluetooth and devices > Touchpad.
This distinction matters when diagnosing unwanted pointer movement. Confirm which physical surface is involved before changing a setting. If the problem occurs while using the touchpad, begin with the Touchpad page in Settings. If direct contact with the display is the feature that must be suspended, use the touch-screen entry in Device Manager.
Multiple Entries Require One-at-a-Time Testing
Some PCs may show more than one entry with a touch-related name. That does not justify disabling the entire Human Interface Devices category.Start by recording what is visible. A screenshot of Device Manager can be useful on a support call, as can a written note of which entries were enabled before troubleshooting began. Then disable one clearly named touch-screen entry and test the display.
If touch remains active, return to Device Manager and evaluate the next clearly identified touch entry. If another function stops working, re-enable the most recently changed entry before continuing.
The goal is controlled testing:
- Note the original state.
- Change one entry.
- Test the result.
- Keep the change only if it produces the intended outcome.
- Restore any entry that affects unrelated hardware.
Users with an external touch-enabled display should take extra care. Device Manager may show separate components for the laptop and the attached display, and the names may not immediately identify which screen each entry controls. One-at-a-time testing is the most practical way to distinguish them without making assumptions about the hardware layout.
What to Do When Disable Device Is Greyed Out
A greyed-out or missing command is a signal to stop and use a narrow escalation path. Do not compensate by disabling neighboring entries.First, right-click the identified touch-screen entry and select:
Update driver > Search automatically for drivers
Allow the search to complete, restart Windows, reopen Device Manager, and check the entry again. If the command remains unavailable, the next step depends on who controls the PC.
On a personally owned laptop, check the manufacturer’s support resources for the exact model. Use the full product or model identifier rather than relying only on the family name, because similar-looking laptops may ship with different screens and controllers.
On a workplace or school computer, contact the organization’s administrator or support desk. The device may be subject to configuration rules, and support staff should determine whether the change is appropriate.
Avoid registry modifications, random driver downloads, and bulk changes to the HID category. Those actions go beyond the quick, reversible procedure described here and can make the original issue harder to trace.
When Disabling Touch Is Useful
The procedure is most appropriate when a user intentionally wants to suspend direct screen input or needs a temporary way to continue working while a touch-related problem is assessed.Common situations include:
- A user prefers keyboard, touchpad, or mouse input.
- A convertible is being used primarily as a conventional laptop.
- Direct screen contact is causing unwanted actions during a particular workflow.
- Support staff want to determine whether changing the touch-screen device state affects a reported input problem.
- The PC must remain usable while the owner arranges further diagnosis or repair.
Conversely, a symptom changing after the device is disabled is useful information, but it is not by itself a complete diagnosis. Record the result and provide it to the PC manufacturer or repair technician if further service is required.
Users should also consider how they normally operate the computer. On a clamshell laptop, turning off touch may have little effect on the everyday workflow. On a 2-in-1 or tablet-oriented device, the same change can make navigation inconvenient until touch is restored.
Test the controls you expect to use before leaving the device disabled for an extended period. Keep a mouse available if the PC’s design makes pointer navigation difficult without the screen.
Restoring Touch Should Be the First Recovery Step
If touch stops working after it was intentionally disabled, return to Device Manager before attempting repairs:- Right-click Start or press Windows + X.
- Open Device Manager.
- Expand Human Interface Devices.
- Locate the disabled touch-screen entry.
- Right-click it and select Enable device.
- Test the screen.
If the entry is enabled but the screen still does not respond, use Update driver > Search automatically for drivers, restart the PC, and test again. If it remains missing or nonfunctional, move to model-specific manufacturer support rather than disabling additional hardware.
A useful support record should include:
- The exact PC model.
- The Windows version.
- The touch-related device name shown in Device Manager.
- The category where the entry appeared.
- Whether it was enabled or disabled.
- Whether the state changed successfully.
- What happened when the screen was tested.
- Whether the PC was restarted.
- Whether Windows found a driver through the automatic search.
Administrator Checklist
- Confirm whether the user means the touch screen or the touchpad.
- Verify that the keyboard, touchpad, or an external mouse works before disabling touch.
- Open Device Manager.
- Check Human Interface Devices for HID-compliant touch screen.
- Also check for HID-compliant touch screen controller.
- If necessary, inspect System devices for a clearly identified touch component.
- Record the original state before changing anything.
- Disable one touch-related entry at a time.
- Test after every change.
- Re-enable any entry that affects an unintended function.
- Do not disable unrelated HID entries.
- Do not use Uninstall device for a temporary suspension.
- If the command is unavailable, use Update driver > Search automatically for drivers and restart.
- Escalate unresolved cases to the PC manufacturer or the organization’s support process.
A Reversible Setting, Not a Permanent Fix
Turning off touch through Device Manager is best understood as a reversible configuration choice. It can help a user work without direct screen input, support a limited troubleshooting test, or provide a temporary operating arrangement while a hardware issue is evaluated.It should not be presented as a repair, a battery-saving guarantee, a form of physical screen protection, or a substitute for manufacturer service. It also should not lead users into uninstalling drivers or disabling groups of similarly named devices.
The quickest reliable workflow remains intentionally small:
Device Manager > Human Interface Devices > HID-compliant touch screen > Disable device
To undo it:
Device Manager > Human Interface Devices > HID-compliant touch screen > Enable device
If that exact entry is missing, check HID-compliant touch screen controller, then System devices. If several plausible entries appear, test them one at a time. If the command is greyed out, use the automatic driver-search option, restart, and escalate if necessary.
That combination of a direct path, a limited decision tree, and an equally clear recovery step is what makes the procedure useful. Windows may not place the touch-screen switch in an obvious Settings page, but once the correct Device Manager entry is identified, users can turn touch off and restore it later without making broader changes to the PC.
References
- Primary source: HP
Published: 2026-07-10T20:20:08.428534
Loading…
www.hp.com - Related coverage: tomshardware.com
How to Disable Your Laptop’s Touch Screen in Windows 10 and 11 | Tom's Hardware
Disabling your laptop’s touch screen is just a few clicks away.www.tomshardware.com - Official source: support.microsoft.com
Enable and disable a touchscreen in Windows | Microsoft Support
Enable and disable a touchscreen in Windowssupport.microsoft.com - Official source: learn.microsoft.com
Using Device Manager to Uninstall Devices and Driver Packages - Windows drivers | Microsoft Learn
Learn how to use Device Manager to uninstall devices and driver packages on Windows 10 and Windows 11.learn.microsoft.com - Official source: answers.microsoft.com
Loading…
answers.microsoft.com - Related coverage: allthings.how
Loading…
allthings.how
