

If iPad cellular data is not working—pages will not load, apps stall, or the status bar shows No Service or Searching—work through these fixes in order. This applies to Wi‑Fi + Cellular iPad models running current iPadOS, using either eSIM or a physical carrier SIM. A Wi‑Fi-only iPad does not have cellular hardware or a Cellular Data settings page.
A brief Airplane Mode cycle forces the iPad to disconnect and reconnect to the carrier network.
If the status bar still shows No Service or Searching, restart the iPad before moving on. A restart clears temporary network and carrier-registration problems that Airplane Mode does not always resolve.
If the app is enabled but still fails only on cellular, temporarily disable any VPN, security, parental-control, DNS-filtering, or content-filtering app installed on the iPad. These tools can filter or block traffic before it reaches the cellular network.
This is especially important with prepaid plans, travel eSIMs, corporate accounts, and plans shared with an iPhone. Carrier rules determine whether a plan can be transferred, shared, or used while roaming.
Older Apple SIM activation instructions are no longer applicable. Apple SIM stopped supporting activation of new iPad cellular plans on October 1, 2022.
Warning: Do not force a SIM tray or insert the eject tool into any opening other than the small SIM-tray release hole. Remove the SIM only with the iPad powered off if the carrier or iPad prompts you to do so.
If you are traveling outside your home carrier area:
If the iPad reports No SIM or Invalid SIM after reseating a physical SIM, contact the carrier for a replacement or provisioning check.
For iPads that use LTE:
Also check Low Data Mode:
Then test cellular data again with Wi‑Fi turned off.
If cellular data still fails, reset only the network settings:
If the iPad still shows No Service, Searching, Invalid SIM, No SIM, or has no usable mobile data after these steps, contact the carrier and ask it to verify the account is active and in good standing, the correct iPad data plan is provisioned, there is no local outage, the device is not blocked, and the SIM or eSIM is correctly provisioned.
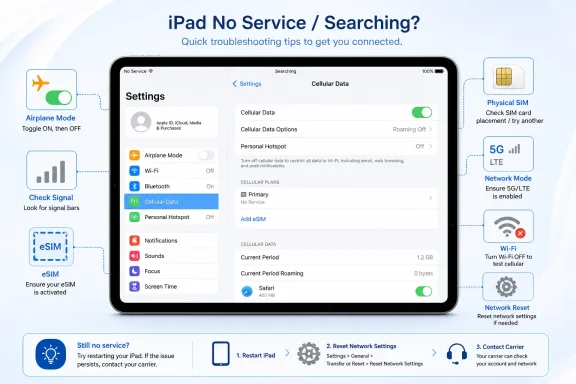 1. Refresh the cellular connection
A brief Airplane Mode cycle forces the iPad to disconnect and reconnect to the carrier network.- Open Settings.
- Turn on Airplane Mode.
- Leave it on for at least 15 seconds.
- Turn Airplane Mode off.
- Open Settings > Cellular Data.
- Confirm that Cellular Data is turned on.
- Test with Safari by loading a website while Wi‑Fi is turned off.
If the status bar still shows No Service or Searching, restart the iPad before moving on. A restart clears temporary network and carrier-registration problems that Airplane Mode does not always resolve.
2. Confirm that the app is allowed to use cellular data
When Safari works over cellular but a particular app does not, the iPad itself is usually connected correctly. The app may simply be blocked from using mobile data.- Open Settings > Cellular Data.
- Scroll down to the list of apps and services.
- Find the app that will not load.
- Turn on its cellular-data switch.
- Test the app again with Wi‑Fi off.
If the app is enabled but still fails only on cellular, temporarily disable any VPN, security, parental-control, DNS-filtering, or content-filtering app installed on the iPad. These tools can filter or block traffic before it reaches the cellular network.
3. Check the active cellular plan
An iPad can store multiple eSIM plans, but it can use only one eSIM at a time. If a plan expired, was disabled, or is not the selected line, the iPad can show cellular signal without providing usable data.- Open Settings > Cellular Data.
- Under SIMs or Cellular Plans, tap the plan you expect to use.
- Confirm that the plan is enabled and selected.
- If available, tap Manage [account name] or Carrier Services to review the plan’s status.
- Return to Cellular Data and test again.
This is especially important with prepaid plans, travel eSIMs, corporate accounts, and plans shared with an iPhone. Carrier rules determine whether a plan can be transferred, shared, or used while roaming.
4. Activate, transfer, or restore the eSIM plan
Use this fix when cellular data never worked on the iPad, stopped after moving to a new iPad, or disappeared after a carrier account change.Add a new plan or scan a carrier QR code
- Open Settings > Cellular Data.
- Tap Add a New Plan to select a supported carrier or begin activation.
- To use a carrier-provided QR code, tap Other.
- Scan the QR code, or enter the carrier details manually if requested.
- Complete the carrier activation prompts.
Transfer an eSIM from another iPad
- Update the receiving iPad to the latest available version of iPadOS.
- Open Settings > Cellular Data.
- Tap Transfer iPad Plan.
- Tap Transfer next to the line you want to move.
- Follow the onscreen instructions and allow a few minutes for activation.
Join an existing iPhone plan
If your carrier supports adding an iPad to an existing iPhone data plan:- Update the iPad to the latest available iPadOS version.
- Turn on Wi‑Fi temporarily.
- Make sure the iPhone and iPad are signed in to the same Apple Account.
- Open Settings > Cellular Data.
- Tap Join iPhone Plan and follow the prompts.
Older Apple SIM activation instructions are no longer applicable. Apple SIM stopped supporting activation of new iPad cellular plans on October 1, 2022.
5. Check the SIM card and roaming settings
Use SIM-tray steps only if your iPad has a physical nano-SIM tray.Warning: Do not force a SIM tray or insert the eject tool into any opening other than the small SIM-tray release hole. Remove the SIM only with the iPad powered off if the carrier or iPad prompts you to do so.
- Locate the SIM tray on the iPad’s edge.
- Insert a SIM-eject tool or straightened paper clip into the tray-release hole.
- Remove the tray.
- Check that the SIM is clean, undamaged, and seated with its angled corner aligned to the tray.
- Reinsert the tray fully.
- Restart the iPad and enter the SIM PIN if prompted.
If you are traveling outside your home carrier area:
- Open Settings > Cellular Data > Cellular Data Options.
- Turn on Data Roaming.
- Test cellular data again.
If the iPad reports No SIM or Invalid SIM after reseating a physical SIM, contact the carrier for a replacement or provisioning check.
6. Adjust LTE, 5G, and Low Data Mode
A carrier network change, an outdated software version, or an unsuitable network mode can cause data trouble, particularly in areas where 3G service has been retired.For iPads that use LTE:
- Open Settings > Cellular.
- Turn on LTE.
- Open Settings > Cellular > Cellular Data Options.
- Tap Voice & Data.
- Choose 5G Auto, 5G On, or LTE.
Also check Low Data Mode:
- Open Settings > Cellular > Cellular Data Options.
- On LTE or 4G service, turn off Low Data Mode.
- On 5G service, tap Data Mode and select Standard or Allow More Data on 5G, if available.
7. Update iPadOS and carrier settings
Apple recommends installing current iPadOS and carrier settings updates when an iPad shows No Service, Searching, or cannot use cellular data.- Back up the iPad.
- Connect it to power and Wi‑Fi.
- Open Settings > General > Software Update.
- Install the available iPadOS update.
- After the iPad restarts, reconnect to Wi‑Fi.
- Open Settings > General > About.
- Wait briefly. If a carrier-settings update is available, install it when prompted.
Then test cellular data again with Wi‑Fi turned off.
8. Remove connection blockers and reset network settings
First test for software that is intercepting the connection:- Disable the network feature in any VPN, firewall, antivirus, parental-control, or content-filtering app.
- Test cellular data.
- If the app is no longer needed, touch and hold it on the Home Screen.
- Tap Remove App > Delete App > Delete.
- Restart the iPad and test again.
- Open Settings > General > VPN & Device Management.
- Select a configuration profile only if you recognize it and have identified it as the source of the problem.
- Tap Remove Profile.
If cellular data still fails, reset only the network settings:
- Open Settings > General > Transfer or Reset iPad > Reset.
- Tap Reset Network Settings.
- Enter the passcode if requested and confirm.
- Allow the iPad to restart or reconnect.
- Rejoin Wi‑Fi networks as needed.
- Return to Settings > Cellular Data and recheck Cellular Data, the active plan, and Data Roaming when traveling.
If the iPad still shows No Service, Searching, Invalid SIM, No SIM, or has no usable mobile data after these steps, contact the carrier and ask it to verify the account is active and in good standing, the correct iPad data plan is provisioned, there is no local outage, the device is not blocked, and the SIM or eSIM is correctly provisioned.
References
- Primary source: Technobezz
Published: 2026-07-19T16:19:02.906000+00:00
iPad Cellular Data Not Working? 8 Fixes That Actually Work (2026) | Technobezz
cellular data ipad not working? Fix iPad cellular issues with settings checks, plan activation, updates, resets, and carrier steps.www.technobezz.com
