

A Logitech USB headset microphone that plays audio but will not transmit voice in Windows is usually muted, selected as the wrong input device, blocked by microphone privacy controls, or overridden inside the calling app. These steps cover wired Logitech USB headsets—including H340, H390/H391, H570e, Zone wired models, and Logitech G USB headsets—on Windows 11. Windows 10 paths are included where they differ, although Microsoft ended Windows 10 support on October 14, 2025.
A USB headset has separate playback and recording functions. Hearing audio proves only that the speaker side is working.
If possible, test the headset on a second computer. A headset that fails to appear or record on two computers after the checks below is likely a hardware or cable problem.
For headsets with a boom microphone, position the boom close to the corner of your mouth rather than directly in front of it. Some Logitech business and consumer models also mute when their boom is raised, folded away, or rotated into a storage position. Lower or rotate the boom back into its normal speaking position.
Do not assume that unmuting in Teams, Zoom, Discord, or a browser also unmutes the headset. Both controls must be unmuted.
If the test records silence:
Warning: Uninstalling a device removes its current driver instance. Save your work first; a restart is required to let Windows reinstall it.
Use Logitech software only when the exact headset’s official support page lists it:
 Start with the headset and USB connection
A USB headset has separate playback and recording functions. Hearing audio proves only that the speaker side is working.- Quit the app where the microphone fails—Teams, Zoom, Discord, a browser, or a game.
- Unplug the headset.
- Connect it directly to a USB port on the PC. Do not use a USB hub, monitor USB port, docking-station port, extension cable, or adapter while diagnosing the problem.
- Wait several seconds for Windows to detect it, then reconnect the headset if Windows does not show a notification.
- Try a different USB port on the computer.
- Reopen the calling or recording app.
If possible, test the headset on a second computer. A headset that fails to appear or record on two computers after the checks below is likely a hardware or cable problem.
Clear every mute control
Check the physical headset mute state before changing Windows settings.- Look for an in-line controller on the headset cable.
- Press its Mute button once, then test the microphone.
- Confirm the meeting or calling app itself is not muted.
For headsets with a boom microphone, position the boom close to the corner of your mouth rather than directly in front of it. Some Logitech business and consumer models also mute when their boom is raised, folded away, or rotated into a storage position. Lower or rotate the boom back into its normal speaking position.
Do not assume that unmuting in Teams, Zoom, Discord, or a browser also unmutes the headset. Both controls must be unmuted.
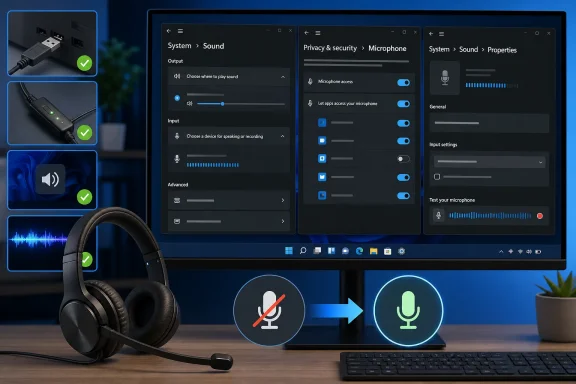
Select and test the Logitech microphone in Windows 11
Windows can continue using a laptop, monitor, webcam, or controller microphone even when the Logitech headset is selected for speakers.- Open Start > Settings > System > Sound.
- Under Input, open Choose a device for speaking or recording.
- Select the Logitech device. Its name may be the model name, Logi USB Headset, or a generic USB audio name.
- Select the arrow beside that device to open its properties page.
- Under Input settings, raise Volume to a usable level.
- Under Microphone test, select Start test.
- Speak normally into the boom microphone for several seconds.
- Select Stop test, then select Play under Recorded sample.
If the test records silence:
- Recheck the headset’s physical mute state.
- Confirm the input selected is the Logitech device, not a webcam or laptop microphone.
- Raise the input volume.
- Move the microphone boom nearer to your mouth.
- Continue to the privacy and device-recovery sections below.
Windows 10 path
- Open Start > Settings > System > Sound.
- Under Input, select the Logitech device from Choose your input device.
- Speak into the microphone and watch the Test your microphone meter.
Allow microphone access in Windows
Windows privacy controls can block a working microphone from applications. This is especially common after a privacy reset, a new Windows installation, or an app update.Windows 11
- Open Start > Settings > Privacy & security > Microphone.
- Turn on Microphone access.
- Turn on Let apps access your microphone.
- If the affected Microsoft Store app appears in the list, turn on its individual switch.
- Turn on Let desktop apps access your microphone for desktop programs such as Teams, Zoom, Discord, Chrome, Edge, Firefox, and many audio-recording applications.
Windows 10
- Open Start > Settings > Privacy > Microphone.
- Under Allow access to the microphone on this device, select Change and turn access on.
- Turn on Allow apps to access your microphone.
- Enable the affected Microsoft Store app if it appears in the app list.
- Turn on Allow desktop apps to access your microphone.
Make the Logitech headset the default recording device
The modern Sound page is normally sufficient. If older software continues choosing the wrong microphone, set the Logitech headset in the classic Sound control panel.- Open Start > Settings > System > Sound.
- Scroll to Advanced and select More sound settings.
- Open the Recording tab.
- Select the Logitech headset microphone.
- Select Set Default.
- Select Set Default Communication Device if that button is available and you primarily use the headset for calls.
- Select Properties.
- On the Levels tab, make sure the microphone is not muted and increase its level if needed.
- On the General tab, confirm Device usage is set to Use this device (enable).
- Select OK, then test again in Windows Sound settings.
Fix an app or browser that still cannot hear you
If the Windows recorded sample contains your voice but one service does not, do not reinstall the headset driver first. Select the Logitech microphone inside that app and review its own mute and permission controls.Microsoft Teams
- In Teams, select Settings and more > Settings > Devices.
- Under Audio settings, choose the Logitech headset under Microphone.
- Select Make a test call.
- During a meeting, use the arrow beside the microphone button to review the active microphone or open More audio settings.
Zoom Workplace
- Open Zoom and select your profile picture.
- Select Settings > Audio.
- Choose the Logitech headset from the Microphone list.
- Use Zoom’s microphone test and confirm the input meter responds.
- In a meeting, use the arrow next to Mute to confirm Zoom has not switched to another microphone.
Browser calls: Meet, Teams on the web, Zoom Web App, and similar sites
- Open the meeting site in the browser.
- When prompted to use the microphone, select Allow.
- Open the site’s meeting settings and choose the Logitech headset microphone.
- If you previously selected Block, remove the site block from the browser’s site-permission controls, reload the meeting page, and allow microphone access again.
Discord
- Open User Settings using the gear icon.
- Select Voice & Video.
- Set Input Device to the Logitech headset.
- Check whether Input Mode is set to Push to Talk. Switch to Voice Activity temporarily for testing.
- Confirm Discord’s input meter responds.
Recover a missing or disabled Logitech USB audio device
Use this section only if the Logitech microphone does not appear in Windows Sound settings or the Windows microphone test cannot detect it.- Right-click Start and select Device Manager.
- Expand Sound, video and game controllers.
- Look for the Logitech device or a USB audio device.
- If it is present but disabled, right-click it and select Enable device.
- If it is not listed, select View > Show hidden devices.
- Select Action > Scan for hardware changes.
Warning: Uninstalling a device removes its current driver instance. Save your work first; a restart is required to let Windows reinstall it.
- In Device Manager, right-click the Logitech or USB audio device under Sound, video and game controllers.
- Select Uninstall device.
- Confirm the removal. If Windows offers to remove the driver for that device, use that option only if normal reinstalling has not resolved the problem.
- Restart Windows.
- After the restart, reconnect the headset and allow Windows to reinstall the built-in USB audio driver automatically.
- Return to Settings > System > Sound and run the microphone test again.
Run Microsoft’s audio diagnostics
Windows 11 includes automated audio diagnostics in the Get Help app.- Open Get Help from Start.
- Search for audio troubleshooter.
- Select the audio troubleshooter.
- Approve diagnostics if prompted.
- Follow the on-screen recommendations, then retest the Logitech microphone.
Use Logitech software only when the headset supports it
Most wired Logitech USB headsets use Windows’ built-in USB audio driver and do not need a separate driver download. Avoid third-party “Logitech driver updater” sites.Use Logitech software only when the exact headset’s official support page lists it:
- Logi Tune is appropriate for supported Logitech business headsets and can provide supported firmware updates and device controls.
- Logitech G HUB is appropriate for supported Logitech G headsets, including microphone controls and supported firmware or BLUE VO!CE settings.
- Do not install software merely because it is a Logitech product; unsupported software will not repair a basic USB microphone detection problem.
References
- Primary source: Technobezz
Published: 2026-07-19T16:54:36.651000+00:00
Logitech USB Headset Mic Not Working? How to Fix It (2026) | Technobezz
Fix a Logitech USB headset mic not working with USB, mute, Windows, Mac, app, browser, and Logitech software checks.www.technobezz.com - Related coverage: support.logi.com
Software and drivers for my Logitech headset – Logitech Support + Download
USB — Wired Your Logitech USB headset doesn't require any drivers or software, other than the default device drivers built into your...support.logi.com
