

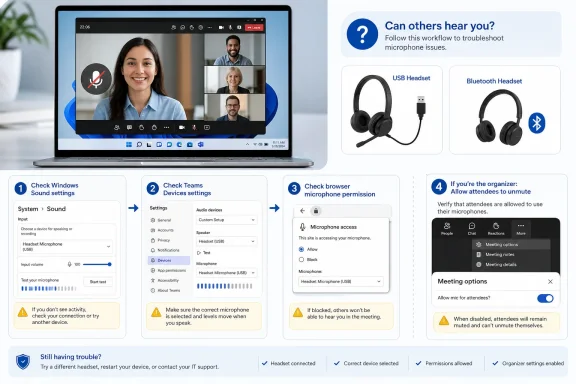
Microsoft Teams microphone not working on a Windows PC is usually fixed by unmuting the correct device, selecting that device in Teams, allowing Windows microphone access, or resolving an organizer policy that prevents attendees from speaking. These steps cover the current Microsoft Teams desktop app and Teams for the web on Windows 11. Windows 10 paths are included where useful, but Microsoft support for Windows 10 ended on October 14, 2025.
Before changing Teams settings, make sure Windows can actually receive sound from the microphone.
To switch devices while already in a meeting:
Close Teams completely after changing these settings:
In Microsoft Edge:
Also check that Edge has a usable default microphone:
Before joining:
If you deliberately selected Phone audio, Room audio, or Don’t use audio, this is not a microphone fault. Switch back to computer audio from the audio controls if you want Teams to use the PC microphone.
In meetings, organizers and presenters can disable attendee microphones. This commonly happens in large meetings, webinars, and tightly managed work or school events. Attendees may see a dimmed microphone control and cannot enable it themselves.
Ask the organizer, co-organizer, or presenter to check:
For a work or school account, a Teams administrator can also apply policies that limit audio features. If Teams reports that a setting is managed by your organization, contact your IT administrator rather than attempting registry edits or third-party “privacy repair” tools.
First, run the built-in input troubleshooter:
 1. Rule out a mute button, loose connection, or Bluetooth conflict
Before changing Teams settings, make sure Windows can actually receive sound from the microphone.- Check the headset inline control, boom-arm mute switch, USB microphone mute button, or webcam privacy/mute control.
- Disconnect and reconnect a wired USB headset or microphone. If it uses a 3.5 mm plug, push it in fully.
- For Bluetooth audio:
- Charge the headset.
- Turn Bluetooth off and back on.
- Confirm the headset shows as connected in Start > Settings > Bluetooth & devices.
- Disconnect it from a phone, tablet, or another PC that may have claimed the microphone.
- Leave and rejoin the Teams meeting if you connected the microphone after entering it.
- In the Teams meeting controls, select Mic to unmute.
2. Select the microphone inside Microsoft Teams
Teams has its own microphone selection. A microphone that works in Windows is not necessarily the microphone Teams is currently using.- Open Teams.
- Select Settings and more next to your profile picture.
- Select Settings > Devices.
- Under Audio > Audio settings, open the Microphone list.
- Select the headset, webcam, USB microphone, or built-in microphone you intend to use.
- Select Make a test call.
- Speak normally and wait for Teams to play back the recorded test.
To switch devices while already in a meeting:
- Select the arrow next to Mic in the meeting controls.
- Select More audio settings.
- Under Microphone, choose the correct device.
3. Test the microphone in Windows before blaming Teams
A Windows recording test separates a Teams configuration issue from a device, driver, or permission issue.- Open Start > Settings > System > Sound.
- Under Input, select the microphone under Choose a device for speaking or recording.
- Select the arrow or device entry to open its properties.
- Under Microphone test, select Start test.
- Speak into the microphone for several seconds.
- Select Stop test, then select Play under Recorded sample.
- Confirm the correct microphone is selected under Input.
- Raise Input volume in the microphone properties.
- Move closer to the microphone and make sure the correct side of a directional microphone faces you.
- Return to Fix 1 and test a different USB port, cable, or headset if available.
4. Allow microphone access in Windows 11
Teams cannot use a microphone that Windows has blocked.- Open Start > Settings > Privacy & security > Microphone.
- Turn on Microphone access.
- Turn on Let apps access your microphone.
- If Microsoft Teams appears in the app list, turn it on.
- Turn on Let desktop apps access your microphone.
Close Teams completely after changing these settings:
- Find the Teams icon in the notification area near the clock.
- Right-click it and select Quit.
- Start Teams again and repeat the test call.
5. Check the browser permission if using Teams for the web
Teams for the web needs permission in both Windows and the browser. Use a current desktop version of Microsoft Edge, Google Chrome, Mozilla Firefox, or Safari on macOS; on Windows, Edge or Chrome are the simplest choices.In Microsoft Edge:
- Open the Teams meeting page.
- Select the lock icon beside the address bar.
- Open Permissions for this site.
- Set Microphone to Allow.
- Refresh the Teams page.
- When Teams asks which microphone to use, select the intended device.
Also check that Edge has a usable default microphone:
- Select Settings and more > Settings.
- Open Cookies and site permissions > Microphone.
- Ensure websites are allowed to ask for microphone access.
- Verify the correct input device is selected if Edge presents a device choice.
6. Correct the meeting audio source and pre-join mute setting
It is possible to enter a meeting with audio deliberately disabled or with phone or room audio selected. In that situation, the computer microphone will not be active.Before joining:
- Open the meeting and select Join.
- On the pre-join screen, select Computer audio if you want to use the PC microphone.
- Select the microphone control and make sure it is on.
- If available, open Audio settings and select the intended microphone.
- Select Join now.
If you deliberately selected Phone audio, Room audio, or Don’t use audio, this is not a microphone fault. Switch back to computer audio from the audio controls if you want Teams to use the PC microphone.
7. Check whether the organizer or your organization has disabled attendee microphones
A greyed-out or unavailable microphone button can be caused by meeting controls, not by your headset.In meetings, organizers and presenters can disable attendee microphones. This commonly happens in large meetings, webinars, and tightly managed work or school events. Attendees may see a dimmed microphone control and cannot enable it themselves.
Ask the organizer, co-organizer, or presenter to check:
- Open the meeting’s Options or meeting controls.
- Open the Participation settings.
- Turn on Allow mic for attendees.
- Apply the change.
For a work or school account, a Teams administrator can also apply policies that limit audio features. If Teams reports that a setting is managed by your organization, contact your IT administrator rather than attempting registry edits or third-party “privacy repair” tools.
8. Run Windows audio repair, then reinstall the audio driver only if needed
Use this step when Windows cannot record from the microphone or the device repeatedly disappears.First, run the built-in input troubleshooter:
- Open Start > Settings > System > Sound.
- Scroll to Advanced.
- Under Troubleshoot common sound problems, select Input devices.
- Follow the prompts and apply any recommended correction.
- Restart Teams and repeat the Windows microphone test.
Warning: Removing an audio driver can temporarily disable sound and microphone access until Windows reinstalls it. Save work and restart the PC when prompted.
- Right-click Start and select Device Manager.
- Expand Sound, video and game controllers.
- Right-click the relevant audio device and select Uninstall device.
- Select Attempt to remove the driver for this device if that option appears.
- Select Uninstall.
- Restart the PC.
- Return to Device Manager.
- Right-click Sound, video and game controllers.
- Select Scan for hardware changes.
- Right-click the audio device and select Update driver.
References
- Primary source: Technobezz
Published: 2026-07-17T17:45:43.029000+00:00
Microsoft Teams Microphone Not Working? 8 Fixes That Work | Technobezz
Microsoft Teams microphone not working? Fix mute, device, permission, browser, mobile, cache, and meeting policy issues.www.technobezz.com - Official source: support.microsoft.com
Manage audio settings in Microsoft Teams meetings | Microsoft Support
To change your speaker, microphone, or camera settings in a Teams meeting or a call, go to Device settings.support.microsoft.com - Official source: learn.microsoft.com
