

Closed the wrong Microsoft Edge tab or lost an entire browser window? On Microsoft Edge for Windows 10, Windows 11, macOS, and Linux, start with Ctrl+Shift+T or Command+Shift+T, then use History, crash recovery, or session startup restore if necessary. Edge for Android and iOS can recover normal pages through synced history, but InPrivate tabs cannot be restored.
The keyboard shortcut is the fastest recovery method when you have just closed a tab.
You can also use the tab bar:
You can also open History using:
If the prompt does not appear:
Microsoft also notes that restoring the last session can conflict with settings that depend on deleting session data when Edge exits, including session-only cookies and certain clear-on-exit configurations.
After synchronization completes, open Edge’s History or recent-tabs interface and look for tabs from other devices. Sync can take a short time, particularly when one device has been offline.
Privacy warning: Turning on History and Open tabs sync sends those data types to your signed-in account so they can be accessed on other devices. Do not enable them on a shared profile unless that is acceptable.
Sync cannot retrieve tabs that were never synchronized, were opened in InPrivate mode, or were removed before another device received them.
If the page was also opened in a normal window, search normal History for that separate visit.
Check these alternatives:
To reopen the pages later:
The current Workspaces design is intended for organizing an individual user’s tabs. Older instructions describing shared or joined Workspaces apply to the previous implementation and should not be used as current recovery guidance.
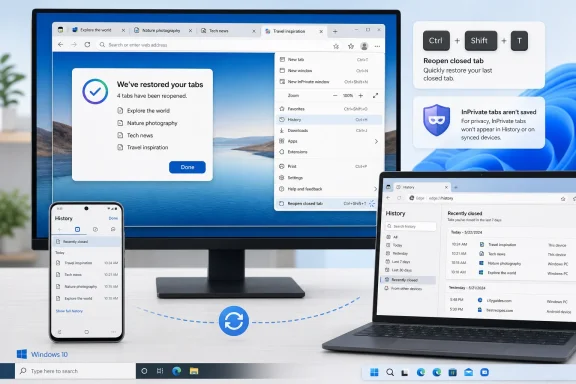 Reopen the last closed tab
The keyboard shortcut is the fastest recovery method when you have just closed a tab.- Return to an open Microsoft Edge window.
- Press:
- Ctrl+Shift+T on Windows or Linux.
- Command+Shift+T on macOS.
- Press the shortcut repeatedly to restore additional tabs in reverse closing order.
You can also use the tab bar:
- Right-click an empty area of the tab strip or title bar.
- Select Reopen closed tab.
- Repeat the command for other recently closed tabs.
Restore a closed window from History
When you close an Edge window containing several tabs, look for the complete window under Recently closed.- Open Microsoft Edge.
- Select Settings and more—the three-dot button in the upper-right corner.
- Select History.
- Expand Recently closed if it is not already visible.
- Find the closed window or page.
- Select the entry to reopen it.
You can also open History using:
- Ctrl+H on Windows or Linux.
- Command+Y on macOS.
Find an older page in full History
Use full History when the page no longer appears under Recently closed.- Open Microsoft Edge.
- Press Ctrl+H on Windows or Linux, or Command+Y on macOS.
- If necessary, select Open history page.
- Enter part of the page title, website name, or address in the search box.
- Select the matching result to open the page in a new tab.
- It was opened in an InPrivate or Guest window.
- Browsing history was cleared.
- Edge was configured or managed not to save history.
- The page was opened in another Edge profile.
- Sync was disabled and the history existed only on another device.
- The website redirected through several addresses and was saved under a different title.
Restore tabs after Edge crashes
Microsoft Edge can display a Restore pages prompt after the browser closes unexpectedly.- Reopen Microsoft Edge normally.
- Look for the Restore pages notification.
- Select Restore to reopen the pages that were active before the crash.
If the prompt does not appear:
- Press Ctrl+Shift+T or Command+Shift+T several times.
- Open Settings and more > History.
- Check Recently closed for the missing window.
- Search full History for the individual pages.
Make Edge restore the previous session at startup
Enable startup restoration if you want Edge to reopen the tabs from your last normal session whenever the browser starts.- Open Microsoft Edge.
- Select Settings and more > Settings.
- Select Start, home, and new tabs.
- Under When Edge starts, select Open tabs from the previous session.
- Close Settings.
- Open two non-InPrivate tabs.
- Close the Edge window normally.
- Reopen Edge.
- Confirm that both tabs return.
Microsoft also notes that restoring the last session can conflict with settings that depend on deleting session data when Edge exits, including session-only cookies and certain clear-on-exit configurations.
If the startup option is missing or changes back
A work or school organization can control Edge startup behavior through policy. Check whether the browser is managed:- Open Settings and more > Settings.
- Look for a message stating that Edge is managed by your organization.
- Alternatively, enter
edge://policyin the address bar. - Check for policies related to startup restoration.
Recover a tab from another synced device
If the page remains open—or exists in history—on another computer or phone, Edge sync may make it available on your current device.Turn on sync on a computer
- Open Microsoft Edge.
- Select the profile icon.
- Sign in with the Microsoft account or work or school account used on the other device.
- Select Settings and more > Settings.
- Open Profiles > Sync.
- Turn on History and Open tabs.
After synchronization completes, open Edge’s History or recent-tabs interface and look for tabs from other devices. Sync can take a short time, particularly when one device has been offline.
Turn on sync on Android or iPhone
- Open Microsoft Edge on the phone.
- Open the Edge menu and select Settings.
- Select your profile.
- Open Sync.
- Turn on the available options for History and Open tabs.
Privacy warning: Turning on History and Open tabs sync sends those data types to your signed-in account so they can be accessed on other devices. Do not enable them on a shared profile unless that is acceptable.
Sync cannot retrieve tabs that were never synchronized, were opened in InPrivate mode, or were removed before another device received them.
Restore pages on Edge for Android or iPhone
Mobile Edge primarily recovers closed normal-browsing pages through History.- Open Microsoft Edge.
- Open the main menu.
- Select History. On some iPhone releases, History may be reached through the menu or Settings.
- Find the page by date or title.
- Tap it to open it again.
Understand what cannot be restored
Some tabs are deliberately excluded from recovery.InPrivate tabs
Edge does not retain normal browsing history for InPrivate sessions. Consequently, an InPrivate tab or window generally cannot be recovered from Recently closed, History, startup restoration, or synced history.If the page was also opened in a normal window, search normal History for that separate visit.
Guest-profile tabs
Guest browsing is designed not to preserve browsing data after all Guest windows close. Do not depend on History or session restore for Guest tabs.Tabs lost after clearing browsing data
If History was included when browsing data was deleted, older pages may no longer be searchable. If sync was active, deleting synchronized history while signed in can also remove it from other synced devices.Check these alternatives:
- Favorites.
- Downloads, if the page involved a downloaded file.
- Windows clipboard history, if you copied the address.
- Email, chat, or documents where the link was shared.
- Another device that has not yet synchronized the deletion.
Pages requiring a sign-in or completed form
Restoring a tab restores its address, not necessarily its temporary state. You may need to sign in again. Unsaved form entries, shopping-cart changes, document edits, and one-time confirmation pages may be gone even when the tab itself reopens.Save important tab sets before closing Edge
For tabs you cannot afford to lose, save them rather than relying exclusively on session restore.Save all open tabs as Favorites
- Arrange the tabs you want to keep in one Edge window.
- Press Ctrl+Shift+D on Windows or Linux.
- Choose or create a Favorites folder.
- Save the tabs.
To reopen the pages later:
- Open Settings and more > Favorites.
- Locate the saved folder.
- Open individual pages or use the folder’s command to open all entries.
Use Microsoft Edge Workspaces
Current Edge Workspaces provide a reusable set of tabs for a project. Microsoft’s redesigned individual-use Workspaces require Edge version 144 or later, Windows 10, Windows 11, or macOS, and a signed-in Microsoft or work account.- Open the tabs you want to preserve.
- Select the Search tabs icon in the upper-left corner.
- Select Manage workspaces.
- Open the New Workspace menu.
- Select Create workspace with X tabs or Create blank workspace.
- Enter a name and choose a theme.
- Select Done.
The current Workspaces design is intended for organizing an individual user’s tabs. Older instructions describing shared or joined Workspaces apply to the previous implementation and should not be used as current recovery guidance.
Troubleshoot tabs that still will not return
Work through these checks before resetting or repairing Edge:- Confirm the profile. Select the profile icon and switch between Personal, Work, or other profiles. Each profile has separate History and Recently closed records.
- Check full History. The page may have dropped out of the short Recently closed list but still exist in full History.
- Search by website rather than page title. Dynamic pages sometimes appear in History under an unexpected title.
- Check another Edge window. The tab may still be open in a minimized window, another virtual desktop, or a workspace.
- Inspect sync settings. Open Settings > Profiles > Sync and verify that History and Open tabs are enabled.
- Check management policies. Enter
edge://policyand look for startup, history-saving, or crash-dialog policies. - Stop before clearing data. Clearing History, removing the profile, or resetting Edge will not reconstruct missing tabs and may eliminate remaining recovery records.
- Use Favorites or Workspaces for future sessions. Session recovery is useful for accidental closures, but it is not a substitute for saving important pages.
References
- Primary source: Technobezz
Published: 2026-07-14T17:49:52.930000+00:00
How to Restore Tabs on Microsoft Edge in 2026 | Technobezz
How to restore tabs on Microsoft Edge using shortcuts, History, startup restore, sync, mobile History, and crash recovery.www.technobezz.com - Official source: support.microsoft.com
Sign in to sync Microsoft Edge across devices | Microsoft Support
With Microsoft Edge, you can turn on sync to browse the web on all your devices, keep your favorites organized, and more.support.microsoft.com - Official source: learn.microsoft.com
Microsoft Edge Browser Policy Documentation RestoreOnStartup | Microsoft Learn
Windows and Mac documentation for supported Microsoft Edge Browser policy: Action to take on Microsoft Edge startuplearn.microsoft.com
