

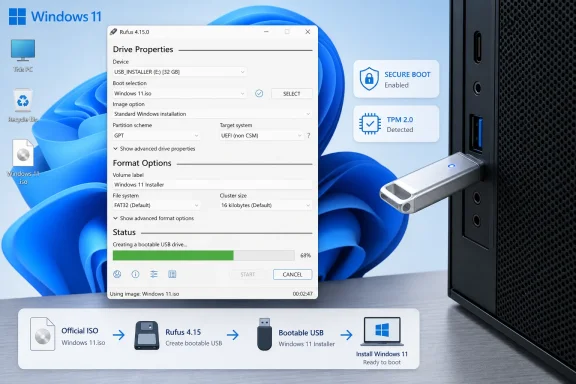
Rufus 4.15 can create a bootable Windows 11 USB from an official Microsoft ISO on Windows 8 or later. For most Windows 11 PCs, select GPT, UEFI (non CSM), and Standard Windows installation, then review Rufus’s Windows User Experience options before writing the drive. These instructions cover Windows 11 version 25H2 installation media for x64 PCs and Rufus 4.15, released June 30, 2026.
Before opening Rufus, prepare the following:
A bootable installer does not include a Windows license. Windows Setup may activate automatically from a digital license or a product key embedded in the target PC’s firmware. Otherwise, you may need to enter a valid product key.
Do not download modified Windows ISOs from file-sharing sites. Rufus can customize an official image during USB creation, so a third-party image is unnecessary and may contain unwanted software or malware.
Use MBR only when the target computer specifically requires legacy BIOS or Compatibility Support Module booting. Such a configuration normally indicates that the computer does not meet the standard Windows 11 firmware requirements.
Common options include:
Installing on unsupported hardware can result in:
To create a local account:
Do not select it routinely because it sounds newer. Use it when the target PC’s firmware and Secure Boot configuration require Windows CA 2023-signed installation media. Rufus documents that Windows 11 24H2 ISOs are not suitable for this option.
Warning: Continuing destroys the existing partition table and files on the selected USB drive. File recovery is not guaranteed.
If DOWNLOAD does not appear:
When both legacy and UEFI entries appear for the same USB, select the UEFI entry for a GPT Windows 11 installation.
Warning: This erases the Windows installer and any other files on the USB.
 What you need
Before opening Rufus, prepare the following:- A working PC running Windows 8 or later.
- Rufus 4.15 or a later stable release.
- A blank USB flash drive with at least 8 GB of capacity.
- An official Windows 11 ISO appropriate for the target PC.
- Administrator access on the PC running Rufus.
- A reliable internet connection if you need to download the ISO.
- A backup of files on both the USB drive and the PC receiving Windows.
A bootable installer does not include a Windows license. Windows Setup may activate automatically from a digital license or a product key embedded in the target PC’s firmware. Otherwise, you may need to enter a valid product key.
Download Rufus and the Windows 11 ISO
Download Rufus only from the official Rufus site. Rufus is a portable executable, so the standard download does not require a traditional installation.- Download the current stable Rufus executable for your Windows architecture.
- Open the downloaded file.
- Approve the User Account Control prompt by selecting Yes.
- If Rufus asks whether it may check for application updates, select Yes if you want Rufus’s built-in ISO download feature to be available.
- Right-click the Rufus executable and select Properties.
- Open the Digital Signatures tab.
- Select the signature and choose Details.
- Confirm that Windows reports the digital signature as valid.
- Find Download Windows 11 Disk Image (ISO) for x64 devices.
- Select the current Windows 11 release.
- Select Download Now.
- Choose the required product language and confirm it.
- Select the 64-bit download and save the ISO to an internal drive.
Do not download modified Windows ISOs from file-sharing sites. Rufus can customize an official image during USB creation, so a third-party image is unnecessary and may contain unwanted software or malware.
Create the bootable Windows 11 USB
Connect the USB drive before configuring Rufus.- Open Rufus.
- Under Device, select the USB flash drive that Rufus may erase.
- Set Boot selection to Disk or ISO image.
- Select SELECT.
- Browse to the Windows 11 ISO and select Open.
- Set Image option to Standard Windows installation.
- Set Partition scheme to GPT.
- Confirm that Target system displays UEFI (non CSM).
- Leave Volume label, File system, and Cluster size at the values Rufus selects unless you have a specific compatibility requirement.
- Recheck the drive shown under Device.
- Select START.
Use MBR only when the target computer specifically requires legacy BIOS or Compatibility Support Module booting. Such a configuration normally indicates that the computer does not meet the standard Windows 11 firmware requirements.
Choose the Windows User Experience options
After you select START, Rufus analyzes the ISO and may open a Windows User Experience dialog. The available checkboxes depend on the Rufus release and the selected Windows ISO.Common options include:
- Remove requirement for 4GB+ RAM, Secure Boot and TPM 2.0
Allows Windows Setup to continue on certain unsupported computers. - Remove requirement for an online Microsoft account
Restores the offline local-account setup path for applicable Windows 11 releases. - Create a local account with username
Preconfigures a local account name. - Set regional options to the same values as this user’s
Copies regional settings from the computer running Rufus. - Disable data collection (Skip privacy questions)
Applies preset privacy answers rather than displaying the normal questions during setup. - Disable BitLocker automatic device encryption
Prevents Setup from automatically enabling device encryption where Windows would otherwise do so. - Use ‘Windows CA 2023’ signed bootloaders
Creates media intended for compatible systems prepared for Microsoft’s newer Secure Boot certificate. - Quality of Life options
Apply a group of installation customizations. Review the tooltip and listed changes in your Rufus version before enabling this option because its contents can change between releases.
Supported versus unsupported hardware
Microsoft’s supported Windows 11 requirements include TPM 2.0, UEFI firmware, Secure Boot capability, and at least 4 GB of memory. Rufus’s hardware-requirement removal is a workaround, not a hardware upgrade or a supported compatibility fix.Installing on unsupported hardware can result in:
- Missing driver or firmware support.
- Reduced security protections.
- Reliability or performance problems.
- No guarantee that future Windows updates will remain available.
- Difficulty obtaining support from Microsoft or the PC manufacturer.
Local account requirements
Rufus’s online-account option restores an offline setup path; it does not force that path while Setup has internet access.To create a local account:
- Enable the online Microsoft account removal option in Rufus.
- Boot the target PC from the completed USB.
- Disconnect Ethernet before reaching account creation.
- Do not connect to Wi-Fi during that part of Setup.
- Select the offline or limited-setup choice when it appears.
- Create the local username and password.
Windows CA 2023 bootloaders
The Use ‘Windows CA 2023’ signed bootloaders option is intended for a specific Secure Boot transition scenario. It requires Rufus 4.10 or later, a compatible target PC, and a Windows 11 25H2 ISO.Do not select it routinely because it sounds newer. Use it when the target PC’s firmware and Secure Boot configuration require Windows CA 2023-signed installation media. Rufus documents that Windows 11 24H2 ISOs are not suitable for this option.
Write the USB drive
After confirming the Windows User Experience settings, Rufus displays a final erase warning.Warning: Continuing destroys the existing partition table and files on the selected USB drive. File recovery is not guaranteed.
- Verify the displayed USB model and capacity.
- Select OK to erase it.
- Leave the USB connected while Rufus formats it and copies the Windows Setup files.
- Wait until the status bar displays READY.
- Select CLOSE, or leave Rufus open if you want to inspect the log.
- Use the Windows notification-area eject command before removing the USB.
Download the ISO from inside Rufus
Rufus can also retrieve a Windows ISO directly from Microsoft’s servers.- Open Rufus while connected to the internet.
- Select Show application settings near the bottom of the window.
- Set Check for updates to an enabled interval.
- Close Rufus.
- Reopen Rufus while the internet connection is active.
- Open the arrow beside SELECT.
- Change the button to DOWNLOAD.
- Select DOWNLOAD.
- Choose the Windows version, release, edition, language, and architecture, selecting Continue after each choice.
- Select Download and choose where to save the ISO.
- After the download finishes, configure and write the USB using the preceding steps.
If DOWNLOAD does not appear:
- Confirm that update checks are enabled.
- Close and reopen Rufus.
- Verify that the PC has internet access.
- Temporarily disconnect a VPN or proxy if Microsoft rejects the request.
- Download the ISO directly from Microsoft and use SELECT instead.
Boot the target PC from the USB
Warning: Booting from installation media and deleting partitions during Windows Setup can erase the target computer. Back up personal files and save any BitLocker recovery keys before proceeding.- Shut down the target PC.
- Connect the Rufus USB directly to the PC.
- Turn the PC on and immediately press its one-time boot-menu key.
- Select the entry that identifies the USB as a UEFI device.
- Press Enter.
- Wait for the Windows Setup language screen.
- Dell: Repeatedly press F12 during startup.
- Lenovo: Press F12 or Fn+F12 during startup.
- Surface: Turn the Surface off, insert the USB, hold Volume Down, press and release Power, and release Volume Down when the logo appears.
When both legacy and UEFI entries appear for the same USB, select the UEFI entry for a GPT Windows 11 installation.
Verify that the USB works
A successful Rufus operation does not require you to begin erasing or installing Windows.- Boot the target PC from the USB.
- Confirm that the Windows Setup language and keyboard screen appears.
- Select Next.
- Confirm that the Install Windows 11 or repair choices appear.
- Exit Setup or shut down the PC if you are not ready to install.
- Remove the USB before starting the computer normally.
bootefisourcessupportbootmgrsetup.exe
Fix common Rufus and boot problems
The wrong USB drive appears under Device
Stop before selecting START.- Disconnect all removable drives except the intended USB.
- Compare the displayed capacity with the physical drive.
- Reopen Rufus after reconnecting the correct drive.
- Do not proceed if the drive identity remains uncertain.
Rufus does not detect the USB
- Reconnect the drive to a different USB port.
- Avoid an unpowered USB hub.
- Open Disk Management and check whether Windows detects the device.
- Test another flash drive.
- If the device reports No Media, the flash drive may have failed.
The Windows User Experience dialog does not appear
Confirm that:- Image option is Standard Windows installation.
- You selected an actual Windows 11 ISO.
- Rufus completed its ISO analysis.
- The ISO is not an unsupported Insider or modified image.
- You are using a current Rufus release on Windows 8 or later.
The PC says “BIOS/LEGACY BOOT OF UEFI-ONLY MEDIA”
The USB was created for UEFI, but the PC attempted to boot it in legacy mode.- Restart the PC.
- Enter the firmware settings or one-time boot menu.
- Enable UEFI boot.
- Disable Legacy or CSM boot if necessary.
- Select the USB entry prefixed with UEFI.
A Secure Boot security violation appears
Do not automatically disable Secure Boot. First:- Confirm that the ISO came directly from Microsoft.
- Recreate the USB with the current Rufus release and current Windows 11 ISO.
- Check whether the target computer has received Secure Boot certificate or revocation updates.
- For a prepared Windows CA 2023 system, recreate the media from a Windows 11 25H2 ISO and select the corresponding Rufus option.
Windows Setup cannot find the internal SSD
The USB has booted correctly; this is usually a storage-controller driver or firmware configuration issue.- Obtain the target model’s storage driver from the PC manufacturer.
- Extract it to a separate folder on the installer USB or another USB.
- At the disk selection screen, select Load driver and browse to the driver.
- Check the manufacturer’s instructions before changing RAID, Intel VMD, or storage-controller modes.
Return the USB to normal storage
After Windows is installed, Rufus can remove the installer partitions and reformat the drive.Warning: This erases the Windows installer and any other files on the USB.
- Connect the USB and open Rufus.
- Select the correct drive under Device.
- Set Boot selection to Non bootable.
- Choose a file system such as exFAT or NTFS.
- Enter a volume label if wanted.
- Select START.
- Confirm the erase warning.
- Wait for READY.
References
- Primary source: Technobezz
Published: 2026-07-13T16:58:01.625000+00:00
How to Make a Rufus Windows 11 USB | Technobezz
Make a Rufus Windows 11 USB with the official ISO, current Rufus settings, boot options, and setup steps.www.technobezz.com
