
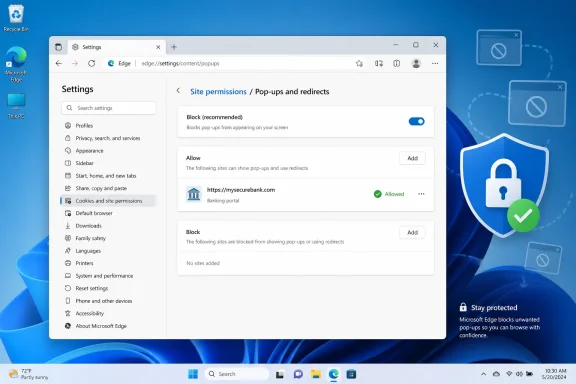
 Overview: Why Edge Blocks Pop-Ups in the First Place
A pop-up is a browser window, tab, overlay, or partial page element that opens separately from the page currently in use. Some are essential parts of modern web workflows. A financial institution may display a monthly statement in a new window; a business system may generate a print label; a university may send a student to a separate identity-verification page.
Others are disruptive at best and deceptive at worst. Microsoft notes that pop-ups can include advertising, offers, alerts, and notices, while malicious examples may use fake warnings, prizes, or download prompts to pressure users into a scam. Microsoft’s Edge accessibility guidance also confirms that the browser’s pop-up blocker is enabled by default.
That default matters. Turning off pop-up blocking everywhere may resolve one short-term compatibility issue, but it also lets unrelated sites attempt to open windows with far less friction. The stronger long-term approach is an allow-list exception for a specific trusted domain.
This distinction is especially important because not every unexpected visual interruption is technically a browser pop-up. A website can display an advertisement, modal dialog, or deceptive page element inside its existing tab. Edge’s pop-up blocker cannot necessarily stop those embedded elements, and Microsoft explicitly warns that ads built into a webpage can look like pop-ups without being blockable by the browser’s pop-up setting. Microsoft’s support documentation also notes that a pop-up opened after the user deliberately selects a page button or link may be permitted.
The Best Option: Allow Pop-Ups for One Trusted Website
For most Windows users, allowing pop-ups only for the site that requires them is the correct balance of convenience and security. This is the right choice for a known destination such as an employer’s intranet, a state agency, a university learning platform, a bank, or a familiar online service.
The current desktop route in Edge is:
- Open Microsoft Edge.
- Select Settings and more (
...) in the upper-right corner. - Choose Settings.
- Open Privacy, search, and services.
- Select Site permissions.
- Choose All permissions.
- Open Pop-ups and redirects.
- Under Allowed to send pop-ups and use redirects, select Add site.
- Enter the trusted website address, beginning with
https://. - Select Add.
This process creates a site-specific exception rather than changing browsing behavior for every domain. The current path and the allowed-sites workflow are documented in the updated Technobezz Edge pop-up guide, while Microsoft’s own Edge policy documentation confirms the underlying distinction between a global pop-up setting and per-site allowances. Microsoft Learn’s PopupsAllowedForUrls policy reference describes a URL-pattern list that can permit pop-up windows for particular sites.
Use the Exact Site That Needs the Window
When adding an exception, start with the secure address of the service that is actually launching the window. For example:
[url unfurl="true"]https://portal.example.edu[/url]
Avoid adding broad, unrelated domains simply because a link passed through them. A payment page may begin on a retailer’s website but open a verification window from the retailer’s payment provider. In that case, Edge may need permission for the site that launches or hosts the new window rather than the first site visited.
The safest practical procedure is to add the main trusted site first, return to the page, and repeat the original action. If the workflow still fails, inspect the address bar and any browser messages for evidence of a different required domain. Do not add a domain that is unfamiliar, misspelled, or presented only through a suspicious prompt.
Why the Site-Specific Method Is Stronger
A one-site exception delivers several advantages:
- It keeps Edge’s default protection active for every other website.
- It limits accidental exposure to advertising and scam-oriented pop-up attempts.
- It is easy to reverse after completing a one-time task.
- It works well for sensitive services, where legitimate pop-up behavior may be required for authentication or document delivery.
- It is easier to audit, because the allowed list shows precisely which sites have exceptions.
The key principle is simple: trust should be narrow, deliberate, and revocable. If a site only needs a pop-up for one login or one downloadable document, it does not need to become a reason to loosen browser protections everywhere.
Use Edge’s Pop-Up Blocked Indicator for a Faster Fix
When Edge blocks a window, it can show a Pop-up blocked indicator in the address bar. This is often the fastest way to approve a site because it appears at the moment the browser has identified the blocked request.
- Return to the page that attempted to open the window.
- Repeat the action that caused the pop-up attempt.
- Select the Pop-up blocked indicator in the address bar.
- Choose Always allow pop-ups and redirects from this site.
- Select Done.
- Repeat the original click, button press, or menu action on the website.
This direct option is useful because it removes guesswork about which site needs permission. The same workflow is detailed in the current Technobezz instructions for enabling Edge pop-ups.
Why Repeating the Original Action Matters
Approving a site does not normally restore the exact window that Edge already blocked. The blocked request has passed; the page must initiate a new one. That is why the final step is not optional: return to the site and click the relevant button again.
For example, after approving a bank’s statement portal, select View statement again. After approving an employer’s business application, choose Print, Open report, or Generate label again. After approving an online exam portal, launch the external verification or assessment step again.
This behavior can feel inconvenient, but it is more predictable than automatically reviving blocked windows without another user action. It also helps prevent a website from opening a previously blocked window unexpectedly after permissions change.
How to Enable Pop-Ups for Every Site in Desktop Edge
There are cases where a broad setting is appropriate. A test device, a controlled business workflow, or an internal environment with many trusted web applications may require pop-ups from numerous locations. In those situations, Edge can be configured to allow pop-ups globally.
To turn off the global blocker in desktop Edge:
- Open Microsoft Edge.
- Select Settings and more (
...). - Choose Settings.
- Open Privacy, search, and services.
- Select Site permissions.
- Choose All permissions.
- Open Pop-ups and redirects.
- Turn off Blocked (recommended).
When Blocked (recommended) is disabled, Edge allows websites to show pop-ups rather than blocking them. The setting path is documented in the Technobezz walkthrough, and Microsoft’s Edge policy documentation similarly identifies an “AllowPopups” state that permits all sites to show pop-up windows. Microsoft Learn maps AllowPopups to the value 1 and BlockPopups to 2 for managed deployments.
The Risks of Disabling the Global Blocker
The all-sites setting is convenient, but its name is not subtle: it changes the default behavior for the whole browser. Every website gets the opportunity to create pop-up windows, including sites encountered through search results, ad links, shortened URLs, or redirected pages.
Potential downsides include:
- More aggressive advertising windows.
- More convincing fake technical-support or security alerts.
- Greater visual clutter and distraction.
- More opportunities for phishing pages to imitate sign-in prompts.
- More difficulty identifying which website opened an unexpected window.
Microsoft’s guidance specifically identifies scam-oriented pop-ups as a concern, including deceptive prompts involving warnings, prizes, and free downloads. Microsoft Support therefore treats the blocker as a default browser safeguard rather than an obsolete annoyance.
A sensible compromise is to disable the global blocker only for the time needed to complete a controlled task, then turn Blocked (recommended) back on. Better still, use the allowed-sites list whenever the websites involved can be identified in advance.
Keyboard and Screen Reader Access in Edge
Pop-up settings should not require a mouse. Edge provides a keyboard-accessible route to its site-permission controls, which is particularly useful for users of Narrator, JAWS, NVDA, keyboard-only navigation, remote sessions, and accessibility-focused workflows.
To reach the relevant setting:
- Press Alt + F to open Settings and more.
- Use the Down Arrow to select Settings, then press Enter.
- Press Tab to move to the settings categories.
- Use the Down Arrow to select Cookies and site permissions, then press Enter.
- Press Tab until Pop-ups and redirects is selected, then press Enter.
- Press Tab until Block (recommended) is reached.
- Press Spacebar to toggle the setting.
Microsoft’s screen-reader instructions for blocking pop-ups in Edge document this keyboard sequence and note that the feature has been tested with Narrator.
There is a minor but potentially confusing interface difference here. The general settings path may show Privacy, search, and services before Site permissions, while the accessibility guide refers directly to Cookies and site permissions. Both routes lead to the same essential control: Pop-ups and redirects. The wording can vary across Edge builds, profiles, and interface updates, so the destination matters more than the exact category label.
Accessibility Is More Than a Toggle
A blocked pop-up can prevent access to a vital task: downloading an accessible statement, opening a remote-work application, completing identity verification, or reading a document in a compatible viewer. That makes clear, keyboard-accessible controls important.
At the same time, the security rationale remains intact. Pop-ups that impersonate account alerts or accessibility-related updates can be especially persuasive. Users should allow the known service, complete the needed workflow, and resist prompts that appear unexpectedly or demand software downloads, passwords, or payment details.
Enabling Pop-Ups in Edge on Android
Microsoft Edge on Android places the control under Site permissions. The procedure is short:
- Open Edge.
- Tap the menu (
...). - Tap Settings.
- Select Site permissions.
- Tap Pop-ups and redirects.
- Turn Pop-ups and redirects on.
Microsoft’s Edge mobile support page confirms this route and explains the switch’s behavior: turning it off blocks pop-ups, while turning it on permits them on the Android device.
The mobile setting is broad, so it deserves the same caution as a desktop-wide exception. On a phone, a surprise window may be harder to inspect because the smaller screen can obscure the full address and the relationship between the original page and the new one. If a specific service works after the task is complete, consider restoring the blocker rather than leaving the device globally permissive.
Mobile Pop-Ups and Redirects Are Related but Not Identical
The setting is called Pop-ups and redirects for a reason. Many web services move users between domains for authentication, payment, document generation, or content delivery. A blocked redirect can look similar to a blocked pop-up from the user’s perspective: a button appears to do nothing, a sign-in loop begins, or a confirmation page never appears.
That does not mean every redirect should be accepted blindly. Legitimate services should use recognizable domains and secure https:// connections. A page that suddenly redirects to an unrelated or alarming destination should be treated as a warning sign, not as a reason to weaken browser settings further.
Edge on iPhone and iPad: Use the iOS-Specific Control
Edge for iPhone and iPad uses a different mobile interface from the Android app. The current path is:
- Open Microsoft Edge.
- Tap the menu (
...). - Tap Settings.
- Open Privacy and security.
- Turn Block pop-ups off.
- Tap Done.
This iOS and iPadOS route is outlined in the Technobezz Edge pop-up guide. Because mobile browser menus can change with app updates, it is sensible to look for either Privacy and security or a similarly named privacy section if the exact label is not immediately visible.
The goal is unchanged: switch off Block pop-ups only when the trusted site needs pop-up behavior. Once the required sign-in, transaction, or document action is complete, switching the blocker back on restores the safer default.
Microsoft’s enterprise policy documentation shows that pop-up behavior is also a managed setting on iOS, with support for the DefaultPopupsSetting policy beginning with Edge for iOS version 84 and later. Microsoft Learn lists equivalent policy support for Windows, macOS, Android, and iOS.
When Edge Still Will Not Open the Window
If a trusted website remains broken after it has been allowed, the pop-up blocker may not be the only factor. Work through the problem methodically rather than turning off every browser safeguard at once.
Check the Browser and the Site Exception
First, confirm that the right website was added to Allowed to send pop-ups and use redirects. A site may use multiple subdomains, and the allowed entry must match the part of the service initiating the request.
Then retry the action. A permission change cannot restore an already blocked window; it only affects the next pop-up attempt.
Test Extensions Carefully
Privacy extensions, ad blockers, security add-ons, script blockers, and corporate browser extensions can interfere with legitimate windows. Microsoft advises temporarily disabling extensions, testing the website, and then re-enabling extensions one at a time to identify a conflict. Microsoft’s Edge accessibility guide also recommends confirming that the browser is updated and checking for malware if unwanted pop-up behavior persists.
This testing approach is safer than permanently removing all extensions. It identifies the specific conflicting component and preserves useful protections elsewhere.
Separate Pop-Ups from Notifications
A browser notification is not the same thing as a pop-up. Notifications may appear through the Windows notification area or mobile device notification system even when the pop-up blocker is active. Microsoft explicitly distinguishes unwanted website notifications from pop-ups in its Edge guidance. Microsoft Support advises managing notifications separately.
If the issue is a stream of alerts rather than new windows or tabs, open the relevant website’s Notifications permission and block or remove the suspicious sender. Do not assume that changing Pop-ups and redirects will solve a notifications problem.
Recognize In-Page Ads and Modal Windows
If a disruptive box appears within the same browser tab and has no separate address-bar behavior, it may be an in-page element rather than a true pop-up. Microsoft states that ads created within a webpage cannot be blocked by Edge’s pop-up blocker. Microsoft Support
This limitation is not a failure of the setting. It reflects the distinction between a browser-managed new window and content that a website renders in its own page. Addressing in-page ads may require a trusted content-blocking extension, careful site-permission review, or simply leaving a suspicious website.
Managed Work and School Devices: When IT Controls the Setting
On an employer-managed or school-managed PC, phone, or tablet, the pop-up setting may be unavailable, locked, or reset after a user changes it. That is not necessarily an error. Organizations can enforce Edge settings through policy to maintain consistent security and compatibility standards.
For desktop Edge, administrators can use the DefaultPopupsSetting policy to establish the global behavior. Microsoft documents AllowPopups (1) as the configuration that permits all sites to display pop-ups and BlockPopups (2) as the setting that prevents them. Microsoft Learn’s policy reference also states that the policy can be mandatory, can refresh dynamically, and is configured under Administrative Templates / Microsoft Edge / Content settings.
For a less disruptive enterprise configuration, IT can use PopupsAllowedForUrls to permit pop-up windows only for specific URL patterns. Microsoft documents wildcard support and gives examples such as [url]https://www.contoso.com[/url] and [*.]contoso.edu. Microsoft Learn lists the policy as available across Windows, macOS, Android, and iOS, with platform version requirements varying by operating system.
What Employees and Students Should Do
If the control is locked or the allowed entry disappears, contact the IT team with concise, useful details:
- The full website address beginning with
https://. - The business purpose of the pop-up.
- The action that fails, such as Print label, Open statement, or Complete sign-in.
- Any visible Edge message or screenshot.
- Whether the service is required for work, coursework, payroll, benefits, or compliance.
The ideal request is not “turn off pop-up blocking.” It is “allow pop-ups for this specific trusted service.” That gives IT a precise, lower-risk action to take.
Do Not Use Internet Explorer’s Old Pop-Up Settings
Current Microsoft Edge settings are separate from the legacy Internet Options and Internet Explorer pop-up blocker controls. Internet Explorer 11’s desktop application has been retired and permanently disabled on certain supported Windows 10 systems through a Microsoft Edge update, according to Microsoft Learn’s Internet Explorer redirection documentation.
That history explains why old instructions can be misleading. Changing the Privacy tab in Internet Options is not the correct way to manage pop-ups in modern Edge. Use Edge’s own Pop-ups and redirects page instead.
The reliable pattern is straightforward: keep Blocked (recommended) enabled, add a narrowly scoped exception when a trusted service requires one, retry the original action, and review the exception afterward. In a browser environment full of legitimate authentication windows and increasingly convincing scams, selective permission is both the cleaner fix and the safer one.
