

To add footnotes in Microsoft Word, place the cursor where the reference belongs, then select References > Insert Footnote and type the note at the bottom of the page. Use Insert Endnote instead when the note should appear at the end of the document or section. These steps cover Word for Microsoft 365, Word 2024, Word 2021, Word 2019, and Word 2016 on Windows, plus Word for the web, Mac, and supported mobile apps.
A footnote appears at the bottom of the same page as its reference. An endnote appears at the end of the document or, depending on the document’s configuration, at the end of a section.
Word creates and maintains the superscript reference mark automatically. Do not type your own superscript numbers for notes that you intend Word to manage.
Use footnotes when readers should see supporting information close to the relevant text. Use endnotes when you want to keep pages less crowded.
Before starting, make sure you can edit the file:
Microsoft recommends opening the document in desktop Word on Windows or Mac for advanced changes such as number-format changes, placement changes, note conversion, and section-specific numbering.
Word keeps the note connected to its reference point. If text moves to a different page during editing, the footnote moves with that reference automatically.
Warning: Section breaks can alter page layout, headers, footers, and page numbering when a document is already configured with section-specific formatting. Save the document before adding or changing section breaks.
For consistent formatting throughout the document, use Word’s note styles rather than manually changing each note. In desktop Word, the relevant styles are generally named Footnote Text and Endnote Text.
Instead:
Warning: Replace All removes every matching footnote or endnote in the document. Save a copy first if you may need the notes later.
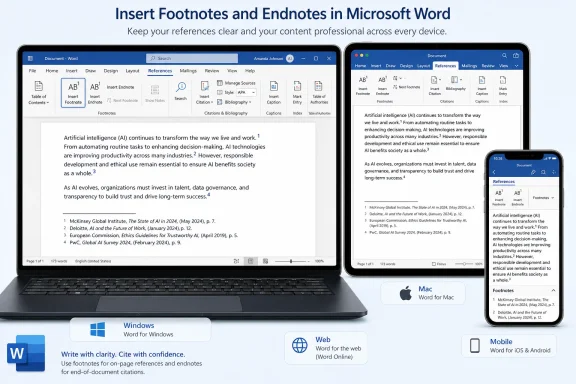 Choose footnotes or endnotes
A footnote appears at the bottom of the same page as its reference. An endnote appears at the end of the document or, depending on the document’s configuration, at the end of a section.Word creates and maintains the superscript reference mark automatically. Do not type your own superscript numbers for notes that you intend Word to manage.
Use footnotes when readers should see supporting information close to the relevant text. Use endnotes when you want to keep pages less crowded.
Insert a footnote in Word for Windows
- Open the Word document and click immediately after the word, sentence, or punctuation mark that needs a note.
- Select the References tab.
- In the Footnotes group, select Insert Footnote.
- Word adds a superscript reference mark in the document and moves the insertion point to the footnote area at the bottom of the current page.
- Type the footnote text.
- To return to the document body, double-click the note’s reference mark.
- Put the cursor where the footnote reference should appear.
- Press Ctrl+Alt+F.
- Type the footnote text.
- Double-click the reference mark at the beginning of the footnote when you want to return to the body text.
Insert an endnote instead
- Click where the endnote reference belongs.
- Select References > Insert Endnote.
- Type the note text at the endnote location.
Add notes in Word for Mac
In the desktop Word app for Mac:- Click where the footnote or endnote reference should appear.
- Select the References tab.
- Select Insert Footnote or Insert Endnote.
- Type the note text when Word moves the cursor to the new note.
- Command+Option+F — insert a footnote
- Command+Option+E — insert an endnote
Insert footnotes in Word for the web
Word for the web can create and format footnotes and endnotes, although its advanced note-management options are more limited than the desktop app.Before starting, make sure you can edit the file:
- Look at the mode selector in the upper-right corner.
- If it shows Viewing, select Edit, then choose Editing.
- If Editing is unavailable, the document owner may need to grant edit permission, or you may need to save a copy you can edit.
- Click where the reference mark belongs.
- Select Reference > Insert Footnote.
- Type the note text.
- Click where the endnote reference belongs.
- Select Reference > Insert Endnote.
- Type the note text.
Insert notes on Word mobile
On Word for iPhone, iPad, Android phones, and Android tablets:- Tap where the footnote or endnote reference should appear.
- Open the Insert tab.
- Select Footnote or Endnote.
- Type the note text.
Microsoft recommends opening the document in desktop Word on Windows or Mac for advanced changes such as number-format changes, placement changes, note conversion, and section-specific numbering.
Edit an existing footnote or endnote
To change only the text of a note:- Click the footnote or endnote text.
- Edit it as you would ordinary document text.
- Click back in the document when finished.
Word keeps the note connected to its reference point. If text moves to a different page during editing, the footnote moves with that reference automatically.
Change note numbering, symbols, location, or scope in desktop Word
Use the Footnote and Endnote dialog in desktop Word when you need more than the default sequential numbering.- Select the References tab.
- In the Footnotes group, select the small dialog launcher arrow in the lower-right corner.
- In the Footnote and Endnote dialog, choose whether you are configuring Footnotes or Endnotes.
- Change the required option, such as:
- Footnote or endnote location
- Number format
- Custom mark or symbol
- Numbering behavior
- Scope for the change
- In Word for Windows, select Apply to update existing notes using the chosen settings.
- Select Insert if you are configuring the settings while adding a new note.
Warning: Section breaks can alter page layout, headers, footers, and page numbering when a document is already configured with section-specific formatting. Save the document before adding or changing section breaks.
Format footnote and endnote text
For a single note, click inside its text and use the Home tab to change the font, size, bold formatting, paragraph alignment, or indentation.For consistent formatting throughout the document, use Word’s note styles rather than manually changing each note. In desktop Word, the relevant styles are generally named Footnote Text and Endnote Text.
- Click in a footnote or endnote.
- Open the Styles pane from the Home tab.
- Locate Footnote Text or Endnote Text.
- Modify the style to set the formatting you want for all notes using that style.
- Select a footnote reference in the body, or select References > Show Footnotes.
- For endnotes, select References > Show Endnotes.
- In the note view, select Format Footnotes or Format Endnotes.
- Choose the font, size, or indentation settings.
- Select Apply for the current note, or Apply to all when available for all notes of that type.
Convert footnotes to endnotes, or the reverse
Conversion is a desktop Word task. If the document is open in Word for the web, choose Open in Word first.- In Word for Windows or Mac, select References.
- Open the Footnote and Endnote dialog using the Footnotes group dialog launcher.
- Select Convert.
- Choose one of the available actions:
- Convert all footnotes to endnotes
- Convert all endnotes to footnotes
- Swap footnotes and endnotes
- Select OK.
- Close the Footnote and Endnote dialog or apply any additional settings needed.
Remove a single footnote or endnote correctly
Do not delete only the text in the footnote or endnote area. That can leave an unwanted reference mark in the document.Instead:
- Find the superscript reference mark in the document body.
- Select the reference mark.
- Press Delete.
Remove all footnotes or all endnotes
This is a bulk deletion method for desktop Word.Warning: Replace All removes every matching footnote or endnote in the document. Save a copy first if you may need the notes later.
- Click at the beginning of the document.
- Open Find and Replace:
- Windows: press Ctrl+H.
- Mac: select Find > Advanced Find and Replace.
- Select the Replace tab.
- To remove all footnotes, enter
^fin Find what. - To remove all endnotes, enter
^ein Find what. - Leave Replace with empty.
- Select Replace All.
Change or remove the footnote separator line
The separator is the horizontal line between body text and footnotes. This is a desktop Word feature.- Select View > Draft.
- Double-click a footnote or endnote in the document.
- In the Footnotes pane at the bottom of the window, open the list and choose Footnote Separator.
- Select the separator line.
- Use the Home tab to format it, or press Delete to remove it.
- Return to View and select Print Layout, Read Mode, or Web Layout.
References
- Primary source: Technobezz
Published: 2026-07-17T18:10:03.014000+00:00
How to Add Footnotes in Microsoft Word | Technobezz
How to create footnotes in Word, add endnotes, format notes, convert them, and delete them in current Word.www.technobezz.com - Official source: support.microsoft.com
Add footnotes and endnotes | Microsoft Support
Add or delete footnotes and endnotes in your documentssupport.microsoft.com
