Set Up Microsoft Defender Application Guard in Windows 10/11 for Safe Browsing
Difficulty: Intermediate | Time Required: 20 minutesMicrosoft Defender Application Guard is a built-in Windows security feature designed to help protect your PC when browsing untrusted websites. Instead of opening risky sites directly in your normal browser session, Application Guard runs them inside an isolated, hardware-based container. That means if a malicious site tries to exploit your browser, the attack is contained and much less likely to affect the rest of your system.
For WindowsForum.com users who want an extra layer of protection against phishing pages, drive-by downloads, and browser-based attacks, Application Guard can be a very useful tool—especially on shared, work, or high-risk systems.
What Microsoft Defender Application Guard Does
Application Guard creates a separate, isolated browsing session using virtualization-based security. In practical terms, this means:Quick walkthrough
- Untrusted websites open in a protected container
- Malware from an isolated session cannot easily access your main Windows environment
- Cookies, memory, and session data from the protected container stay separated from your normal browsing session
- It adds another layer of defense beyond antivirus and SmartScreen
Note: Microsoft Defender Application Guard has historically been associated with Microsoft Edge and supported editions of Windows. Availability and behavior can vary depending on your Windows version, edition, and whether your device is managed by an organization.
Prerequisites
Before you begin, check the following:- Windows 10 or Windows 11 Pro, Enterprise, or Education
- Application Guard is generally not available on Windows Home
- Hardware virtualization support enabled
- Intel VT-x or AMD-V must be supported and enabled in BIOS/UEFI
- At least 8 GB of RAM recommended
- It may work with less, but performance is better with more memory
- Microsoft Edge installed
- Application Guard is primarily used with Edge
- You must be signed in with an administrator account
- Enabling Windows features requires admin rights
Important: On some systems, virtualization-based features may already be in use by Hyper-V, Windows Sandbox, Core Isolation, or enterprise security settings. That usually isn’t a problem, but it can affect setup or performance.
Step 1: Confirm Your Windows Edition
First, make sure your version of Windows supports the feature.- Press Windows + I to open Settings.
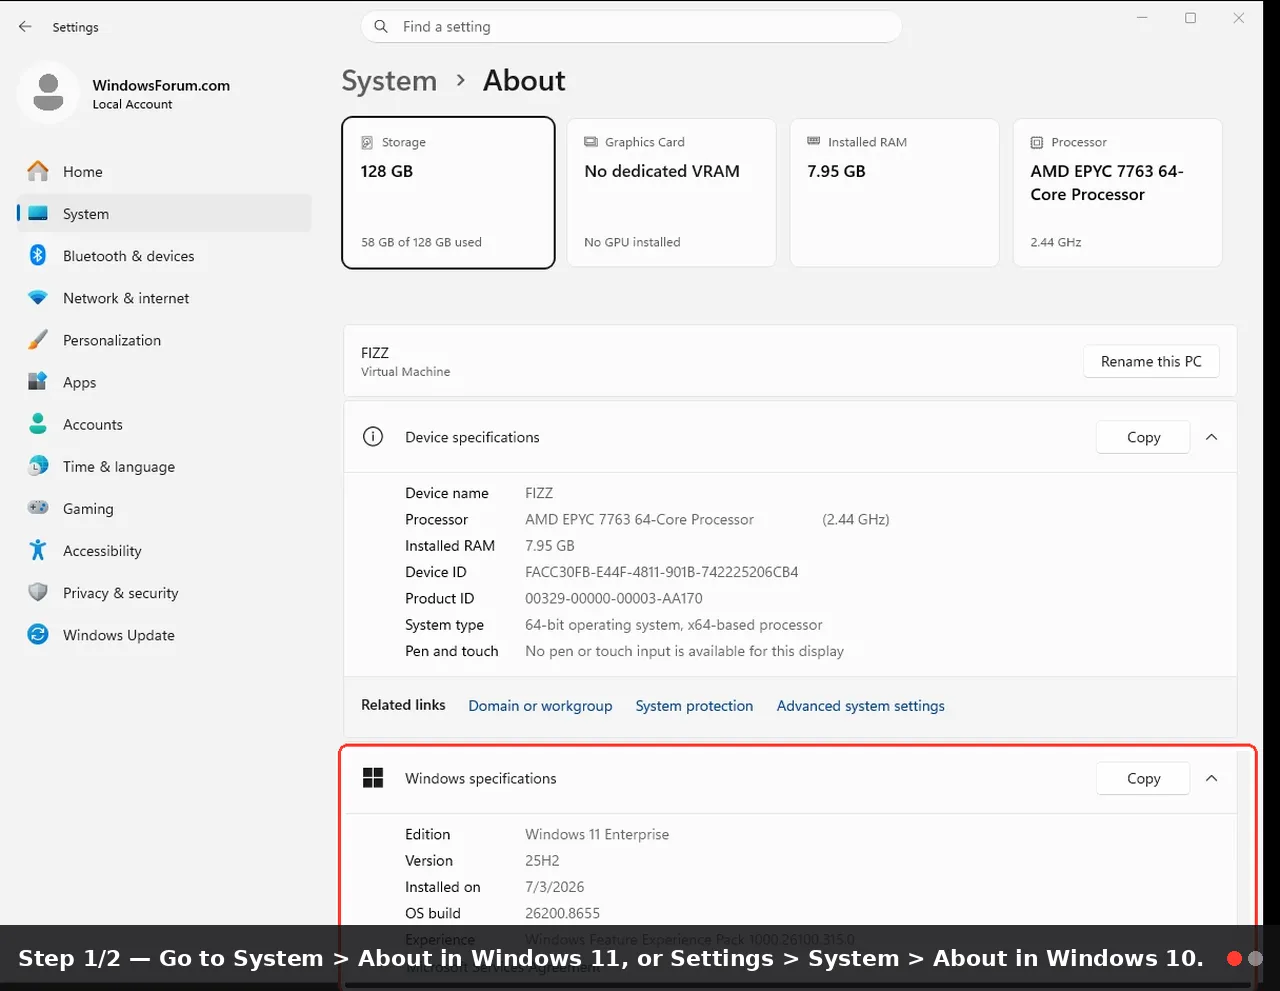
- Go to System > About in Windows 11, or Settings > System > About in Windows 10.
- Look for Windows specifications.
- Check the Edition entry.
You should see one of the following:
- Windows 10 Pro / Enterprise / Education
- Windows 11 Pro / Enterprise / Education
Step 2: Verify Virtualization Is Enabled
Application Guard relies on hardware virtualization.- Press Ctrl + Shift + Esc to open Task Manager.
- Click the Performance tab.
- Select CPU.
- Look for Virtualization in the details panel.
If it says Enabled, you’re good to continue.
If it says Disabled:
- Restart your PC.
- Enter your BIOS/UEFI firmware settings.
- Common keys include F2, Delete, F10, or Esc
- Find a setting such as:
- Intel Virtualization Technology (VT-x)
- Intel VT-d
- SVM Mode
- AMD-V
- Enable the virtualization option.
- Save changes and restart Windows.
Tip: BIOS/UEFI menus differ by manufacturer. If you can’t find the setting, check your motherboard or laptop vendor’s support page.
Step 3: Enable Microsoft Defender Application Guard
Now enable the Windows feature.Method 1: Use Windows Features
- Press Windows + R, type
optionalfeatures, and press Enter. - In the Windows Features window, scroll down.
- Find Microsoft Defender Application Guard.
- Check the box next to it.
- Click OK.
- Windows will install the required components.
- Restart your computer when prompted.
Method 2: Use PowerShell
If you prefer PowerShell:- Right-click Start and choose Windows Terminal (Admin) or PowerShell (Admin).
- Run this command:
Enable-WindowsOptionalFeature -Online -FeatureName Windows-Defender-ApplicationGuard- Wait for the process to complete.
- Restart your PC.
Warning: If the feature fails to install, check whether virtualization is enabled and whether your Windows edition supports Application Guard.
Step 4: Open an Application Guard Browsing Session
Once installed, you can launch a protected browsing window in Microsoft Edge.- Open Microsoft Edge.
- Click the three-dot menu in the upper-right corner.
- Look for New Application Guard window.
- Click it to open an isolated browsing session.
In this protected window, you can visit websites you do not fully trust without exposing your normal Windows session as directly.
Note: Depending on Windows version and Microsoft changes over time, menu wording may vary slightly. If you don’t see the option, make sure the feature installed correctly and your system was restarted.
Step 5: Understand the Limitations
Application Guard is useful, but it is not the same as regular browsing. Some features may be intentionally limited for security.You may notice restrictions such as:
- Limited access to local files
- Limited clipboard sharing
- Printing restrictions
- No persistent cookies or session data after closing, depending on configuration
- Slower startup than a normal browser window
Tip: Use Application Guard for unknown links, suspicious websites, temporary research, downloads from untrusted sources, or testing login pages you’re unsure about.
Step 6: Configure Optional Enterprise or Advanced Settings
On managed systems, organizations can customize Application Guard behavior using Group Policy or Microsoft Intune. Advanced users on Pro/Enterprise editions may also explore policy-based configuration.Possible options can include:
- Clipboard behavior
- Printing permissions
- Camera and microphone access
- File download handling
- Data persistence rules
- Press Windows + R, type
gpedit.msc, and press Enter. - Browse through policies related to Microsoft Defender Application Guard.
- Review each setting carefully before changing it.
Warning: Incorrect Group Policy changes can reduce protection. If this is a work PC, follow your IT department’s guidance.
Tips and Troubleshooting Notes
1. “Microsoft Defender Application Guard” is missing from Windows Features
Possible reasons include:- You’re using Windows Home
- Virtualization is disabled
- Your hardware does not support required virtualization features
- Some firmware settings are preventing it from loading
2. The Application Guard window won’t open
Try the following:- Restart the PC
- Make sure Edge is fully updated
- Confirm virtualization is enabled in Task Manager
- Check that the feature is installed in Windows Features
- Run Windows Update and install pending updates
3. Performance feels slow
This is fairly normal on older hardware. To improve performance:- Close unused apps
- Ensure you have enough free RAM
- Install Windows updates
- Use an SSD if possible
4. Downloads or copy/paste don’t work as expected
That can be by design. Application Guard intentionally isolates the session to reduce risk. If you need more flexibility, you may need to review policy settings—especially on business-managed devices.5. New Application Guard option is not visible in Edge
If the feature is installed but the option is missing:- Restart Windows again
- Update Edge to the latest version
- Confirm your edition supports the feature
- Check whether Microsoft has changed feature availability for your build or environment
Helpful Tip: If you regularly open unknown links from email, forums, or downloads, make it a habit to use Application Guard for those sessions instead of your normal browser window.
Version Information for Windows 10 and Windows 11
Application Guard support has varied somewhat across releases, but in general:- Windows 10 Pro, Enterprise, and Education: Supported on compatible hardware
- Windows 11 Pro, Enterprise, and Education: Supported on compatible hardware
- Windows Home: Typically unsupported
Conclusion
Microsoft Defender Application Guard is one of the more useful built-in security features available in supported editions of Windows 10 and Windows 11. By isolating risky browsing activity in a protected container, it helps reduce the chance that a malicious website can compromise your main Windows session.If you often visit unknown links, test websites, or want stronger browser isolation without installing third-party tools, Application Guard is well worth enabling.
Key Takeaways:
- Microsoft Defender Application Guard isolates untrusted websites in a secure container
- It helps protect your main Windows environment from browser-based threats
- It requires compatible hardware, virtualization support, and a supported Windows edition
- It works best for browsing unknown or potentially risky websites in Microsoft Edge
- Some usability limitations are intentional and improve security
This tutorial was generated to help WindowsForum.com users get the most out of their Windows experience.
Last edited: