
Microsoft’s current Windows documentation confirms that Game Bar recordings are MP4 files saved by default under Videos\Captures, and that recording can be started or stopped directly with Win + Alt + R. Tom’s Hardware independently notes that Windows exposes only coarse capture controls—30 or 60 fps, plus Standard or High video quality—rather than the bitrate, encoder, resolution, and keyframe controls found in dedicated tools. That limited control is the central constraint: Game Bar is best treated as a fast clip tool, not a fully tunable recording workstation.
For most players trying to reduce stutter, the best optimization is to stop asking Game Bar to preserve every recent second of play.
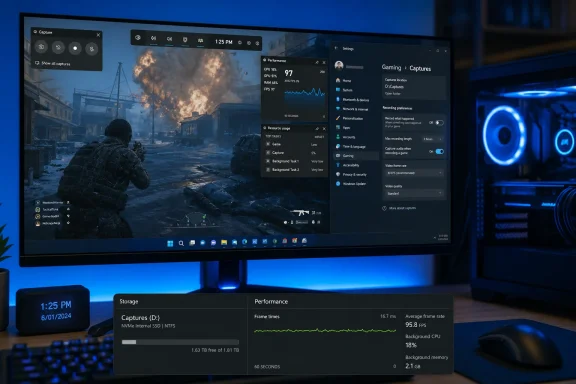 Start in Windows Settings, Not the Game Bar Overlay
Press Win + I, then go to Gaming > Captures. This is where Windows keeps the performance-relevant settings; the Capture widget opened with Win + G is primarily for starting recordings, taking screenshots, viewing the gallery, and toggling audio.
The names vary slightly between Windows 10 and Windows 11. On Windows 11, the retrospective buffer is commonly labeled Record what happened; older guides may call it Background recording or Record in the background while I’m playing a game. It is the same basic idea: Windows continuously captures gameplay so that you can save an event that already happened.
Do not confuse this with pressing Win + Alt + R to begin a manual recording. A manual recording incurs capture work only while you are deliberately recording. Background capture is an ongoing workload during gameplay, even when you never save a clip.
Microsoft has long identified background recording as a performance-sensitive Game DVR feature. That warning deserves more weight than it usually gets in optimization guides: if a game already pushes your GPU, CPU, video encoder, system memory, or storage drive near its limits, a permanent capture buffer competes for the same resources at the moment frame pacing is most vulnerable.
Turn Off “Record What Happened” Unless You Use It
For the largest reduction in recording-related overhead, turn Record what happened off in Settings > Gaming > Captures. This is the recommended baseline for competitive games, demanding single-player titles, gaming laptops on battery, and systems where gameplay stutters only after Game Bar features are enabled.
With it disabled, you can still record deliberately:
- Press
Win + Alt + Rto start and stop a manual recording. - Press
Win + Gto open the Xbox Game Bar overlay and use the Capture widget. - Press
Win + Alt + Print Screento take a screenshot.
The trade-off is simple: you lose the ability to save a surprise play after it occurs. If clips are rare and planned—a boss attempt, benchmark run, bug report, or short tutorial—that is usually a good exchange for steadier performance.
If you regularly capture unexpected multiplayer highlights, enable background recording only for those sessions. Set the shortest retrospective duration Windows offers that still fits your purpose, then turn it off when you are done. A 30-second buffer is enough for a kill, a goal, or an error demonstration; retaining several minutes of footage increases the amount of data Windows must continually process and retain without improving the game itself.
This is also a useful troubleshooting split. If a game stutters with background capture enabled but plays normally after it is disabled, you have identified a capture-path problem rather than a general graphics-settings problem. Leave the game’s visual settings alone until that comparison is complete.
Use 30 FPS and Standard Quality as the Performance Profile
Under Recording preferences in Settings > Gaming > Captures, set Video frame rate to 30 fps and Video quality to Standard when smooth gameplay is more important than pristine footage.
Moving from 30 fps to 60 fps doubles the number of frames the capture process must handle every second. Choosing High quality also increases the amount of video data Windows must encode and write. Neither change guarantees better-looking results if the game is already dropping frames, the encoder is overloaded, or the destination drive cannot keep up. A 60 fps file with repeated or uneven frames is worse evidence of gameplay than a clean 30 fps recording.
Use 60 fps when the footage itself needs smooth motion: fast competitive shooters, racing games, fighting games, or clips intended for editing and upload. Test it in the actual game and scene you care about, not only in a menu or training area. A system that appears comfortable at 60 fps capture in a quiet scene may fail during explosions, dense crowds, shader-heavy effects, or asset streaming.
Use High quality only after 30 fps Standard is stable and the footage has a real destination that benefits from it. If the clip is for Discord, an issue report, a quick social post, or personal review, Standard is usually the rational setting. Game Bar does not provide a precise target bitrate or resolution selector, so “High” is not a controlled production setting; it is a broader quality-and-file-size choice.
A sensible order of operations is:
- Disable retrospective recording.
- Test a manual recording at 30 fps and Standard quality.
- If gameplay and playback are stable, try 60 fps at Standard quality.
- Only then test High quality, one change at a time.
Do not raise frame rate and quality together. If the resulting clip stutters, you will not know whether the system ran out of encoding capacity, storage throughput, or GPU headroom.
Put Captures on a Suitable Local Drive
Game Bar saves recordings as MP4 files in the Captures folder under your Windows Videos folder by default. Microsoft’s accessibility documentation confirms that location and format, while its older Game DVR guidance specifies that moving the Captures folder in File Explorer changes where future game clips and screenshots are stored.
Open Win + G, select See my captures or the gallery, and use Open file location to verify where Windows is writing files before moving anything. This matters because some PCs have redirected Videos libraries, OneDrive folder backup, a prior custom folder location, or an old drive path that is no longer suitable.
For recording, choose a local internal SSD with adequate free space. Avoid an almost-full system drive, a removable USB stick, a network share, or a slow external hard drive if you are troubleshooting skipped frames. The capture workload does not end at the GPU: video data still has to be written reliably while the game is loading assets, compiling shaders, updating save data, and paging memory.
To move the destination, use File Explorer to locate the existing Captures folder, then move the folder to the chosen drive through its folder-location controls rather than copying only selected MP4 files. Preserve the folder as a normal Windows folder and keep the target drive connected. If Windows cannot reach a previously selected location, Game Bar can fail to save clips correctly or put them somewhere unexpected.
Do not assume moving the folder solves a GPU or encoder bottleneck. It helps when the original drive is full, slow, busy, or constrained by low free space. If the game stutters immediately when recording begins and Task Manager shows the GPU near saturation, reduce the game’s graphics load or return Game Bar to 30 fps Standard before chasing storage changes.
Keep the Recording Short and the Test Repeatable
The Maximum recording length setting is a storage guardrail, not a performance booster while a manual capture is actively running. Still, set it to a realistic ceiling. A five-minute cap prevents an accidental hotkey press from becoming an hour-long recording that silently consumes tens of gigabytes.
For a low-overhead clip setup, use this profile:
- Keep “Record what happened” disabled except during sessions where retrospective clips are essential.
- Record manually with
Win + Alt + Rat 30 fps and Standard quality. - Set a maximum recording length that matches your normal use, such as five or 10 minutes.
- Save captures to a local SSD with meaningful free space rather than a nearly full C: drive.
- Disable microphone capture unless commentary or diagnostic narration is needed.
The microphone setting is easy to overlook. Capturing game audio plus microphone input adds another stream to manage and can create unnecessary privacy and cleanup problems when you only need visual proof of a bug or a short gameplay highlight. During a recording, Win + Alt + M toggles the microphone without stopping the clip.
Before changing Game Mode, reinstalling graphics drivers, editing the registry, or disabling Game Bar entirely, run one controlled test: record the same demanding area for two minutes at 30 fps Standard with background capture off, then repeat with your preferred higher-quality settings. Watch both the game’s frame-time behavior and the resulting MP4. The better setting is the one that produces a watchable file without making the game worse to play.