Automate Disk Cleanup with Storage Sense and Task Scheduler in Windows 10/11
Difficulty: Intermediate | Time Required: 20 minutesIntroduction
Keeping temporary files, old update files, and clutter out of your drives improves performance and frees space without manual intervention. Windows 10 and Windows 11 include Storage Sense — a built‑in automatic cleanup tool — and you can combine it with Task Scheduler or the classic Disk Cleanup (cleanmgr) utility for more granular control. This guide shows two complementary approaches: enable and configure Storage Sense for automatic cleaning, and create a Task Scheduler job that runs Disk Cleanup (cleanmgr) on a schedule.Prerequisites
Quick walkthrough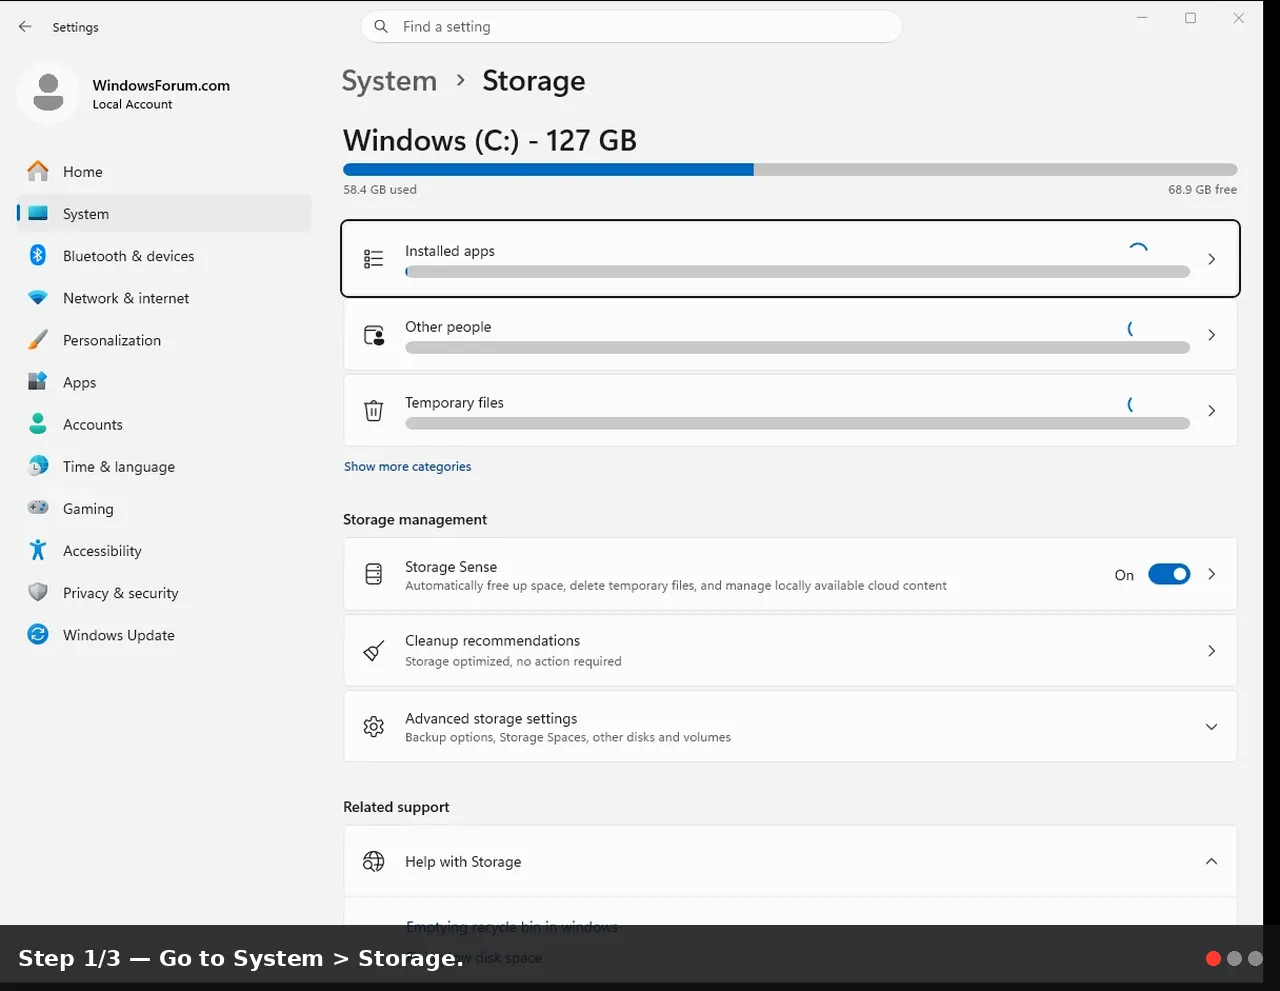
- Windows 10 (recommended: 1803 or later) or Windows 11.
- An administrator account (required for creating scheduled tasks that run elevated and for using cleanmgr /sageset).
- ~20 minutes of time and basic familiarity with Settings and Task Scheduler.
- Note: cleanmgr.exe is deprecated in newer Windows builds but still present on most systems. If it’s missing, rely on Storage Sense.
Step-by-step instructions
Part A — Enable and configure Storage Sense (recommended, native method)- Open Settings:
- Press Windows + I or click Start > Settings.
- Go to System > Storage.
- Turn on Storage Sense by toggling the "Storage Sense" switch to On.
- Click "Storage Sense" (or “Configure Storage Sense or run it now” in Windows 11) to open options.
- Configure Frequency:
- Under "Run Storage Sense", choose how often it should run: During low free disk space, every day, every week, or every month.
- For most users, Weekly or Monthly is a good balance.
- Temporary files and Recycle Bin:
- Under "Temporary Files" choose whether to delete temporary files and for how long to keep files in the Recycle Bin and Downloads folder (e.g., 30 days).
- IMPORTANT: Be careful with Downloads — if you choose to delete files you haven’t opened in X days, you may lose important downloads.
- OneDrive content:
- If available, configure "Local cloud content" to make unused files online-only after a period (saves local disk space if you use OneDrive).
- Run Storage Sense now (optional):
- Click "Run Storage Sense now" to test the setting immediately.
Part B — Use Disk Cleanup (cleanmgr) with Task Scheduler for granular control
(Use this if you prefer classic Disk Cleanup options or need specific cleanup tasks.
- Create a Disk Cleanup settings profile:
- Open an elevated Command Prompt: press Start, type cmd, right-click Command Prompt and choose "Run as administrator".
- Type: cleanmgr.exe /sageset:1 and press Enter.
- The Disk Cleanup settings dialog opens. Check the boxes for the items you want to remove (e.g., Temporary files, Windows Update Cleanup, Thumbnails). Click OK. This saves the selection to profile 1.
- Note: If Disk Cleanup does not show "Windows Update Cleanup", you may need to run it as admin or wait until the system has updates installed.
- Test run your saved settings:
- In the same elevated Command Prompt, run: cleanmgr.exe /sagerun:1
- Disk Cleanup will run using the options you saved. Observe for any unexpected deletions.
- Create a scheduled task to run Disk Cleanup automatically:
- Open Task Scheduler: press Start, type Task Scheduler, and open it.
- In Task Scheduler, click Action > Create Task.
- On the General tab:
- Name: "Automated Disk Cleanup (cleanmgr)".
- Check "Run whether user is logged on or not".
- Check "Run with highest privileges".
- Configure for: Windows 10 or Windows 11 (choose appropriate).
- On the Triggers tab:
- Click New… and choose a schedule (Weekly or Monthly). Set a time when the PC is normally on (e.g., during off-hours).
- On the Actions tab:
- Click New… Action: Start a program.
- Program/script: cleanmgr.exe
- Add arguments (optional): /sagerun:1
- If you prefer to run via PowerShell: Program/script: powershell.exe
Arguments: -NoProfile -WindowStyle Hidden -Command "Start-Process -FilePath 'cleanmgr.exe' -ArgumentList '/sagerun:1' -Verb runAs" - Conditions & Settings:
- On Conditions, uncheck “Start the task only if the computer is on AC power” if you want it on laptops on battery (use caution).
- On Settings, enable “Run task as soon as possible after a scheduled start is missed”.
- Click OK and provide admin credentials when prompted.
- Test the scheduled task:
- In Task Scheduler, right-click your new task and choose "Run".
- Verify Disk Cleanup runs and performs the expected actions.
- Check the task History tab for success/failure details (enable history if it’s off).
Tips, warnings, and troubleshooting notes
- Tip: Storage Sense is simplest and safest for most users; it integrates with OneDrive and respects common settings.
- Warning: When configuring Storage Sense or cleanmgr, be careful with the Downloads folder and files older than X days — you may lose downloads you still need. Consider excluding Downloads in Storage Sense.
- Note on Windows versions: Storage Sense improvements arrived in Windows 10 1803 and later; Windows 11 includes similar options with slightly different UI labels. If you do not see some settings, update Windows or use cleanmgr.
- If cleanmgr.exe is missing: modern Windows builds have deprecated cleanmgr; if it’s not present, rely on Storage Sense or use third-party cleanup tools (use reputable software).
- Permissions: /sageset must be run with admin rights to save settings. The scheduled task should run elevated to remove system-level items like Windows Update Cleanup.
- Task fails to run: ensure “Run with highest privileges” is checked and that the account you used has sufficient rights. Check Task Scheduler History and Windows Event Viewer for error codes.
- If Storage Sense doesn’t free expected space: check “Temporary files” types selected, and clean up system restore points or large app caches (e.g., browsers) separately.
Conclusion
Automating disk cleanup with Storage Sense and Task Scheduler keeps your system lean and reduces manual maintenance. Storage Sense provides a safe, integrated option for regular cleanup and OneDrive management, while Task Scheduler with Disk Cleanup (cleanmgr) offers more granular control for advanced users. Together, they help reclaim disk space, improve responsiveness, and minimize interruptions.Key Takeaways:
- Storage Sense is the easiest built‑in way to automate cleanup on Windows 10/11.
- Use cleanmgr /sageset and /sagerun with Task Scheduler for customized, scheduled cleanups.
- Always review cleanup settings (Downloads, Recycle Bin) to prevent unintended file loss.
- Administrator rights are required for saving and running advanced cleanup profiles.
This tutorial was generated to help WindowsForum.com users get the most out of their Windows experience.
Last edited: