Back Up and Restore Device Drivers with DISM and pnputil in Windows 10/11
Difficulty: Intermediate | Time Required: 20 minutesWhen you reinstall Windows, replace a storage drive, recover from a failed driver update, or prepare for a clean Windows 10/11 deployment, having a local backup of your working device drivers can save a lot of time. Instead of hunting through vendor websites for chipset, network, audio, Bluetooth, printer, or touchpad drivers, you can export the third-party drivers already installed in Windows and restore them later.
This tutorial shows two built-in ways to back up and restore drivers:
Quick walkthrough
- DISM for exporting drivers from the current Windows installation.
- pnputil for exporting and restoring drivers from the Windows Driver Store.
Important: These methods export driver packages that are installed as.infdriver packages. They do not back up full vendor installer apps, control panels, firmware utilities, or.exesetup programs.
Prerequisites
Before you begin, make sure you have:- A PC running Windows 10 or Windows 11.
- An administrator account.
- A backup location, such as:
- External USB drive
- Secondary internal drive
- Network share
- Cloud-synced folder
- At least a few GB of free space, depending on how many third-party drivers are installed.
D:\DriverBackupYou can replace this path with your own location.
Tip: If you are backing up drivers before reinstalling Windows, save the driver backup somewhere other than the Windows system drive, such as a USB flash drive or external SSD.
Part 1: Create a Driver Backup Folder
- Connect your external drive or choose a safe backup location.
- Open File Explorer.
- Create a new folder named:
DriverBackup- Note the full path. For example:
D:\DriverBackup- If you prefer using the command line, open an elevated terminal and run:
mkdir D:\DriverBackupPart 2: Back Up Drivers with DISM
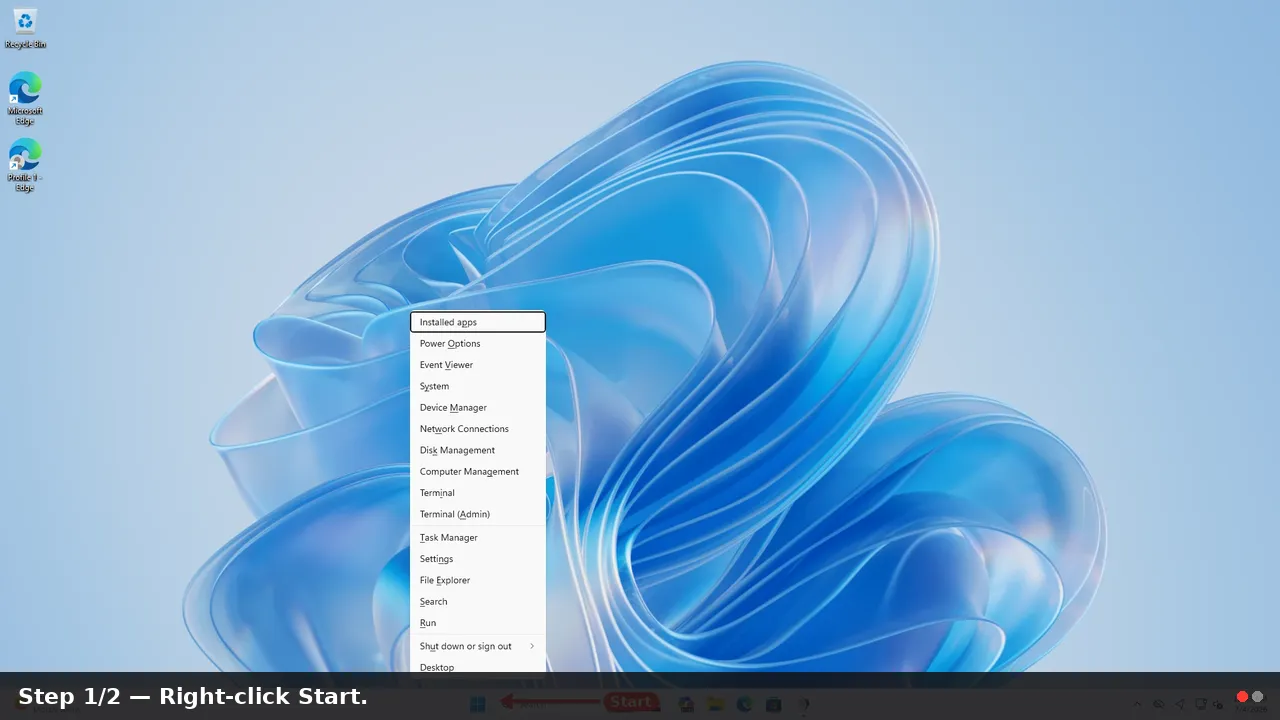
DISM can export all third-party driver packages from the currently running Windows installation.- Right-click Start.
- Select Terminal (Admin), Windows PowerShell (Admin), or Command Prompt (Admin).
- If prompted by User Account Control, select Yes.
- Run the following command:
DISM /Online /Export-Driver /Destination:D:\DriverBackup- Wait for the export process to finish.
- When complete, DISM should report that the operation completed successfully.
- Open the backup folder in File Explorer. You should see multiple folders, often with names such as:
Code:
oem0.inf
oem1.inf
oem2.inf.inf file and related driver files.Note:/Onlinemeans DISM is working with the currently running Windows installation. It does not mean the command uses the internet.
Part 3: Back Up Drivers with pnputil
You can also usepnputil to export drivers from the Windows Driver Store. This is especially useful because pnputil is designed specifically for Plug and Play driver package management.- Open Terminal, Command Prompt, or PowerShell as administrator.
- Run:
pnputil /export-driver * D:\DriverBackup- Wait while Windows exports the driver packages.
- Review the output for any errors.
- Check the destination folder to confirm that driver folders were created.
pnputil to export all third-party driver packages from the driver store.Example:Tip: DISM and pnputil exports are similar for this purpose. You usually only need one method. However, if you are preparing for an important reinstall, using both commands to separate folders can provide extra confidence.
Code:
mkdir D:\DriverBackup_DISM
mkdir D:\DriverBackup_PNPUtil

DISM /Online /Export-Driver /Destination:D:\DriverBackup_DISM
pnputil /export-driver * D:\DriverBackup_PNPUtil
Part 4: Review Installed Third-Party Drivers
Before or after exporting, you can list third-party drivers currently installed in the driver store.Run:
pnputil /enum-driversThis displays information such as:
- Published Name
- Original Name
- Provider Name
- Class Name
- Driver Version
- Signer Name
You can also use DISM:
DISM /Online /Get-Drivers /Format:TableTo include default Microsoft drivers as well, use:
DISM /Online /Get-Drivers /All /Format:TableNote: By default, DISM focuses on third-party drivers. That is normally what you want for backup purposes because Windows can usually restore built-in Microsoft drivers automatically.
Part 5: Restore Drivers After Reinstalling Windows
After reinstalling Windows 10 or Windows 11, you can restore your saved drivers usingpnputil.- Copy your
DriverBackupfolder back to the PC, or connect the USB drive containing the backup. - Open Terminal, Command Prompt, or PowerShell as administrator.
- Run the following command:
pnputil /add-driver D:\DriverBackup\*.inf /subdirs /install- Wait for Windows to add the driver packages.
- Restart the computer if prompted.
*.inftargets driver information files./subdirssearches all subfolders./installinstalls or updates drivers for matching devices.
Warning:pnputilwill not necessarily force a driver if Windows determines another installed driver is a better match. This is normal driver ranking behavior.
Part 6: Restore a Specific Driver Only
If you only want to restore one driver, locate its.inf file inside the backup folder.For example:
pnputil /add-driver D:\DriverBackup\oem12.inf\driver.inf /installIf the driver is inside a subfolder, adjust the path accordingly.
You can also restore all
.inf files from a specific folder:pnputil /add-driver D:\DriverBackup\Network\*.inf /subdirs /installThis is useful if you only need network, audio, printer, or chipset drivers.
Part 7: Optional — Add Drivers to an Offline Windows Image
This step is more advanced and is useful for IT admins or users building custom Windows installation images.DISM can add drivers to an offline mounted Windows image:
DISM /Image:C:\Mount\Windows /Add-Driver /Driver:D:\DriverBackup /RecurseAfter adding drivers, you can verify them with:
DISM /Image:C:\Mount\Windows /Get-DriversFor most home users, restoring drivers withWarning: Be careful with/Recursewhen adding drivers to an offline image. Some vendor driver folders contain many related packages and shared files, which can make a Windows image much larger than expected.
pnputil after Windows installation is simpler and safer.Tips and Troubleshooting
Keep the Backup Organized
Create folders by PC name and date:D:\DriverBackups\DesktopPC-2026-06-17This helps avoid mixing drivers from different systems.
Back Up Before Major Changes
Create a driver backup before:- Clean installing Windows.
- Replacing a motherboard.
- Installing a major Windows feature update.
- Testing beta or manufacturer-provided drivers.
- Removing OEM recovery partitions.
Do Not Rely on Driver Backup Alone
A driver backup is helpful, but it is not a full system backup. It does not include:- Installed programs
- User files
- Product keys
- Windows activation data
- Vendor utility software
- Firmware updates
- App settings
If a Device Still Does Not Work
If a device remains unknown or has a warning icon in Device Manager:- Right-click Start.
- Select Device Manager.
- Right-click the problem device.
- Select Update driver.
- Choose Browse my computer for drivers.
- Select your driver backup folder.
- Make sure Include subfolders is checked.
- Continue the wizard.
If Network Drivers Are Missing
Network drivers are one of the most important things to preserve before reinstalling Windows. Without Ethernet or Wi-Fi, downloading other drivers can be inconvenient.Before a clean install, confirm your backup includes network adapter drivers by running:
pnputil /enum-driversLook for providers such as Intel, Realtek, Broadcom, Qualcomm, MediaTek, Killer, or your PC manufacturer.
Use Manufacturer Drivers When Needed
The exported driver backup is great for recovery, but for performance-sensitive devices such as graphics cards, docking stations, fingerprint readers, and specialized hardware, you may still want to install the latest driver package from the device or PC manufacturer after Windows is running again.Conclusion
Backing up drivers with DISM or pnputil is a quick, practical step that can make Windows recovery and reinstallation much easier. In about 20 minutes, you can preserve the working third-party drivers from your current Windows 10 or Windows 11 installation and restore them later with a single command.For everyday users, the simplest workflow is:
- Export drivers with DISM or pnputil.
- Save the backup to external storage.
- Reinstall Windows if needed.
- Restore drivers with
pnputil /add-driver. - Reboot and confirm devices are working.
- DISM and pnputil are built-in Windows tools for managing driver packages.
- Driver exports include third-party
.infdriver packages, not full vendor installer apps. pnputil /add-driverwith/subdirs /installis the easiest restore method.- Saving network, chipset, storage, and input device drivers can prevent headaches after a clean install.
- A driver backup is useful, but it should complement—not replace—a full system or file backup.
This tutorial was generated to help WindowsForum.com users get the most out of their Windows experience.
Last edited: