

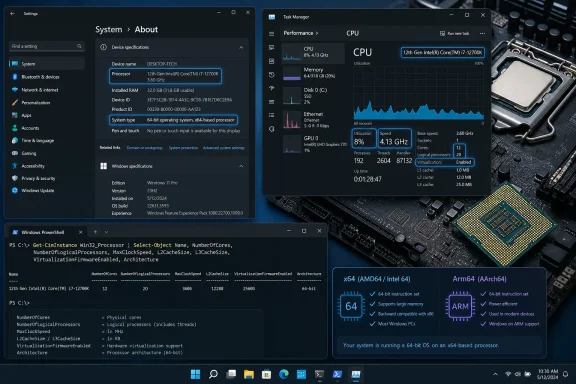
The fastest way to check your CPU is Settings > System > About, where Windows lists the processor model under Device specifications. For core counts, thread counts, current speed, and virtualization status, use Task Manager > Performance > CPU. These instructions cover current Windows 11 releases, including Windows 11 in S mode, and Windows 10 22H2. Windows 10 reached end of support on October 14, 2025, although these built-in tools still work.
Windows can show several different processor details:
Also check System type on the same page. It identifies the installed Windows architecture and may describe the processor as:
Settings does not normally show the physical core or logical processor counts. Use Task Manager for those values.
To restore the original display, right-click the graphs and select Change graph to > Overall utilization.
You can also open this utility by searching Start for System Information. Do not confuse it with the general System Settings result.
If you need to send the complete report to a technician:
System Information has limited hardware reporting when Windows is running in Safe Mode. Restart into normal Windows before relying on a missing or incomplete Processor entry.
Expected output resembles:
The command reports one
For additional CPU properties, run:
Some values depend on firmware and hardware reporting. A blank or unexpected field does not necessarily mean that the processor lacks the feature.
To copy a compact result directly to the clipboard, run:
You can then paste the result into a document or support message.
Do not rely on older instructions that use:
Microsoft deprecated WMIC in favor of PowerShell-based WMI and CIM access. WMIC is not installed by default on Windows 11 version 24H2, and it is uninstalled during the Windows 11 version 25H2 feature update. Reinstalling WMIC simply to identify a CPU is unnecessary;
Use Task Manager > Performance > CPU for accurate Sockets, Cores, and Logical processors labels.
Do not uninstall processor entries to fix an incorrect name or count. That does not upgrade or replace the physical CPU and can needlessly force Windows to redetect system devices.
To create a text report:
For Intel processors, Intel’s official Processor Identification Utility can provide identification and technology details on supported systems. Intel’s release notes for version 8.1.54 include a known issue involving incorrect cache values, so verify cache-sensitive information against Intel’s official product specifications.
CPU-Z from CPUID is a widely used third-party identification tool that can display the processor name, package, clocks, cache, cores, and threads. Download it only from CPUID’s official site, not from a driver bundle or third-party download portal.
AMD Ryzen Master can display extensive telemetry for supported Ryzen desktop processors, but it is primarily an overclocking and tuning utility rather than a basic identification tool.
Warning: Changing settings in Ryzen Master can affect CPU clocks, voltage, temperature, stability, and warranty coverage. If you open it only to inspect the processor, do not apply profiles, Precision Boost Overdrive settings, voltage changes, or overclocking controls. Close the program without applying changes.
If an application requires virtualization, check the PC manufacturer’s instructions before changing firmware settings. Firmware menu names vary and may use labels such as Intel Virtualization Technology, Intel VT-x, AMD-V, or SVM Mode.
Task Manager > Performance > CPU > Sockets, Cores, Logical processors
For a final identification check, the model name should agree across Settings > System > About, Task Manager > Performance > CPU, and the PowerShell
 Decide which CPU information you need
Windows can show several different processor details:- Model name: Identifies the processor, such as an Intel Core, Intel Core Ultra, AMD Ryzen, AMD Ryzen AI, or Qualcomm Snapdragon model.
- Cores: Physical processing cores available to Windows.
- Logical processors: Processing threads that Windows can schedule work on.
- Sockets: Number of physical processor packages installed.
- Speed: Current and base clock information.
- Architecture: Whether Windows and the processor use an x64 or Arm-based platform.
- Virtualization status: Whether hardware virtualization is enabled for Windows.
Check the CPU model in Settings
This is the quickest built-in method and does not require administrator permission.- Press Windows key + I to open Settings.
- Select System.
- Scroll down and select About.
- Under Device specifications, find Processor.
Also check System type on the same page. It identifies the installed Windows architecture and may describe the processor as:
- x64-based processor
- ARM-based processor
- x86-based processor
Settings does not normally show the physical core or logical processor counts. Use Task Manager for those values.
Check CPU cores, logical processors, and speed in Task Manager
Task Manager provides the most useful built-in CPU overview for games, virtual machines, creative applications, and troubleshooting.- Press Ctrl + Shift + Esc.
- If Task Manager opens in a compact view on an older Windows installation, select More details.
- Select Performance.
- Select CPU in the left pane.
- Read the processor model displayed above the utilization graph.
- Check the details below or beside the graph.
- Utilization
- Speed
- Base speed
- Sockets
- Cores
- Logical processors
- Virtualization
- L1, L2, and L3 cache
- Speed is the approximate current operating speed. It changes as Windows adjusts CPU performance according to workload, temperature, power mode, and firmware controls.
- Base speed is reference information reported for the processor. It is not the maximum boost speed.
- Cores indicates physical processing cores available to Windows.
- Logical processors indicates the number of hardware execution threads Windows can schedule.
- Sockets identifies physical CPU packages, not cores.
- Virtualization shows whether supported hardware virtualization is enabled and available to Windows.
Show a graph for each logical processor
Task Manager can divide the main graph into separate logical processor graphs.- Open Task Manager > Performance > CPU.
- Right-click inside the CPU graph.
- Select Change graph to.
- Select Logical processors.
To restore the original display, right-click the graphs and select Change graph to > Overall utilization.
Use System Information for a copyable hardware summary
System Information lists the CPU beside the computer model, BIOS mode, installed memory, and other system details.- Press Windows key + R.
- Enter:
msinfo32- Select OK or press Enter.
- Select System Summary in the left pane.
- Find Processor in the right pane.
You can also open this utility by searching Start for System Information. Do not confuse it with the general System Settings result.
If you need to send the complete report to a technician:
- In System Information, select File > Export.
- Choose a save location.
- Enter a file name.
- Select Save.
System Information has limited hardware reporting when Windows is running in Safe Mode. Restart into normal Windows before relying on a missing or incomplete Processor entry.
Check the CPU with PowerShell or Windows Terminal
PowerShell produces structured, copyable processor information. Administrator permission is not normally required for a local CPU query.- Right-click Start.
- Select Terminal or Windows Terminal.
- If Terminal opens Command Prompt, open a Windows PowerShell tab.
- Run:
Code:
Get-CimInstance -ClassName Win32_Processor |
    Select-Object Name, Manufacturer, NumberOfCores, NumberOfLogicalProcessors
Code:
Name                      Manufacturer  NumberOfCores  NumberOfLogicalProcessors
----                      ------------  -------------  -------------------------
AMD Ryzen 7 ... AuthenticAMD 8 16Win32_Processor instance for each physical processor socket. Most consumer PCs produce one row. A workstation or server with two installed CPUs can produce two rows.For additional CPU properties, run:
Code:
Get-CimInstance -ClassName Win32_Processor |
Format-List Name,Manufacturer,Description,MaxClockSpeed,NumberOfCores,NumberOfEnabledCore,NumberOfLogicalProcessors,SocketDesignation,VirtualizationFirmwareEnabledTo copy a compact result directly to the clipboard, run:
Code:
Get-CimInstance Win32_Processor |
    Select-Object Name,NumberOfCores,NumberOfLogicalProcessors |
    Out-String |
Set-ClipboardCheck the CPU from Command Prompt
Thesysteminfo command provides a general Windows and hardware report.- Open Start.
- Type Command Prompt.
- Select Command Prompt.
- Run:
systeminfo- Find the Processor(s) section.
Do not rely on older instructions that use:
wmic cpu get nameMicrosoft deprecated WMIC in favor of PowerShell-based WMI and CIM access. WMIC is not installed by default on Windows 11 version 24H2, and it is uninstalled during the Windows 11 version 25H2 feature update. Reinstalling WMIC simply to identify a CPU is unnecessary;
Get-CimInstance is the supported replacement.Check the processor entry in Device Manager
Device Manager can confirm the processor device name and whether Windows reports a device error.- Right-click Start.
- Select Device Manager.
- Expand Processors.
- Read the names shown underneath.
Use Task Manager > Performance > CPU for accurate Sockets, Cores, and Logical processors labels.
Do not uninstall processor entries to fix an incorrect name or count. That does not upgrade or replace the physical CPU and can needlessly force Windows to redetect system devices.
Check the CPU while collecting DirectX information
DirectX Diagnostic Tool is useful when checking whether a PC meets a game’s processor, memory, graphics, and DirectX requirements.- Press Windows key + R.
- Enter:
dxdiag- Press Enter.
- If prompted to check whether drivers are digitally signed, select Yes.
- Select the System tab.
- Find Processor under System Information.
To create a text report:
- Select Save All Information.
- Choose a folder.
- Save the text file.
- Open it and review the Processor line.
Verify the exact processor specifications
Windows identifies the installed CPU, but it may not show every supported instruction set, maximum memory configuration, integrated graphics specification, or official boost frequency.- Copy the full CPU model from Settings, Task Manager, or PowerShell.
- Search for that exact model on the processor manufacturer’s official product database.
- Match the complete model number, including suffixes such as H, HX, K, U, X, X3D, or G.
- Confirm the specifications required by your application or upgrade plan.
For Intel processors, Intel’s official Processor Identification Utility can provide identification and technology details on supported systems. Intel’s release notes for version 8.1.54 include a known issue involving incorrect cache values, so verify cache-sensitive information against Intel’s official product specifications.
CPU-Z from CPUID is a widely used third-party identification tool that can display the processor name, package, clocks, cache, cores, and threads. Download it only from CPUID’s official site, not from a driver bundle or third-party download portal.
AMD Ryzen Master can display extensive telemetry for supported Ryzen desktop processors, but it is primarily an overclocking and tuning utility rather than a basic identification tool.
Warning: Changing settings in Ryzen Master can affect CPU clocks, voltage, temperature, stability, and warranty coverage. If you open it only to inspect the processor, do not apply profiles, Precision Boost Overdrive settings, voltage changes, or overclocking controls. Close the program without applying changes.
Troubleshoot missing or conflicting CPU information
Settings shows only a generic processor description
Use these methods in order:- Open Task Manager > Performance > CPU.
- Run the
Get-CimInstancePowerShell command. - Open System Information with
msinfo32. - Check the PC manufacturer’s original configuration or firmware setup screen.
Core counts do not match an online specification
Check Task Manager > Performance > CPU first. A lower count can occur when:- Cores are disabled in UEFI or BIOS.
- Windows is running inside a virtual machine with only some virtual processors assigned.
- The PC manufacturer configured the processor differently.
- Windows is restricted by a boot configuration setting.
- The reported model was misidentified because its complete suffix was omitted.
Task Manager says virtualization is disabled
This does not mean the CPU model is wrong. It normally means hardware virtualization is turned off in UEFI or BIOS, unavailable to the current environment, or hidden from a virtual machine.If an application requires virtualization, check the PC manufacturer’s instructions before changing firmware settings. Firmware menu names vary and may use labels such as Intel Virtualization Technology, Intel VT-x, AMD-V, or SVM Mode.
Device Manager shows many identical processors
This is expected. The entries usually correspond to logical processors. Confirm the actual topology under:Task Manager > Performance > CPU > Sockets, Cores, Logical processors
A utility reports a different clock speed from Task Manager
CPU speed changes continuously. Power-saving states, boost behavior, temperature, workload, and manufacturer controls can produce different readings between tools. Compare the exact processor model first; do not treat a momentary clock difference as evidence that the wrong CPU is installed.For a final identification check, the model name should agree across Settings > System > About, Task Manager > Performance > CPU, and the PowerShell
Win32_Processor result.References
- Primary source: Technobezz
Published: 2026-07-13T17:03:45.903000+00:00
How to Check CPU on Windows in 2026 | Technobezz
How to check CPU details on Windows using Settings, Task Manager, System Information, PowerShell, and trusted CPU tools.www.technobezz.com
