

You can create a ZIP file in Windows 11 or Windows 10 without installing another app. Select the files or folder in File Explorer, right-click the selection, and use Compress to > ZIP File on current Windows 11 builds or Send to > Compressed (zipped) folder on Windows 10 and systems showing the classic menu. PowerShell and the built-in
Check these points before compressing a large collection:
If Compress to does not appear, use the classic-menu procedure in the next section.
You can also open the Windows 11 classic context menu directly by selecting the files and pressing Shift + F10.
For an ordinary ZIP, the one-click ZIP File option remains faster. Use the wizard when you need to review the format, compression method, or archive destination.
For a scripted update, PowerShell can add new files and replace older copies by using the
The ZIP contains a top-level
This places the contents of
This adds new items and replaces older archived versions with files having the same names.
PowerShell uses Optimal compression by default. You can specify another supported level:
Supported values are
The options mean:
To inspect the completed archive without extracting it, run:
The command prints the archive’s file and folder names in the terminal.
To move the ZIP, use Ctrl + X and Ctrl + V, or drag it to the destination. Copy it with Ctrl + C and Ctrl + V if you want to retain the original.
Do not delete the original data until the extraction test succeeds and any required backup has been confirmed.
Also check whether the command used
tar command are available for repeatable or scripted ZIP creation.
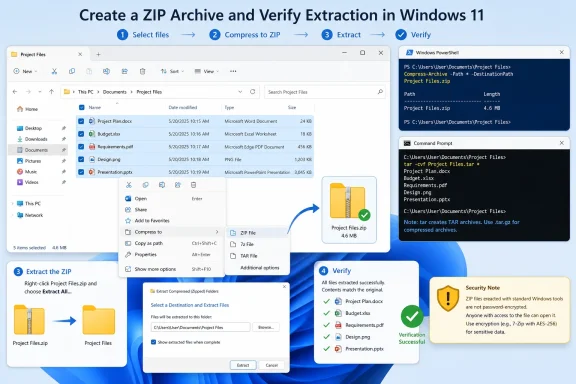 Before creating the ZIP
Check these points before compressing a large collection:- Keep all source files closed so Windows can read them without sharing conflicts.
- Confirm that the destination drive has enough free space for the completed archive.
- Move files into one temporary folder first if they are scattered across many locations.
- Remember that ZIP compression may not substantially shrink JPEG, MP4, MP3, PDF, and other already-compressed files.
- Do not assume that a ZIP file is encrypted. A standard ZIP created by Windows has no password protection.
Create a ZIP file in Windows 11
Current Windows 11 releases provide a Compress to menu in File Explorer.- Press Windows key + E to open File Explorer.
- Browse to the files or folder you want to compress.
- Select the items:
- Select one file or folder by clicking it.
- Hold Ctrl while clicking to select multiple individual items.
- Select a continuous range by clicking the first item, holding Shift, and clicking the last item.
- Press Ctrl + A to select everything in the current folder.
- Right-click one of the selected items.
- Select Compress to.
- Select ZIP File.
- Enter a name for the new ZIP file and press Enter.
If Compress to does not appear, use the classic-menu procedure in the next section.
Create a ZIP file in Windows 10 or through the classic menu
Microsoft continues to document the Send to method for Windows 10 and Windows 11.- Open File Explorer.
- Select the files or folder you want to include.
- Right-click the selection.
- In Windows 11, select Show more options if the classic menu is not already displayed.
- Point to or select Send to.
- Select Compressed (zipped) folder.
- Type the name you want and press Enter.
.zip file appears beside the original items. The source files are not deleted or moved.You can also open the Windows 11 classic context menu directly by selecting the files and pressing Shift + F10.
Use the Windows 11 compression wizard
Windows 11 versions containing the expanded archive features introduced with the June 25, 2024 KB5039302 preview and incorporated into later releases can create additional archive formats and expose more compression controls.For an ordinary ZIP, the one-click ZIP File option remains faster. Use the wizard when you need to review the format, compression method, or archive destination.
- Open File Explorer and select the required files or folders.
- Right-click the selection.
- Select Compress to.
- Select Additional options.
- Set the archive format to ZIP.
- Review the available compression settings.
- Choose the destination and archive name.
- Start the compression operation.
Add files to an existing ZIP
You do not have to recreate a ZIP when an item was omitted.- Open File Explorer.
- Double-click the existing ZIP file to open it as a compressed folder.
- Open a second File Explorer window containing the files you want to add.
- Select the additional files or folders.
- Drag them into the open ZIP window.
- Wait for Windows to finish copying the items into the archive.
For a scripted update, PowerShell can add new files and replace older copies by using the
-Update parameter.Create a ZIP with PowerShell
TheCompress-Archive cmdlet is useful when you need exact source and destination paths or want to repeat the same operation. It is included through the Microsoft.PowerShell.Archive module in Windows PowerShell and current PowerShell releases.Zip a folder and include the folder itself
- Right-click Start.
- Open Terminal, Windows PowerShell, or Terminal (Admin) if the destination requires administrator permission.
- Run:
Compress-Archive -Path "C:\Reference" -DestinationPath "C:\Archives\Draft.zip"The ZIP contains a top-level
Reference folder and everything under it.Zip only the contents of a folder
Use a wildcard after the folder path:Compress-Archive -Path "C:\Reference\*" -DestinationPath "C:\Archives\Draft.zip"This places the contents of
Reference at the root of the ZIP instead of creating a top-level Reference folder.Zip several specific files
Separate the source paths with commas:Compress-Archive -LiteralPath "C:\Work\Report.docx","C:\Work\Budget.xlsx" -DestinationPath "C:\Archives\Documents.zip"-LiteralPath is useful when names contain characters that PowerShell could otherwise interpret as wildcards.Replace an existing ZIP
Warning: The following command overwrites the archive at the destination. Copy the existing ZIP elsewhere first if you may need to recover it.Compress-Archive -Path "C:\Reference\*" -DestinationPath "C:\Archives\Draft.zip" -ForceAdd or update files in an existing ZIP
Compress-Archive -Path "C:\Reference\*" -DestinationPath "C:\Archives\Draft.zip" -UpdateThis adds new items and replaces older archived versions with files having the same names.
PowerShell uses Optimal compression by default. You can specify another supported level:
Compress-Archive -Path "C:\Reference\*" -DestinationPath "C:\Archives\Draft.zip" -CompressionLevel FastestSupported values are
Optimal, Fastest, and NoCompression.Compress-Archive has two important limitations:- It ignores hidden files and folders.
- Its underlying API limits individual files to 2 GB.
tar, or another suitable archive utility if either limitation affects the job.Create a ZIP with the built-in tar command
Windows includes a command-linetar utility based on bsdtar. Despite its name, it can create ZIP archives by selecting the format from the output extension.- Open Windows Terminal, PowerShell, or Command Prompt.
- Change to the parent folder containing the folder you want to archive:
cd /d "C:\Projects"- Create the ZIP:
tar -caf ProjectBackup.zip .\CurrentProjectThe options mean:
-ccreates an archive.-aselects the archive format from the output extension.-fidentifies the archive filename.
.zip, Windows creates a ZIP rather than a TAR archive.To inspect the completed archive without extracting it, run:
tar -tf ProjectBackup.zipThe command prints the archive’s file and folder names in the terminal.
Rename or move the completed ZIP
To rename the archive:- Select the ZIP in File Explorer.
- Press F2.
- Enter the new name.
- Press Enter.
.zip extension. Changing only the extension does not convert an archive to another format.To move the ZIP, use Ctrl + X and Ctrl + V, or drag it to the destination. Copy it with Ctrl + C and Ctrl + V if you want to retain the original.
Verify that the ZIP works
Verify the archive before deleting source files, uploading it, or sending it to someone else.- Confirm that the ZIP appears in the intended location.
- Right-click it and select Properties.
- Check that Type of file identifies it as a compressed or ZIP file.
- Double-click the ZIP.
- Confirm that the expected files and folders appear.
- Right-click the ZIP and select Extract All.
- Choose a temporary test folder.
- Select Extract.
- Open several extracted files to confirm that they are usable.
Do not delete the original data until the extraction test succeeds and any required backup has been confirmed.
Fix missing or failed ZIP creation
Compress to is missing
- On Windows 11, right-click the selection and check Show more options > Send to > Compressed (zipped) folder.
- Press Shift + F10 to open the classic context menu.
- Restart File Explorer or restart Windows if the context menu is incomplete.
- Install applicable Windows updates through Settings > Windows Update > Check for updates.
Windows says access is denied
The source or destination may be protected.- Create the ZIP in your Documents or Desktop folder first.
- Avoid writing directly to protected locations such as
C:\WindowsorC:\Program Files. - Confirm that you have permission to read every source item.
- Open Terminal as administrator only when the operation genuinely requires elevated access.
The destination ZIP already exists
File Explorer may offer to replace or rename the file. In PowerShell, use one of these approaches:- Choose another destination name.
- Use
-Updateto add or refresh content. - Use
-Forceto replace the archive completely.
-Force.The ZIP is not much smaller
This is normal for already-compressed formats, including:- JPEG and many other image formats
- MP3 and other compressed audio
- MP4 and other compressed video
- Existing ZIP, 7z, and RAR archives
- Many PDF and modern Office files
Files are missing from a PowerShell ZIP
Compress-Archive omits hidden files and folders. Check the source in File Explorer with View > Show > Hidden items. If the missing content is hidden, use File Explorer, Windows tar, or another archive method that includes it.Also check whether the command used
*.* instead of *. With Compress-Archive, Folder\*.* selects files in the root but does not include its subfolders, while Folder\* includes the folder’s files and subdirectories.ZIP files open in the wrong app
Repair the.zip file association:- Open Settings.
- Select Apps > Default apps.
- Search for
.zip. - Select the current associated app.
- Choose File Explorer or the ZIP utility you intend to use.
The archive is too large to email or upload
Creating a ZIP does not bypass a service’s attachment or upload limit.- Remove unnecessary files.
- Split the source into several smaller ZIP files.
- Upload the archive to an approved cloud-storage service and share a link.
- Check whether the receiving service has a maximum file-size or total-upload limit.
References
- Primary source: Technobezz
Published: 2026-07-13T18:45:10.851000+00:00
How to Create a Zip File on Windows (2026) | Technobezz
How to create a zip file on Windows using File Explorer, PowerShell, tar, Dropbox, 7-Zip, WinRAR, PeaZip, or WinZip.www.technobezz.com
