

Logitech Gaming Software (LGS) can still be installed safely on supported legacy Logitech G hardware in Windows 11 and Windows 10. As of July 14, 2026, Logitech’s official support page lists LGS 9.04.49 as the 64-bit package for those systems. Check your exact device first: if Logitech’s product page offers G HUB instead, use G HUB rather than forcing the older software.
LGS and Logitech G HUB overlap, but they are not interchangeable for every device.
To check your PC:
LGS 9.04.49 is listed as an x64 package. Do not assume that this establishes native compatibility with Windows on Arm. For an Arm-based PC, check the device’s Logitech support page and use the application Logitech explicitly recommends.
Before continuing:
If you are migrating a device with important profiles, record the current button assignments, sensitivity levels, lighting settings, and game profiles before removing LGS. Do not assume every legacy profile will import into G HUB unchanged.
Warning: Removing LGS can remove locally stored profiles or settings. Record important assignments and export profiles from within LGS when that option is available before uninstalling it.
Do not bypass SmartScreen or Windows Security merely because an old tutorial recommends doing so. Confirm the download source and signature first.
Manual registry cleanup is not a safe first-line fix. Removing the wrong installer or device entries can affect other Logitech hardware and make rollback harder.
Provide IT with:
Installation is complete when LGS launches without an error, identifies the supported Logitech device, and successfully applies a test setting. If the official product page does not offer LGS, or the verified package cannot detect the hardware after a clean reinstall and direct USB test, move to the software Logitech lists for that device or escalate the model-specific problem to Logitech Support.
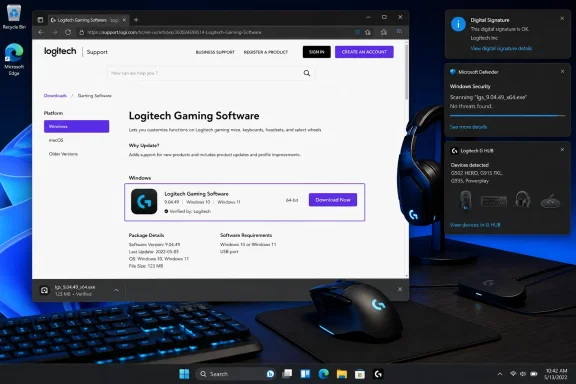 Check whether your device needs LGS or G HUB
LGS and Logitech G HUB overlap, but they are not interchangeable for every device.- Use Logitech Gaming Software when the support page for your legacy Logitech G mouse, keyboard, headset, speaker, or selected racing wheel specifically lists LGS.
- Use Logitech G HUB when the product’s Downloads section directs you to G HUB.
- Do not choose LGS merely because an old guide mentions your product family. Different revisions of similarly named products can use different software.
- Ordinary Logitech office mice and keyboards may use Logi Options+, not LGS or G HUB.
- Disconnecting the device is normally unnecessary at this stage.
- Find the product name and model number on its underside, rear label, battery compartment, receiver label, packaging, or documentation.
- Open Logitech Support in your browser.
- Select Find Your Product or search for the model.
- Open the matching product page.
- Open Downloads.
- Select your Windows version if an operating-system selector appears.
- Check which application Logitech provides:
- Continue with this guide if it lists Logitech Gaming Software.
- Install Logitech G HUB if that is the listed application.
- Do not install either application if the page identifies different software.
Confirm your Windows version and system type
The official LGS 9.04.49 listing identifies Windows 11 and Windows 10 as supported and provides a 64-bit package. It also notes updated drivers for Windows 10 and Windows 11 code-integrity compatibility and security fixes.To check your PC:
- Right-click Start and select Settings.
- Go to System > About.
- Under Windows specifications, check whether the PC runs Windows 11 or Windows 10.
- Under Device specifications, find System type.
- Confirm that it says 64-bit operating system.
LGS 9.04.49 is listed as an x64 package. Do not assume that this establishes native compatibility with Windows on Arm. For an Arm-based PC, check the device’s Logitech support page and use the application Logitech explicitly recommends.
Before continuing:
- Sign in to an account that can approve administrator prompts.
- Save open work in case the installer requests a restart.
- Install pending Windows updates when practical.
- Close an existing copy of LGS or G HUB.
- Keep the Logitech device connected directly to the PC during detection, especially while troubleshooting. Avoid an unpowered USB hub.
Download LGS from Logitech
Use Logitech’s support site rather than a software-download portal, archived mirror, driver bundle, or copied direct installer link. An old direct link may point to a superseded file even when the domain looks familiar.- Open Logitech Support.
- Search for Logitech Gaming Software.
- Open the result hosted on Logitech’s support site.
- Select Windows if the page displays platform choices.
- Select Windows 11 or Windows 10, matching the PC.
- Review the package information before downloading.
- Software: Logitech Gaming Software
- Software version: 9.04.49
- Operating systems: Windows 11 and Windows 10
- Software type: 64 Bit
- File size: approximately 123 MB
- Original listed update date: May 25, 2022
- Select Download Now.
- Save the installer in Downloads or another location you can identify.
- Do not run similarly named installers left over from an earlier download.
Verify the installer before running it
A file downloaded from the correct support page is the safest starting point, but check the file before allowing it to make system changes.- Open File Explorer.
- Select Downloads.
- Locate the installer you just downloaded.
- Right-click it and select Properties.
- Check that the file type is an application and that its size is reasonably consistent with Logitech’s package listing.
- If a Digital Signatures tab is present, open it.
- Select the listed signature and choose Details.
- Confirm that Windows reports the digital signature as valid and identifies Logitech as the signer or publisher.
- The browser says the download came from an unrelated domain.
- The file is packaged inside an unexpected ZIP, password-protected archive, or third-party download manager.
- Windows identifies an unknown publisher when you expected Logitech.
- The signature is invalid.
- The installer asks you to disable Windows Security, Secure Boot, Memory integrity, or antivirus protection.
- The file name or product description refers to unrelated driver-updater software.
- Right-click the downloaded file.
- Select Show more options if necessary.
- Select Scan with Microsoft Defender when that command is available.
- Continue only if Windows Security reports no current threats.
Install Logitech Gaming Software
- Close games and Logitech configuration applications.
- Double-click the verified LGS installer.
- When User Account Control appears, check that the publisher identifies Logitech.
- Select Yes.
- Follow the setup prompts.
- Read any options before accepting them rather than repeatedly selecting the default button.
- Allow the installer to add the required Logitech application components and device drivers.
- Restart Windows if setup requests it.
- Open Start.
- Select Power > Restart.
- Sign back in after Windows starts.
- Launch Logitech Gaming Software from the Start menu.
Verify that LGS works with the device
Opening successfully is not enough; verify that LGS detects and configures the actual hardware.- Connect the device directly to a USB port on the PC.
- For wireless equipment, connect its original Logitech receiver and turn the device on.
- Open Start and launch Logitech Gaming Software.
- Confirm that the correct device appears in the application.
- Open a low-risk setting, such as lighting, button assignment, profile selection, or headset controls.
- Make a temporary change.
- Select Apply or save the profile if the interface requires it.
- Test the setting on the device.
- Restore the original setting if the change was only for verification.
Use G HUB when Logitech lists it instead
Installing G HUB is the correct fix for a device assigned to G HUB. Attempting to force LGS is only a workaround and may leave newer features unavailable.- Uninstall an unsuccessful LGS installation before switching applications.
- Restart Windows.
- Open Logitech’s official G HUB page or your device’s Logitech support page.
- Select the Windows download.
- Run the downloaded installer.
- Approve the Logitech publisher prompt.
- Follow the installation instructions.
- Restart if requested.
- Open G HUB and confirm that it detects the device.
If you are migrating a device with important profiles, record the current button assignments, sensitivity levels, lighting settings, and game profiles before removing LGS. Do not assume every legacy profile will import into G HUB unchanged.
Reinstall LGS if installation or detection fails
A reinstall is appropriate when setup stops unexpectedly, LGS will not open, or a previously supported device no longer appears.Warning: Removing LGS can remove locally stored profiles or settings. Record important assignments and export profiles from within LGS when that option is available before uninstalling it.
Remove LGS in Windows 11
- Close LGS from its main window and notification-area icon.
- Open Start > Settings > Apps > Installed apps.
- Find Logitech Gaming Software.
- Select the More options button beside it.
- Select Uninstall.
- Confirm the removal and follow the prompts.
- Restart Windows.
Remove LGS in Windows 10
Depending on the Windows 10 release, use:- Open Start > Settings > Apps > Apps & features.
- Select Logitech Gaming Software.
- Select Uninstall.
- Follow the removal prompts.
- Restart Windows.
- Search for and open Control Panel.
- Select Programs > Programs and Features.
- Select Logitech Gaming Software.
- Choose Uninstall or Uninstall/Change.
- Complete the removal and restart Windows.
Troubleshoot common installation problems
Windows blocks the installer
Check the User Account Control dialog carefully. If Logitech is shown as the verified publisher, approve the prompt. If the publisher is unknown or unrelated, cancel installation and obtain a new copy from Logitech.Do not bypass SmartScreen or Windows Security merely because an old tutorial recommends doing so. Confirm the download source and signature first.
The installer does not open
- Delete the current download.
- Restart Windows.
- Download the package again from Logitech.
- Move the installer to a local folder such as Downloads rather than running it from a network share.
- Right-click the file, select Properties, and verify its signature.
- Run it again.
LGS installs but does not detect the device
- Confirm that the product’s support page actually lists LGS.
- Try a different built-in USB port.
- Avoid docks and unpowered hubs during testing.
- Reconnect the wireless receiver.
- Charge the device or replace its batteries.
- Restart Windows with the device connected.
- Close G HUB temporarily if both applications are installed.
- Check Device Manager for a warning icon next to the Logitech device or an unknown USB device.
LGS opens but profiles or assignments do not work
- Confirm that the correct device is selected inside LGS.
- Check whether LGS is using onboard-memory mode or automatic game detection.
- Verify that the intended profile is active.
- Test a simple button assignment outside the game.
- If the assignment works outside the game, check the game profile and executable association.
- If no assignments work, reinstall LGS using the clean procedure above.
Uninstall is incomplete or blocked
First restart Windows and try uninstalling again through Settings or Control Panel. Microsoft also provides Windows installation and removal troubleshooting for damaged installer records. On managed computers, contact the administrator instead of manually deleting program folders or registry entries.Manual registry cleanup is not a safe first-line fix. Removing the wrong installer or device entries can affect other Logitech hardware and make rollback harder.
Install on a work or school PC
Managed Windows devices may block local administrator approval, executable downloads, USB software, or driver installation. This is an organizational policy issue, not an LGS installer fault.Provide IT with:
- The exact Logitech product and model number.
- The Windows edition and system type shown under Settings > System > About.
- The Logitech product-support page that identifies LGS.
- The expected LGS version and 64-bit package details.
- Any installation error message.
Installation is complete when LGS launches without an error, identifies the supported Logitech device, and successfully applies a test setting. If the official product page does not offer LGS, or the verified package cannot detect the hardware after a clean reinstall and direct USB test, move to the software Logitech lists for that device or escalate the model-specific problem to Logitech Support.
References
- Primary source: Technobezz
Published: 2026-07-14T16:24:42.397000+00:00
How to Install Logitech Gaming Software Safely in 2026 | Technobezz
How to install Logitech Gaming Software safely from Logitech's official download page and avoid old mirrors.www.technobezz.com - Related coverage: support.logi.com
Logitech Gaming Software – Logitech Support + Download
Logitech Gaming Software Lets you customize functions on Logitech gaming mice,...support.logi.com
