

Microsoft’s desktop documentation confirms that Auto arrange icons controls whether Windows places icons automatically, while its display guidance recommends using each monitor’s marked Recommended resolution and scale. The important distinction is that Auto arrange is a preference you can disable; a disconnected monitor, changed resolution, or changed scaling factor changes the number and position of available icon slots.
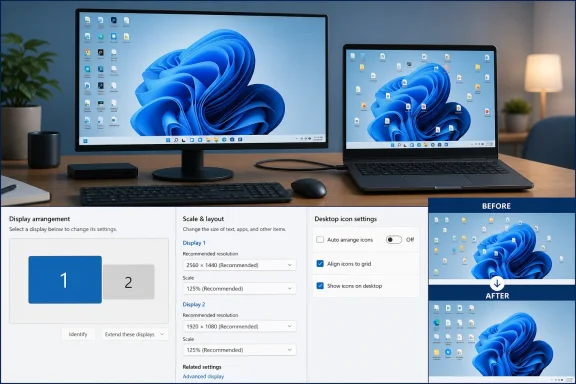 Turn off Auto Arrange before moving anything
First, verify that Windows is not being instructed to organize the desktop for you.
- Right-click an empty area of the desktop. Do not right-click an icon or the taskbar.
- Select View.
- If Auto arrange icons has a check mark, select it to clear the check mark.
- Leave Show desktop icons enabled unless you intentionally want to hide every desktop shortcut.
- Drag a few icons into the positions you want.
On Windows 11, the View submenu is usually visible directly in the desktop context menu. Some configurations may show an abbreviated menu first; if you do not see the expected options, choose Show more options, then open View.
Auto Arrange is useful when the desktop is a temporary drop zone and you prefer alphabetical or type-based order. It is a poor fit for a desktop used as a visual workspace—where folders, project shortcuts, and files are deliberately grouped in specific places. With Auto Arrange enabled, Windows treats your layout as provisional: when an icon is added, removed, refreshed, or the available space changes, it is allowed to reflow the collection.
Do not confuse this setting with sorting commands such as Sort by > Name. Selecting a sort order also imposes an ordered layout, and Auto Arrange keeps that order in effect. If the icons snap into columns at the left edge every time you move one, Auto Arrange remains the first setting to check.
Choose whether Align to Grid helps or hurts
In the same desktop menu—right-click an empty area, then select View—you will find Align icons to grid. This setting is optional, and it behaves differently from Auto Arrange.
With Align icons to grid enabled, Windows lets you choose the general position of an icon but snaps it to an invisible grid. The practical benefit is a clean, evenly spaced layout. Icons will still remain in the approximate areas you choose, rather than being automatically sorted into a single sequence.
With Align icons to grid disabled, shortcuts can be placed almost anywhere, including very close together. That gives you maximum control, but it can make a crowded desktop hard to maintain. It also makes it easier to create a layout that does not translate well when screen space changes.
For most people, the stable starting configuration is:
- Auto arrange icons should be off so Windows does not sort shortcuts on its own.
- Align icons to grid should be on so manually placed shortcuts remain evenly spaced and easier to recover after minor display changes.
Turn off Align to Grid only if you specifically need free-form placement—for example, you use wallpaper regions as visual labels or arrange a few shortcuts around a desktop widget. It will not prevent a major display transition from forcing icons back into the available screen area.
There is also a third, often-overlooked control in the View menu: Large icons, Medium icons, and Small icons. Hold Ctrl and roll the mouse wheel on an empty desktop and Windows changes icon size, too. That action changes the grid density; if the desktop was already packed, Windows may need to reposition icons that no longer fit. Pick a size before carefully organizing a large set of shortcuts.
Keep each display at its Recommended resolution
A resolution change is one of the most common explanations for a desktop that looks correct one day and scrambled the next. Desktop icon positions are constrained by the dimensions of the active display workspace. Lowering a screen from 2560 × 1440 to 1920 × 1080, for example, removes a substantial amount of room. Icons that had occupied space outside the smaller desktop have to go somewhere.
Open Settings > System > Display. If you use more than one monitor, click the display you want to inspect first. Under Scale & layout, set Display resolution to the option marked Recommended.
Microsoft recommends the marked resolution because it is normally the panel’s native resolution. Choosing a lower mode can make text softer or stretched; for desktop organization, it also changes the area Windows has available for shortcut placement.
If resolution keeps changing without your choosing it, do not repeatedly reorganize the desktop before finding the cause. Common triggers include:
- A graphics driver update or failure can cause Windows to fall back to a different display mode.
- A monitor, dock, KVM switch, adapter, or cable can briefly report that the display is unavailable.
- A television or AV receiver may negotiate a different mode after sleep, startup, or input switching.
- A game, remote-control session, or presentation tool can alter the active display configuration.
Microsoft advises checking Windows Update when the resolution changes unexpectedly, since an updated graphics driver may be available. For PCs with NVIDIA, AMD, or Intel graphics, use the PC maker’s supported driver path first when it provides one; laptop display and docking behavior often depends on the manufacturer’s graphics, chipset, and dock firmware combination rather than the generic graphics package alone.
Do not change resolution merely to enlarge text or shortcuts. Use Windows scaling or desktop icon size for that job. Reducing resolution to make items larger creates a less sharp display and alters the desktop’s working area every time the selected mode changes.
Treat DPI scaling as part of the desktop layout
DPI scaling is Windows’ way of keeping text, apps, and interface elements usable on high-density displays. A 13-inch 4K laptop panel may need 200% scaling for readable text, while a 24-inch 1080p monitor is commonly comfortable at 100%. Windows applies scale per display, which is why moving between a laptop screen and an external monitor can visibly alter the desktop.
In Settings > System > Display, select a monitor and review Scale under Scale & layout. Use the value marked Recommended unless you have a clear accessibility reason to choose another value. Microsoft’s Windows display documentation makes the same recommendation for scale and resolution.
Scaling affects the apparent size of icons and the practical density of the desktop grid. It is not normally the setting that alphabetizes or deliberately sorts your shortcuts—that is Auto Arrange—but changing scale can alter how much room a layout appears to have. If you change Scale, sign out and sign back in if Windows asks, then organize the desktop once the new setting is settled.
Avoid switching among custom scale percentages as a casual fix. Custom scaling is intended for cases where the standard choices do not meet an accessibility need, and it applies broadly across the Windows interface. A fixed standard value such as 100%, 125%, 150%, or 200% is generally easier to maintain across restarts and docks.
For a laptop that moves between a built-in high-DPI display and a lower-DPI external monitor, accept that the desktop will be calculated against different displays. The most reliable approach is to keep the same monitor as the primary display when docked and use its recommended scale every time. Trying to force the laptop panel and external monitor to share one arbitrary scaling percentage usually produces less readable text without eliminating the underlying change in desktop dimensions.
Make docking and multiple monitors predictable
Windows identifies displays separately and lets you arrange them in Settings > System > Display by dragging the numbered monitor rectangles to match their physical positions. Use Identify if you are unsure which rectangle represents which screen. Place the monitors in the same left-to-right and vertical relationship as they sit on your desk, then select Apply.
Next, decide where the desktop should live. If you want all shortcuts on one external monitor while docked, make that monitor the primary display and keep the same connection path whenever possible. Changing from a direct DisplayPort connection to a dock, then to HDMI through a KVM, can make Windows see a different display chain even when the physical panel has not changed.
A practical docking routine is simple:
- Connect the dock and wait until every monitor has appeared before signing in or arranging icons.
- Confirm the intended monitor is selected as the main display in Display settings.
- Verify its Recommended resolution and scale.
- Organize the desktop only after those settings are stable.
- Undock only after saving work and giving Windows a moment to transition displays.
Windows 11 includes settings intended to remember application window locations based on monitor connection. Those controls can improve app-window restoration, but they do not promise a permanent, separate shortcut layout for every dock, monitor, resolution, and scaling combination. Desktop icons are not a substitute for a multi-monitor workspace manager.
If your icons move only when a monitor wakes from sleep, test the physical chain before changing Windows settings again. Connect the display directly to the PC if possible, try a known-good cable, update the dock firmware, and check whether the monitor’s power-saving mode is causing it to disappear temporarily. A momentary disconnect can shrink the effective desktop to the remaining display, leaving Windows to relocate icons that no longer have a valid position.
Avoid the “fixes” that do not address icon placement
Icon-cache resets, registry edits copied from old forum posts, and third-party “desktop cleanup” utilities are often suggested for this problem. They are not the first-line fix for ordinary position changes. The icon cache concerns how icon images are stored and displayed; it does not explain a predictable reshuffle that happens exactly when a monitor disconnects, the resolution changes, or Auto Arrange is enabled.
Likewise, Allow themes to change desktop icons in the Desktop Icon Settings dialog controls the artwork for built-in items such as This PC, Network, and Recycle Bin. It does not govern where ordinary shortcuts are placed. Disable it if a theme keeps replacing those system icons, but do not expect it to preserve a custom grid of application shortcuts.
If you need a desktop arrangement that survives frequent changes among several monitor configurations, save the desktop layout only after each setup is stable, reduce the number of desktop-resident files, and keep working shortcuts pinned to Start or the taskbar instead. Those locations are designed for launching apps and are less dependent on the dimensions of the active display.
Windows 10 users should also plan accordingly: Microsoft ended free Windows Update security fixes and technical support for Windows 10 on October 14, 2025. The Auto Arrange, Align to Grid, resolution, and scaling steps still apply to Windows 10 installations, but a supported Windows 11 device is the safer long-term platform for a regularly connected work laptop or desktop.